Did you know the same bottle of bourbon can taste spicy or sweet depending on where it’s aged? I ran this experiment to show you how easy it is to find just the right taste profile with Four Roses Single Barrel and a little bit of label reading. All the same “bottle” at 100 proof, just different aging locations, and a world of difference. Dive in and learn how to tune in your tastes…
This is also my first attempt at a vertical video… Still learning how best to deliver in that format. Remember when that used to be verboten, aka VVS (Vertical Video Syndrome)?
Liq, my free bourbon + whiskey + tequila + mezcal + other spirit collecting and tasting app, was recently featured on the way cool Final Third Cigar Lounge Podcast. We discuss Liq, Final Third’s recent Jack Daniels Single Barrel Rye pick, and experiment with how the barrel location during aging affects its taste.
Finally… my bourbon, whiskey, tequila, mezcal, wine, whatever you want to drink + taste + collect app… Liq… is now available for both mobile platforms. What an adventure!
Originally, Liq was a website – https://liq.live. It was the easiest place to start, and start figuring out what people want. Plus, any updates I push would be immediately available to everyone. No waiting on app updates, supporting older versions, writing an API and more advanced caching infrastructure… And no app store reviews to get through, which can be troublesome in some cases.
But my users have spoken! “We want an app!” So I got to work a couple months ago and started building. Thankfully, most of the code was reusable. I found out quickly, the mobile app was the way to go. I could guarantee the experience. I could code for phones vs. tablets. And I could make it insanely simple to have such a useful tasting + collection tool anywhere users went.
Once it was done and tested – thanks Club Marzipan! – I was ready to submit. I’ve done this countless times. Every time, you cross your fingers… Let the story begin.
The iOS Story
Usually, Apple App Review is the tough part. Who knows what unknown rule you might break when submitting your first app release. Once you’re past that, the untrusting eyes are mostly off you. But still… you have to get over that first hurdle.
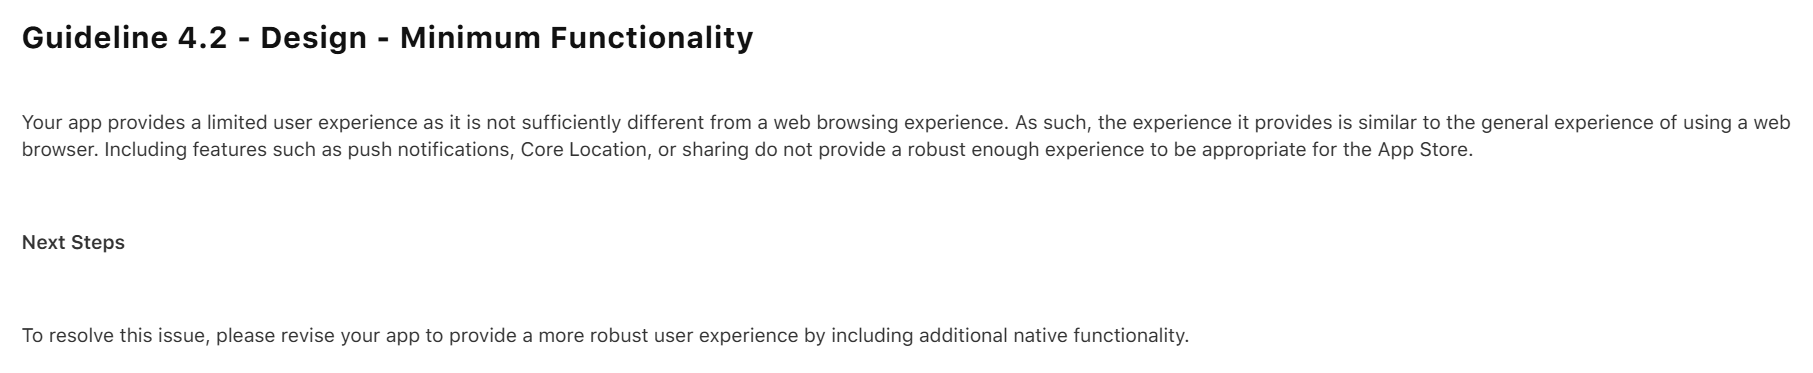
My initial submission was rejected. Apple found a bug I had never tested for, and they rightfully rejected the app. But not only did they reject it for the bug, they rejected it saying it’s nothing better than a website and I should add native features.
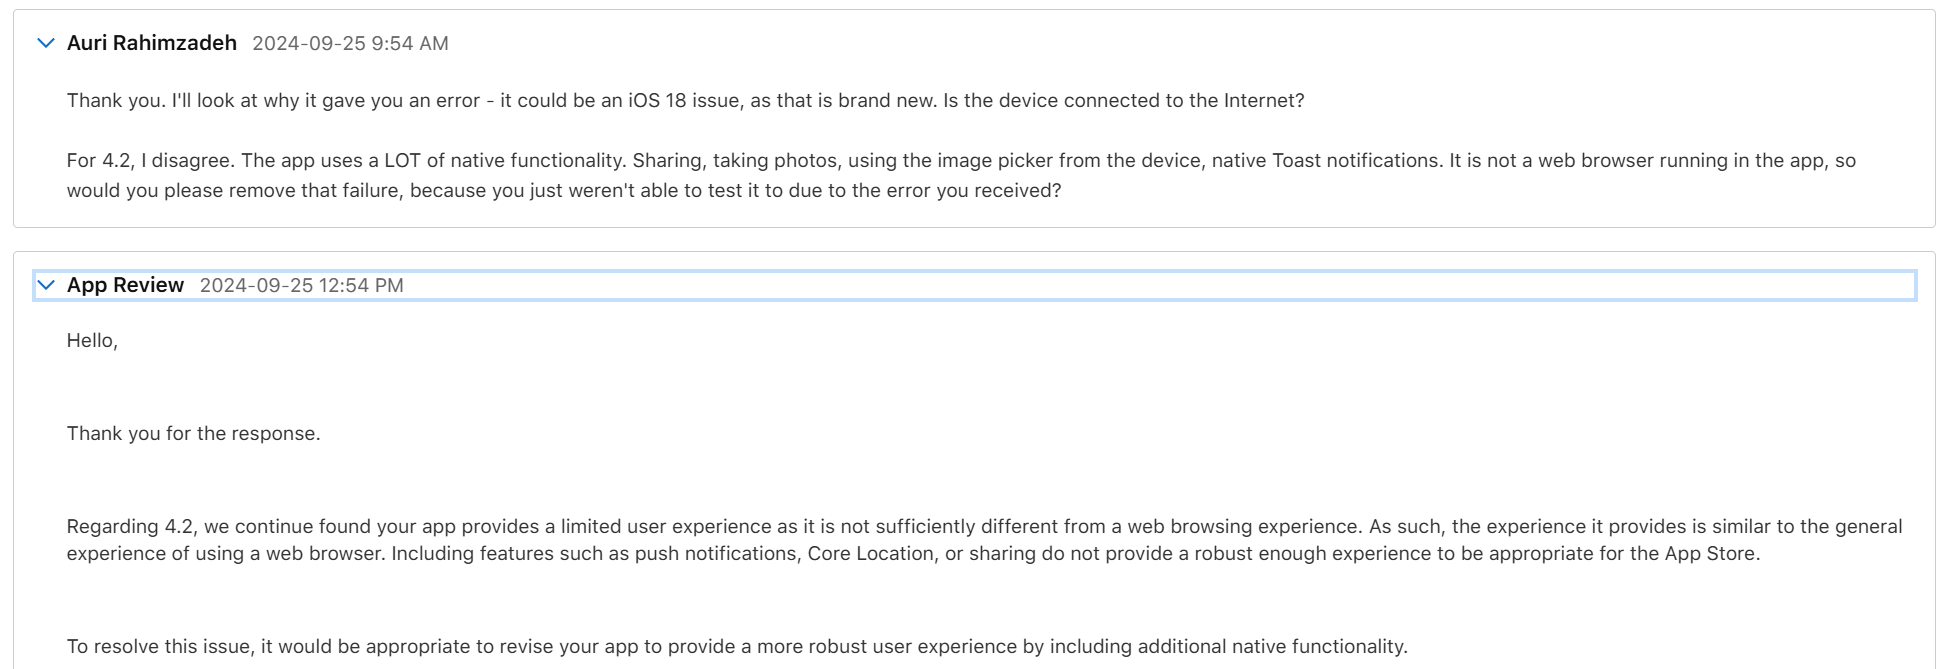
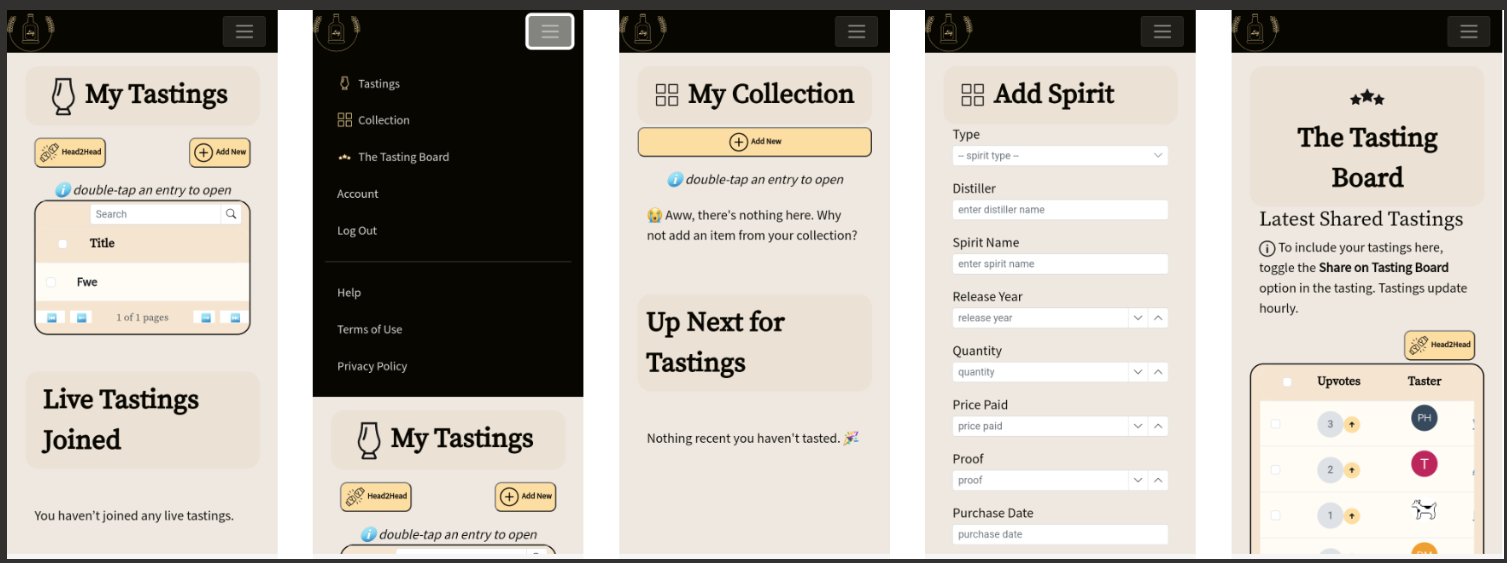
Well, that wasn’t fair, but I could see their point. Because of the bug, you couldn’t use the app. So, you wouldn’t see any of the features. I thanked them for reporting the bug, and that I disagreed about the “native” part. When working properly, Liq uses many native features. Native camera. Native photo access. Native sharing. Plus it’s, well, a native compiled app. Basically, every native feature Facebook uses except Location and Video, neither of which I need. Apple wrote back it doesn’t matter, but I ignored that – I told them “you’ll see in my next upload.”
I fixed the bug – again, thanks Apple, that was a good catch! – and re-uploaded. They came back about a day later with a new rejection reason. The bug was resolved, so that issue was removed, as was the “native” issue – phew! – that would have been an unnecessary rewrite. This time they pointed out I had no way to request account deletion. Fair point. I got to work.
I had the accout deletion fixed within a few hours. I tested the heck out of it. It worked great. I resubmitted and hoped for the best.
Two days later is was approved. w00t!
I did have some additional fixes. I let the original version get out there – it was only going to be out for a day – while I fixed some more bugs and tightened things up. Apple Reviews go much faster when you already a published verison of the app. I submitted the update and it was reviewed and approved the same day. Boom, proof.
Now, on to Android…
The Android Story
Usually, Google Play – the Android store – submission is a slam dunk. Google appears to use AI and another automated code-analysis system. I recall it being named something like The Bouncer. I don’t recall the exact name – it’s been a long time and I imagine things have changed. Anyway, given Apple’s issues were largely just Apple requirements, I figured I’d be reviewed within a day. You never know though!
I started to worry when the review had taken more than 2 days. A status of In Review for more than a few hours is uncommon. I was concerned. Alas, the rejection email came in. And it wasn’t what I expected:
First, I don’t know what “all parts of the metadata” means. I think it’s telling me my provided app screenshots and what’s in the app don’t match its description. Specifically, “track your bottles” and “see what you’ve tasted.” Let’s look at their screenshot:
So that’s their “proof” my app is misleading. But what’s this? Their screenshots show exactly what my app description details. Tastings and Collection. It’s all right there.
I’m guessing this is just a case of AI making a mistake judging my app. I don’t blame Google – they probably get a lot of submissions, and have minimal resources to look at them. Remember all those layoffs?
I submitted an appeal. They said it would take 2 days.
I received an email saying it might take longer than 2 days. OK, let’s be patient.
One week later, I finally received a notice that my appeal was accepted. All I had to do – though it wasn’t entirely clear in the email – was resubmit my app. I did that and started to wait.
Two days later, it still was In Review. “Oh, no…” I was thinking to myself… Not this again… Don’t reject me again, AI.
Thankfully, a few days after, my app was finally approved. Wow, unexpected. But I’m happy 😀🎉
Pick – or at least know – your team ahead of time.
Delegate to those best suited.
If you’re also a contributor, delegate your weaknesses.
Make it about the Vision, the Mission, and the Team. Connect with your people. You can’t succeed if it’s not all three.
If the team believes in the vision and the mission, they’ll work to believe in you. If they already believe in you, they’ll trust your vision and work to make the mission succeed. Trust them to follow through. If you run into trouble, ask THEM why, not just yourself. Correct as necessary.
When you have to be a leader, it’s about Vision, Mission, and Team. It may be hard getting the hang of it. As you see success, it’ll come easier.
Communicate. Communicate. Communicate. Communicate as if you were in the same office. Communicate and have a conversation immediately if work items / task descriptions are not clear. Don’t just @mention someone, then spin in your chair or grab coffee while waiting for them to respond. Communicate and participate in all meetings. Your camera should be on. 70% of communication is non-verbal. Communicate the way you would expect someone in the office, or standing across from you, would communicate with you. Don’t hold others to communication standards you’re not upholding yourself. That’s unfair. You’ve got this – now, go be a team player!
Keep that camera on! A key component of in-person communication is reading body language. Remember, 70% of what’s conveyed in a conversation is non-verbal. An in-person conversation from behind a door is pointless, and silly. A video call is much the same. So, again, keep that camera on!
Some people say they can’t keep the camera on for various reasons (excuses). Kids. Improper clothing. Improper setting. That can indicate a lack of professionalism. It also can indicate a lack of interest. If people are truly engaged, you’ll see it in their faces.
What about keeping the camera off because it’s “not your turn?” Good question. Why are you in the meeting if you have nothing to add/listen for? Then have them call you in when they’re ready.
There is no substitute for real experience. You can’t expect to be a star basketball player having only attended gym class. At the very least, you start with joining a team. It’s the same with software careers. You must experience real world software dev, with real world problems, and, well, real world people. Don’t be afraid of failure – that’s expected in the beginning. It’s the same pattern as everything else new you’ve tried in your life. Internships give you the real world experience, and are a crash course in the “Fail quickly” approach. Fail, then try again, knowing your team is there to support and correct you. That experience will translate directly into your first real job, and translate to increased earning potential.
The act of looking for an internship is a great first step – good for you! There are many resources. First, check with your professors – they may know of open internships. Next, your school’s Careers or Counseling office. They know the sites most often leading to successful internship connections. Third, check known internship sites, like Handshake at https://joinhandshake.com/. Fourth, check out Meetups / Meetup.com. It’s often who you know, not just the little what at this stage in your career. Meetups help you create relationships in your industry of choice. Best of all, they’re free, and there’s often pizza, so you can have informal, less stressful, conversations. Good luck!
Note that Liq is still in beta, so I need your feedback, please! Click the Features & Bug Reports link on the bottom if you want features, or find a bug. If there’s a bug, please provide reproduction steps and the page you were on so it can more quickly be resolved.