I recently presented on how I get the most out of AI every day… and how you can, too. Enjoy!
AI In Your Every Day – New Presentation
Posted: November 16, 2025 in AI / Artificial IntelligenceTags: AI, Anthropic, artificial intelligence, ChatGPT, Claude, CoPilot, development, visual studio, VS Code
0
Fixing “Testflight error: Couldn’t Load Apps, Testflight is currently unavailable”
Posted: August 28, 2025 in Apple, DevelopmentTags: App Store Connect, Apple, Apple App Store, SSO, TestFlight, Testflight Unavailable error
I recently ran into this issue. One of our iPads, which had worked with TestFlight apps before, was now giving an error: “TestFlight is currently unavailable.”
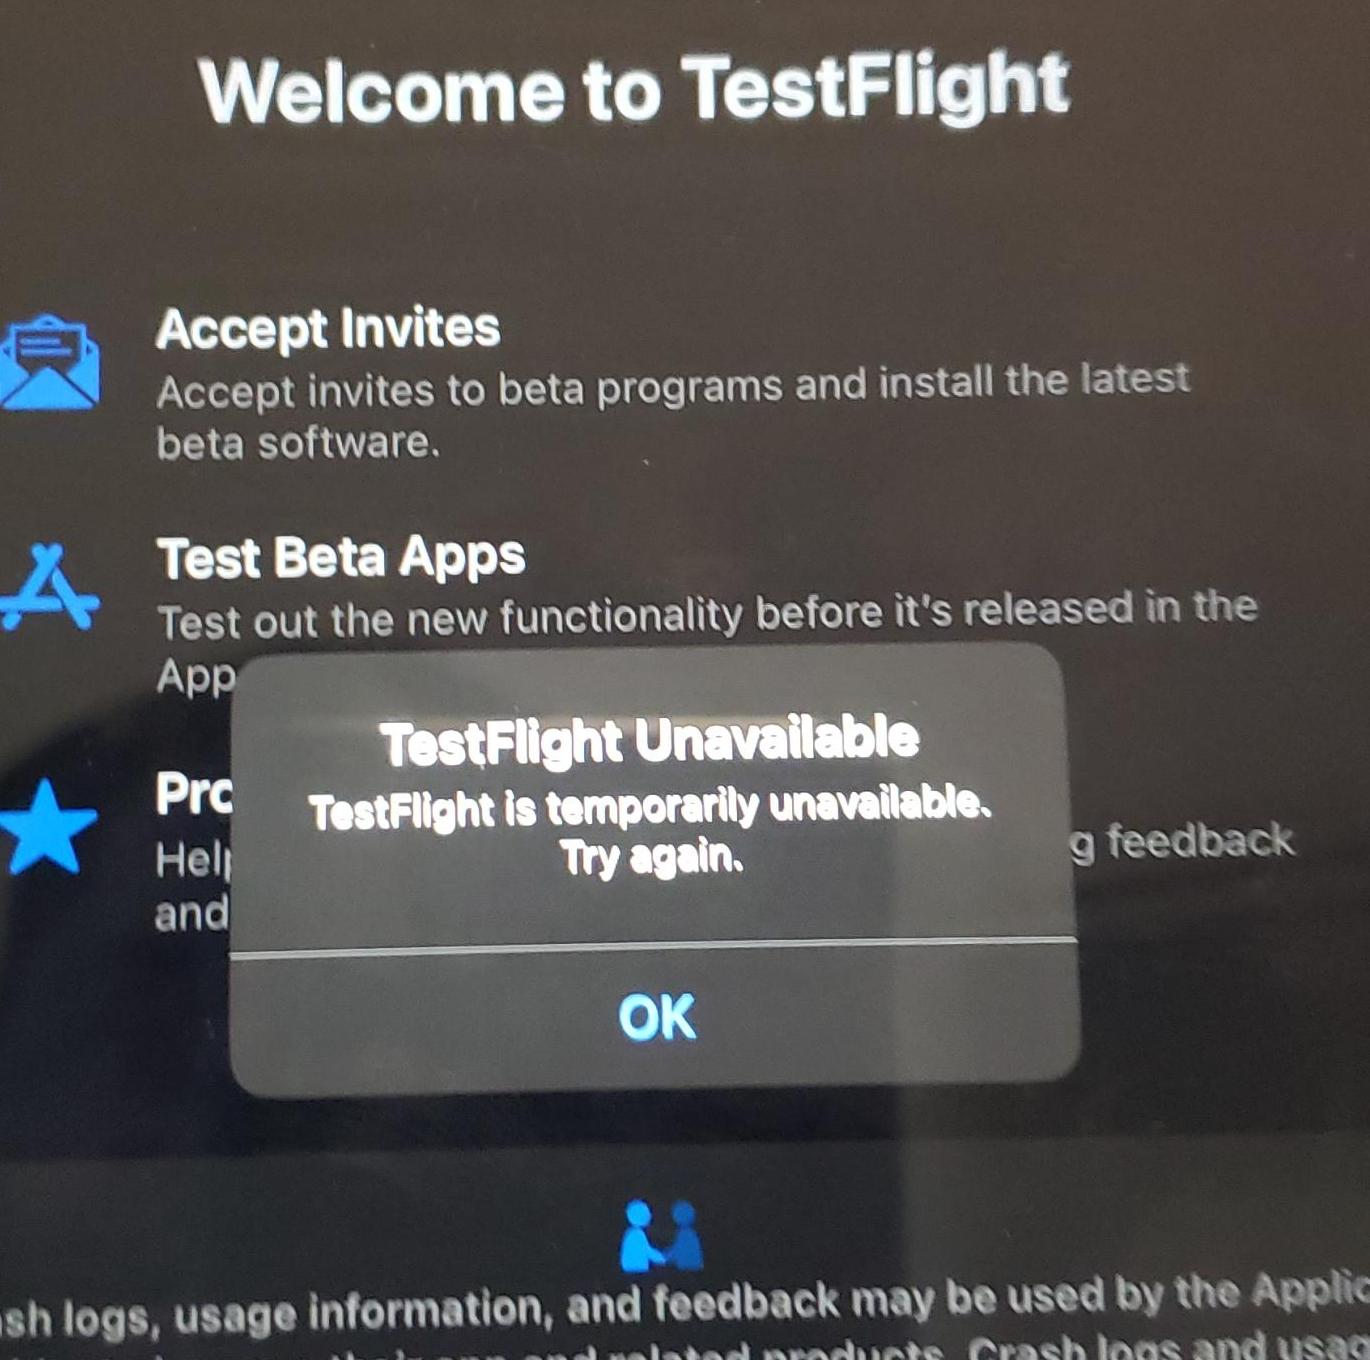
Suffice it to say, this was a blocker to testing our customer’s app.
Looking at Apple’s support forums and StackOverflow, this is a common issue, and I saw no posts with solutions. Just people saying “this happens from time to time” or simply giving up because it worked on another device with another account.
So how do you solve it? A coworker, Jeff, had a suggestion – had we added the user to our Apple account?
I hadn’t thought about this. Normally, you just invite people via TestFlight in App Store Connect and it just works. But the difference here was the iPad was a corporate managed device, via Intune, and the user was a managed user, using single sign-on, aka SSO. It wasn’t a normal personal Apple account.
So here was the fix:
- Open App Store Connect.
- Go to Users & Access.
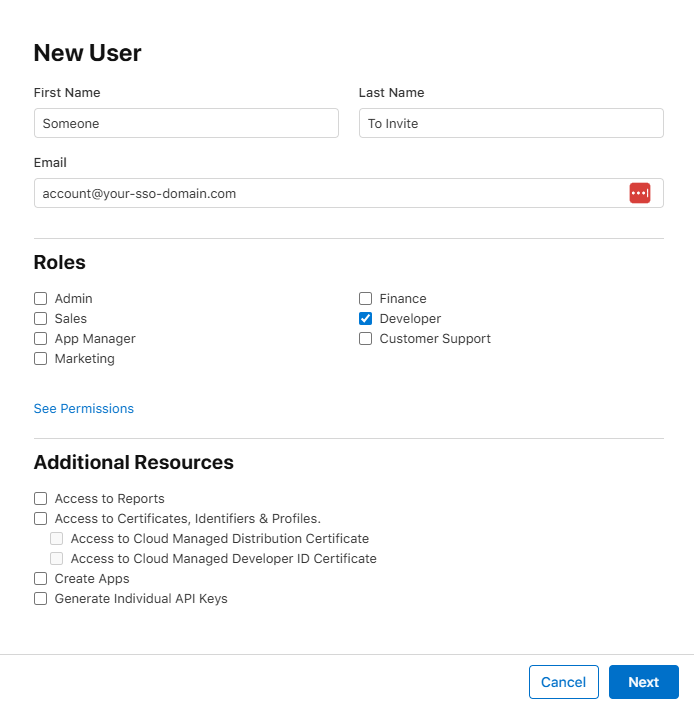
- Click the + to add the Apple account to the list of users. Set their access level to Developer. (I didn’t try this WITHOUT that, feel free to try and update me on success)
- Make sure they accept the invite, otherwise this won’t work. Apple’s invites can sometimes be quarantined/flagged as spam, so be on the lookout.
- Now go to TestFlight and invite that same account to the app and ensure they have access to the necessary builds. I’m assuming you already know how to do this part, so I’m leaving those screenshots out.
- Problem solved. “TestFlight Unavailable” error went away.
Other Solutions to Try
- Has the app build expired?
- Are there pending Apple agreements that need to be signed?
- Has a certificate expired?
- Did you invite the user to the right tester list?
- Are Apple’s servers down? Maybe wait a day…
- Do you have Internet access?
- If you can’t install TestFlight (different problem, really), and it’s a managed device, have you talked with IT to have it added as an allowed / auto-installed app?
Lessons Learned: Apple In-App Purchase Submission Checklist
Posted: August 17, 2025 in UncategorizedTags: app store submission, Apple, business, Google Play, in-app purchases, iOS, marketing, programming, subscriptions, tech, technology
Having submitted an app with In-App purchases – specifically, subscriptions – to Apple’s store, our development team at M3 learned a lot about what will prevent a successful app submission. I hope this compiled list helps you get your app approved quickly, and prevent weeks of headaches.
I will update this article from time to time as more lessons are learned. I hope this article – and all the developer experience I’m relaying on behalf of others and myself – helps you!
An In-App Purchase Must Be Approved Before the App is Released
An In-App Purchase must be in the “Approved” state before it can be used in your app. This means Apple must test any new In-App Purchase Product or Subscription in your app release before anyone can purchase it, including you.
You Must Test In-App Purchases Work – Use the Sandbox Account
As explained above, it can seem like a “chicken and egg” problem. How do you test a product in production when it first must pass testing to get into production? This is where Sandbox accounts come into play. Under Users & Access in App Store Connect, you can assign Apple IDs that are allowed to purchase.
Note that these purchases don’t cost anything, but they can also expire. Make sure you stay on top of your sandbox purchases. Also, make sure you track the original purchase IDs coming back from the API. These will come in handy later when you need to restore subscriptions, which is anothe requirement.
Your App Must Provide a Mechanism to Restore the Subscription
It’s not enough to simply check Apple’s server to see if there is a valid subscription. You must offer an option in the UI (user interface) to explicitly restore.
It’s possible you will still be rejected for this reason. That can be due to Apple’s tester not being able to find the option. So, when you submit your testing instructions, make sure you point out where the option is. If they still say it isn’t there, politely reply to them with a screen shot proving you have such a feature.
You Must Show What the Expired Subscription Experience Looks Like
Make sure you provide an account, with credentials, that can be used to show off the app when a subscription has expired. Just include the credentials in the testing instructions. This should be a different account than the sample credentials you provide Apple for general testing.
Your App Must Clearly Explain What Benefits a Subscription Has vs. a Free Account
You must clearly describe what you get with a free account vs. a paid account. If there is no obvious benefit, Apple may reject you.
Your App Must Clearly Explain The Renewal Terms and Price
You must also be clear about your renewal terms, such as monthly, yearly, and so forth, and pricing. If it’s not clear, Apple can reject you.
It Must be Easy to Cancel Within Your App
It’s not enough that Apple lets you cancel from the App Store UI. You must also provide a button to allow cancelling your subscription.
When Verifying a Subscription Exists, Check BOTH Production AND Sandbox Environments
Apple may subscribe via Sandbox. So, if you only check Production when restoring accounts, you will fail to be approved because Apple won’t be able to restore their subscription. Always check Production first, then fall back to Sandbox.
Note Subscriptions Are Tied to Apple Accounts, Not Your Service’s Accounts
This was a big one. You can only have one subscription of each type per Apple account. However, your service may support multiple accounts. Make sure you track which account from your service subscribed, and tie that to the Apple original subscription ID. If you don’t, it’s possible you’ll be handing out “free” accounts to creating additional accounts under the same Apple ID.
You Can’t Generate Promo Codes Until the App is Approved
Unlike Google, Apple will only let you generate promo codes AFTER the app has been approved. Also, for subscriptions, Apple limits you to 100 promo codes with a 30 day expiration. Make sure you factor this into your testing and soft rollout plans.
Create Separate Test Accounts for Apple to Use
Don’t give Apple accounts your developers are using. Give them accounts that are in the exact state you need them to see. Developer accounts are too “in flux” to be reliable, and your own developers may interfere with Apple’s testing.
Be Thankful for (and take advantage of) Apple’s Feedback System
Apple likely has access to more testers than you do. There are aspects of In App Purchases you may not know how to test, or that you had to test in the first place. So, if you feel your app is in a submittable state and want to see if you covered everything, submit a build to Apple. They can give you a sanity check / smoke test you didn’t miss anything. If you pass the In App Purchases part of Apple’s testing, the rest may be smoother sailing 😉
“File Not Found” When Parsing P8/PEM File to Create JWT Token in Azure S0 Instance – But Works Locally
Posted: August 5, 2025 in UncategorizedHave you run into a FileNotFoundException when attempting to generate a JWT token using ECDsa.Create()? Well, you’re not alone… This will work locally, but not work in Azure. Especially on certain Azure instance types.
I ran into this issue when attempting to create a JWT token for Apple In-App Purchase API access.
Easy fix, though! Under App Settings in Environment Variables add the following setting:
WEBSITE_LOAD_USER_PROFILE = 1
This is because, even though it’s not reading a file, it throws that error. It’s silly, I know, but hey…
Additional info gleaned from Copilot:
🧠 What’s Likely Happening
- The
ECDsaimplementation on Windows relies on CNG (Cryptography Next Generation), which sometimes expects access to user profile directories or system-level key stores—even if you’re passing in a byte array. - On S0 App Service plans, the environment may lack access to certain native crypto libraries or user profile loading, causing
CngKey.Import()to throw a"File Not Found"error.
✅ Additional Tips
- Make sure your private key is in PKCS#8 format and uses a supported curve like
nistP256. - If you’re using .NET 6 or later, consider switching to OpenSSL-based implementations via Linux App Service plans, which tend to be more predictable for ECC operations.
- For Elastic Premium plans, this issue is even more persistent unless the workaround is applied.
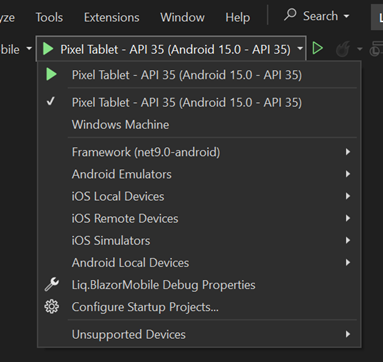
Android debugging options disappeared after updating Visual Studio?
Posted: May 25, 2025 in UncategorizedUpdate: This bug was fixed in an update to Visual Studio 17.4.
In case your #Android #debugging options disappeared after the latest #VisualStudio updates… https://developercommunity.visualstudio.com/t/Android-Options-Gone-After-Updating-to-1/10910189
And here’s the fix to make to your project file:
Original order that broke this:
<TargetFrameworks>net9.0-maccatalyst;net9.0-ios;net9.0-android;</TargetFrameworks>

Changed order to have Android first and .net 9.0 next – otherwise unit tests break??? – and restarted VS (WHY did this make a difference??)
<TargetFrameworks>net9.0-android;net9.0;net9.0-maccatalyst;net9.0-ios;</TargetFrameworks>
Credit to StackOverflow article: https://stackoverflow.com/questions/79626280/visual-studio-doesnt-display-the-android-emulator-run-option-after-the-update
Facebook Preview Scraper shows HTTP 404.19 After Switching from Azure to Another Hosting Provider, like DiscountASP.net
Posted: April 21, 2025 in UncategorizedI had this issue after switching from an Azure app service to DiscountASP.net. I just had to add the following to the web.config to fix the IIS config:
<system.webServer>
  <security>
    <requestFiltering>
      <filteringRules>
         <remove name="facebookexternalhit" />
      </filteringRules>
    </requestFiltering>
  </security>
</system.webServer>
The first time I tried this it did not work. However, I emailed support and they explained THEY had to fix it “at the root.” So, for what it’s worth this does work, but in a shared hosting environment, you may need to put it in the server’s web.config, possibly replacing the rule name to what’s appropriate for your hosting provider.
How to Debug/Test AWS Lambda Functions Locally in Visual Studio, Including with DynamoDb
Posted: March 18, 2025 in UncategorizedTags: .net, AWS, cloud, debugging, DynamoDb, Lambda, programming, Software Development, technology
Overview
Ever want to run your AWS lambda functions locally so you can debug efficiently? Well, the documentation for doing so isn’t in one nice, convenient location. Still, the tools ARE THERE. You just need instructions on what to set up and how. That’s what this article will attempt to help you accomplish.
Assumptions
I’m assuming a Windows and Visual Studio environment here. If that’s not your go-to, I’m imagining the adjustments are small. If you’d like to share your adjustments, I’m happy to update this article.
I’m also assuming you started your project with the AWS Lambda Project (.NET Core, C#) template.
Pre-requisites
Before you can debug, the following must be installed:
- Visual Studio 2022 or higher – look at the date this article was written
- AWS CLI 2 or higher
- AWS Toolkit Visual Studio Plug-in
- AWS Lambda Mock Test Tool – install the version appropriate for your project’s .NET target, such as -8.0 for .NET 8
- Java 1.7 or higher Runtime, if debugging DynamoDb locally, otherwise no need
Lambda Mock Test Tool Install Shortcut
You can install the Mock Test Tool from the command line easily. Just open PowerShell and run the following command:
dotnet tool install -g Amazon.Lambda.TestTool-8.0
Note the -8.0 needs to match the .NET version. Here are some versions to choose from, which will update from time to time. See the Github repo in Pre-requisites for the latest table.
| .NET Core Version | Tool NuGet Package | Tool executable |
|---|---|---|
| .NET Core 2.1 (Deprecated) | Amazon.Lambda.TestTool-2.1 | dotnet-lambda-test-tool-2.1.exe |
| .NET Core 3.1 (Deprecated) | Amazon.Lambda.TestTool-3.1 | dotnet-lambda-test-tool-3.1.exe |
| .NET 5.0 (Deprecated) | Amazon.Lambda.TestTool-5.0 | dotnet-lambda-test-tool-5.0.exe |
| .NET 6.0 | Amazon.Lambda.TestTool-6.0 | dotnet-lambda-test-tool-6.0.exe |
| .NET 7.0 (Deprecated) | Amazon.Lambda.TestTool-7.0 | dotnet-lambda-test-tool-7.0.exe |
| .NET 8.0 | Amazon.Lambda.TestTool-8.0 | dotnet-lambda-test-tool-8.0.exe |
| .NET 9.0 | Amazon.Lambda.TestTool-9.0 | dotnet-lambda-test-tool-9.0.exe |
Configuring Your Project
In your project, you will need to make some adjustments in order to debug.
Update launchSettings.json
In the project’s launchSettings.json file, make sure you are pointing to the Mock Lamda Test Tool profile and environmentVariables are specified. Something like this:
{
  "profiles": {
    "Mock Lambda Test Tool": {
      "commandName": "Executable",
      "commandLineArgs": "--port 5050",
      "workingDirectory": ".\\bin\\$(Configuration)\\net8.0",
      "executablePath": "%USERPROFILE%\\.dotnet\\tools\\dotnet-lambda-test-tool-8.0.exe",
      "environmentVariables": {
        "AWS_LAMBDA_RUNTIME_API": "localhost:5050",
        "AWS_PROFILE": "default",
        "AWS_REGION": "us-east-2",
        "DYNAMODB_ENDPOINT": "http://localhost:8000"
      }
    }
  }
}
The DYNAMODB_ENDPOINT is optional, and your tastes for naming environment variables may vary.
Make sure the workingDirectory and executablePath are set to the appropriate version of your installed .NET and Lambda Mock Test Tool versions.
Update aws-lambda-tools-defaults.json
You must also tell the Lambda Mock Test Tool where to find the function to point your requests. You can only test one function at a time (sorry), but it’s easy to update.
Populate the function-handler setting in the aws-lambda-tools-defaults.json file as follows:
{
  "Information": [
    "This file provides default values for the deployment wizard inside Visual Studio and the AWS Lambda commands added to the .NET Core CLI.",
    "To learn more about the Lambda commands with the .NET Core CLI execute the following command at the command line in the project root directory.",
    "dotnet lambda help",
    "All the command line options for the Lambda command can be specified in this file."
  ],
  "profile": "default",
  "region": "us-east-1",
  "configuration": "Release",
  "function-architecture": "arm64",
  "function-runtime": "dotnet8",
  "function-memory-size": 128,
  "function-timeout": 30,
  "function-handler": "assemblyName::fullClassPath::nameOfFunction",
  "framework": "net8.0",
  "package-type": "Zip"
}
See it there, on line 15? Populate it as follows:
- assemblyName: The name of your assembly. For example, OhMyLambda.
- fullClassPath: The full path of the class containing your function. For example, OhMyLambda.MyFunctionClass
- nameOfFunction: The name of your function, such as Handler
So, if you had a class like this:
// Assembly attribute to enable the Lambda function's JSON input to be converted into a .NET class.
[assembly: LambdaSerializer(typeof(Amazon.Lambda.Serialization.SystemTextJson.DefaultLambdaJsonSerializer))]

namespace OhMyLambda.Functions;

public class MyFunctionClass(IAmazonDynamoDB dynamoDbClient)
{
    public MyFunctionClass() : this(CreateDynamoDbClient()) { }

    public async Task<APIGatewayProxyResponse> Handler(APIGatewayProxyRequest request, ILambdaContext context)
    {
          ... more code here ...
…then your function-handler line would look like:
"function-handler": "OhMyLambda::OhMyLambda.Functions.MyFunctionClass::Handler",
All good? Let’s continue.
Before You Debug
Before debugging, make sure you see Mock Lambda Test Tool as your startup option. You should also have DynamoDb running if it’s needed.

Starting DynamoDb
If you also need DynamoDb to be running, you should start it before debugging. If you have installed DynamoDb Local from the link above, you need to get AWS Credentials and THEN start it.
To get AWS credentials for the local instance, open PowerShell and run aws configure and use the following credentials:
- AWS Access Key ID [None]: fakeMyKeyId
- AWS Secret Access Key [None]: fakeSecretAccessKey
- Default Region Name [None]: fakeRegion
- Default output format [None]: (just hit enter)
This will take care of being able to access DynamoDb locally with the proper credentials
Once the credentials have been set, you can launch DynamoDb as follows:
java -D”java.library.path=./DynamoDBLocal_lib” -jar DynamoDBLocal.jar -sharedDb
I added this to a batch file to quickly run it from File Explorer.
This will launch DynamoDb. You can press Control-C to end its process when you’re done.
Debugging
You should be all set now. Simply launch the debugger and you should see the Mock Lambda Test Tool appear in your default web browser. It will look something like this:

If you don’t see your function details, or the top two dropdowns are empty, you have an error in your configuration. Make sure that function-handler is correct!
Triggering the Lambda
So how do you send the payload and trigger the Lambda? Amazon has you covered – just select API Gateway AWS Proxy from the Example Requests dropdown. Then, fill in the “body” with the proper JSON-formatted-as-string. Hit Execute Function, and the request will be made and should trigger your debug breakpoint, assuming you’ve set one.

The End
That’s it! You should be able to debug now! I hope this helped. If you have any updates or questions, feel free to hit me up. You can find me on LinkedIn: https://www.linkedin.com/in/aurirahimzadeh
Using Copilot to Make My Site Look Better
Posted: March 10, 2025 in AI / Artificial Intelligence, Development, Programming, Software DevelopmentTags: Bootstrap, CoPilot, CSS, HTML, LLM, visual studio, website design
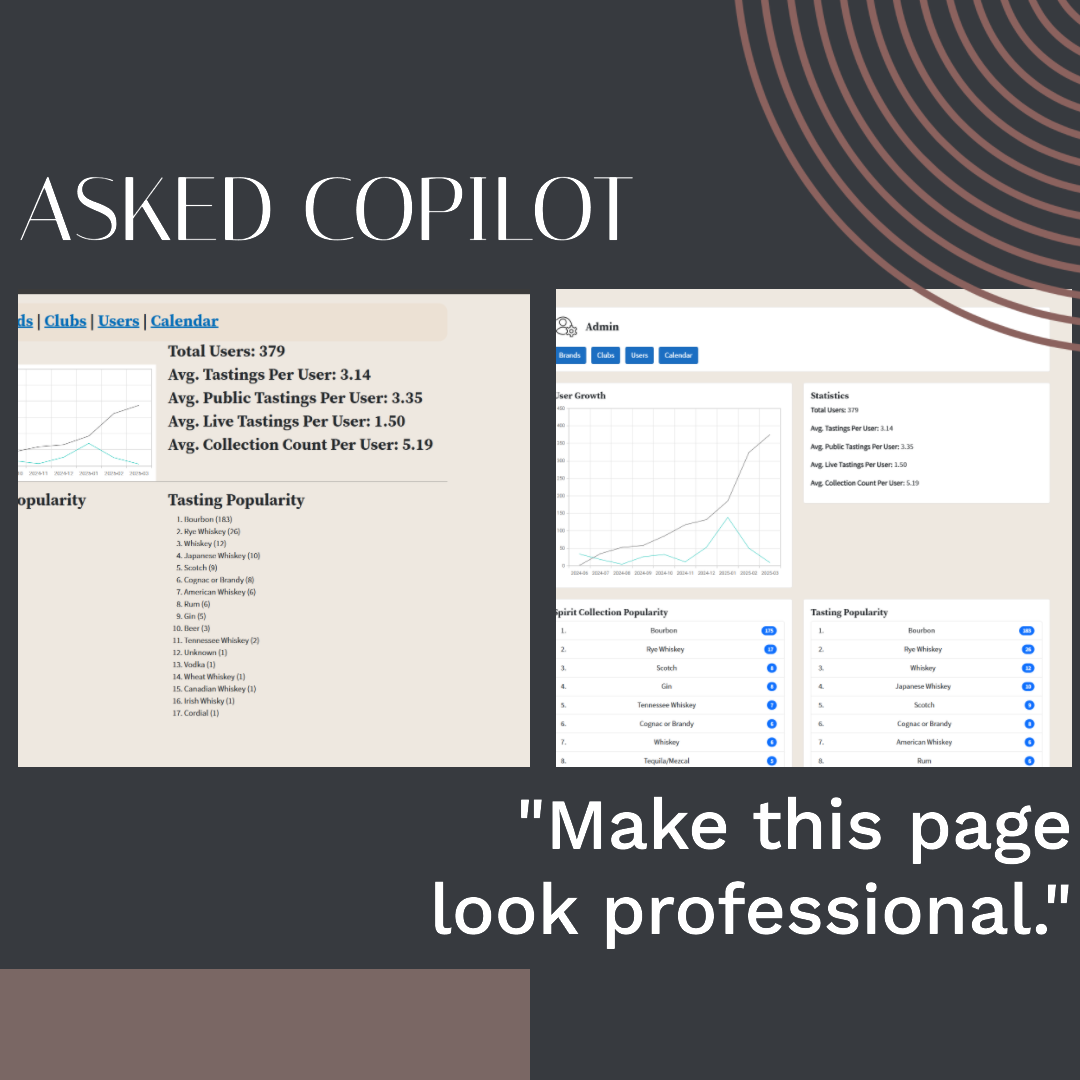
Microsoft Copilot really impressed me with its skills today. I’m not a pro designer by any means. I paid to have Liq designed by a college student, and they did a pretty good job. I was left to do the HTML and CSS – gladly. But I had to add a lot of features to the site this weekend. And they had bare-bones design. So, I wondered…
What if I prompted Copilot… “Make this page look professional.”
And it did. Check out these Before and Afters.
My admin dashboard:
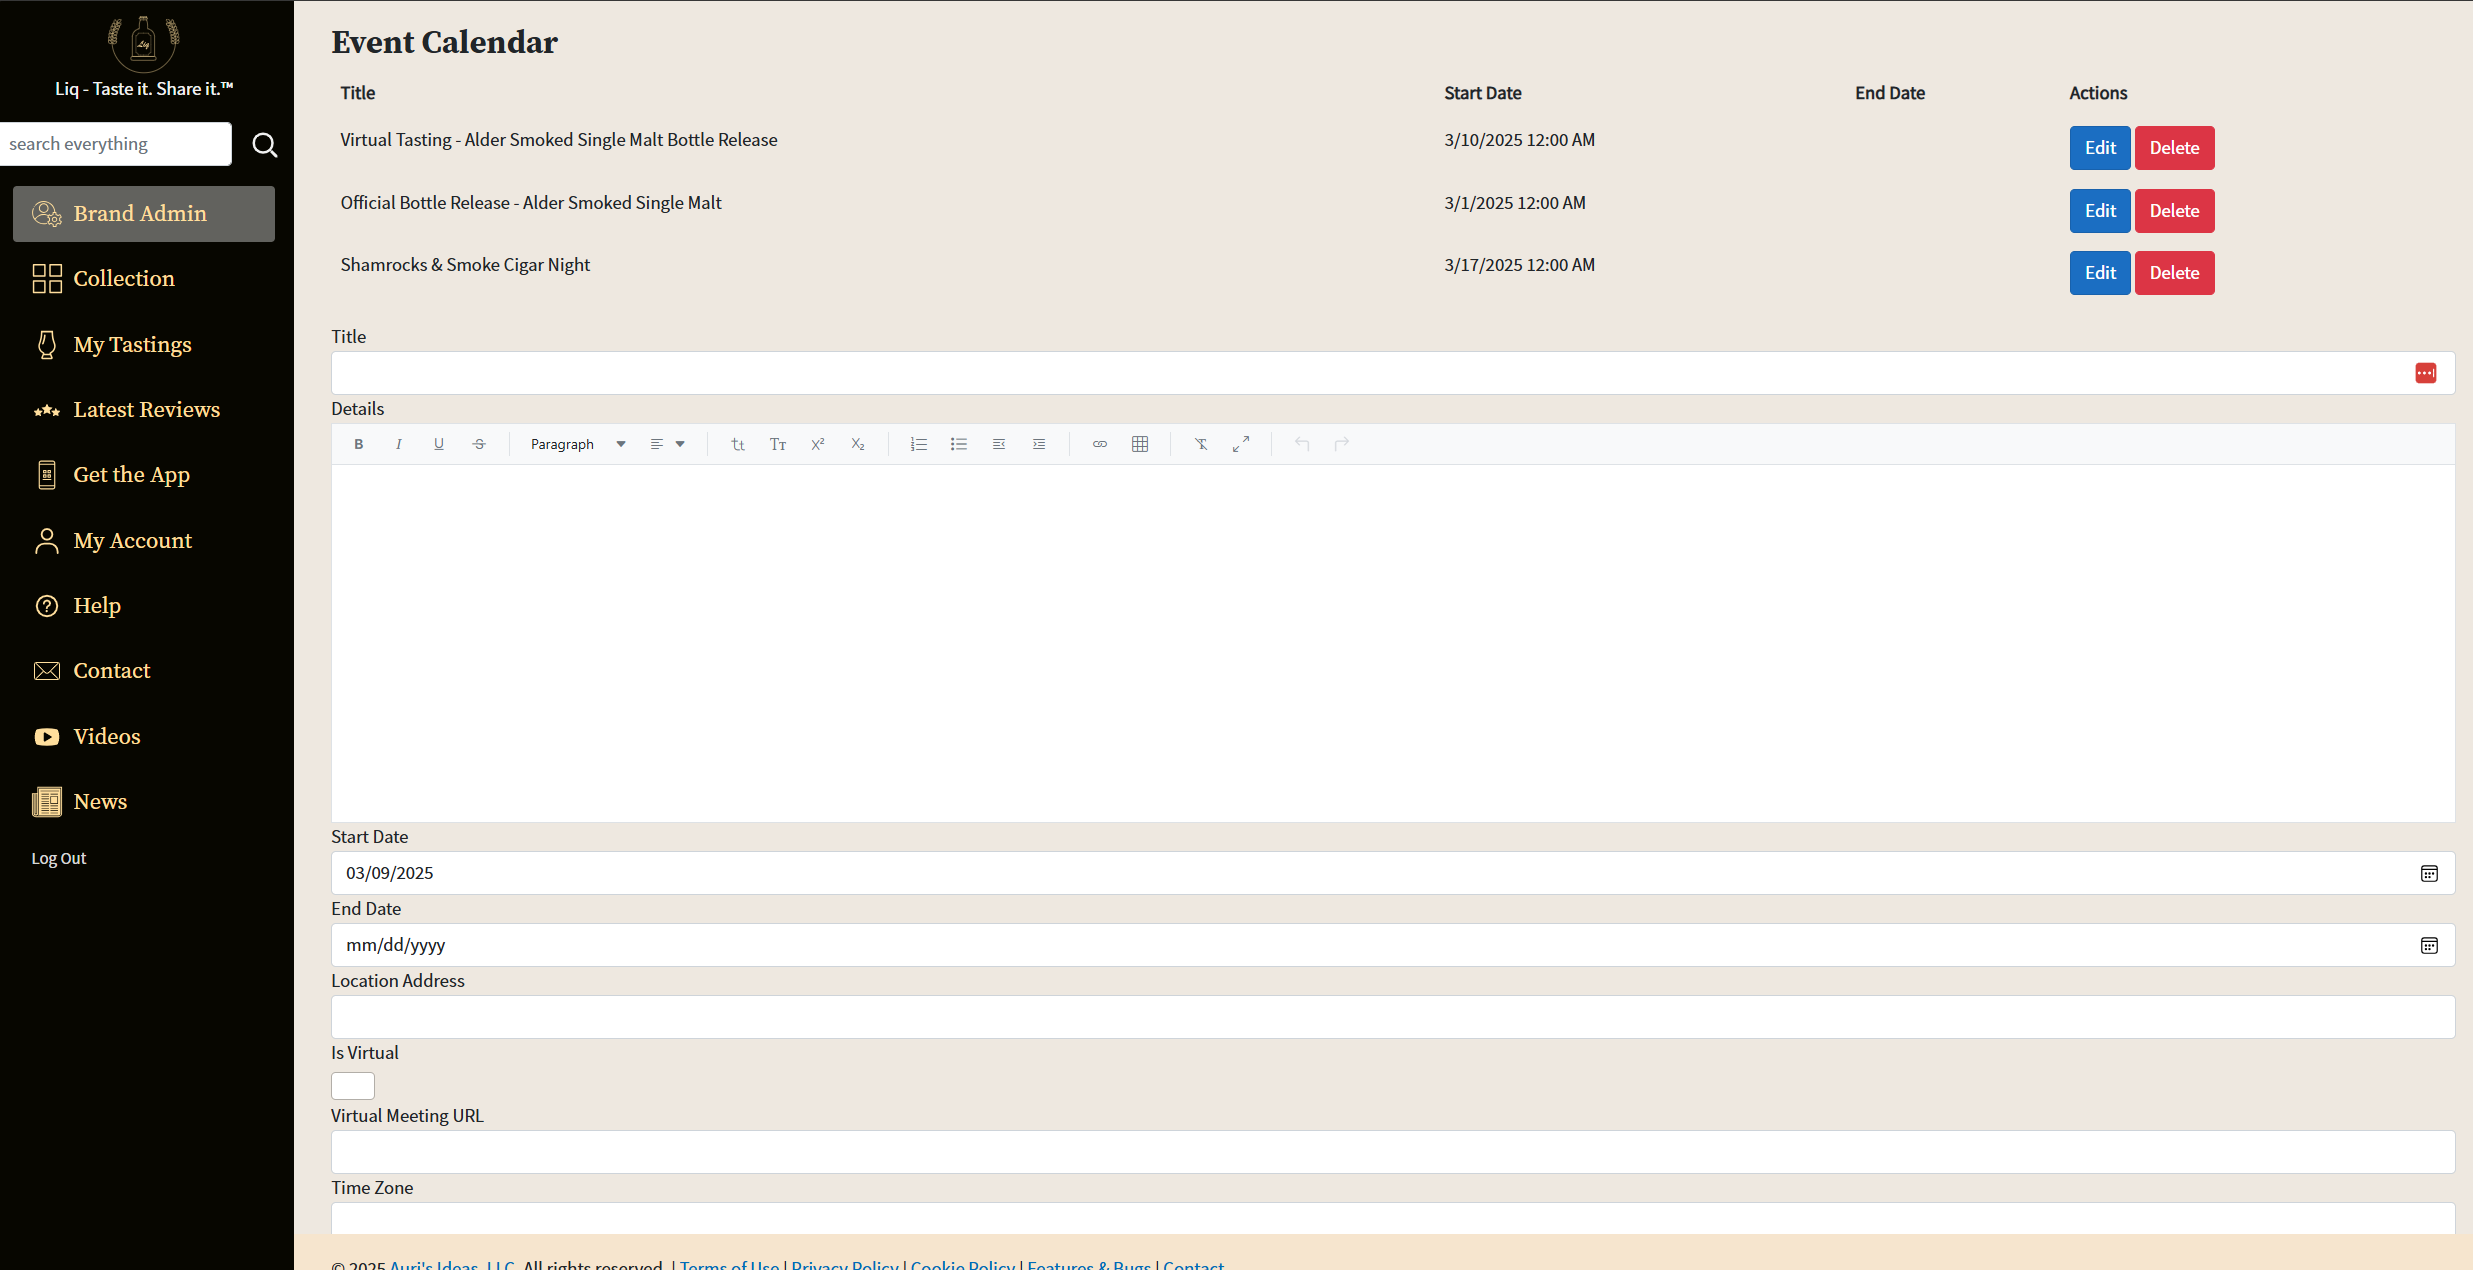
My edit page, which I asked it to split the “create” and “edit” to only be visible when creating/editing.
Before:
After:
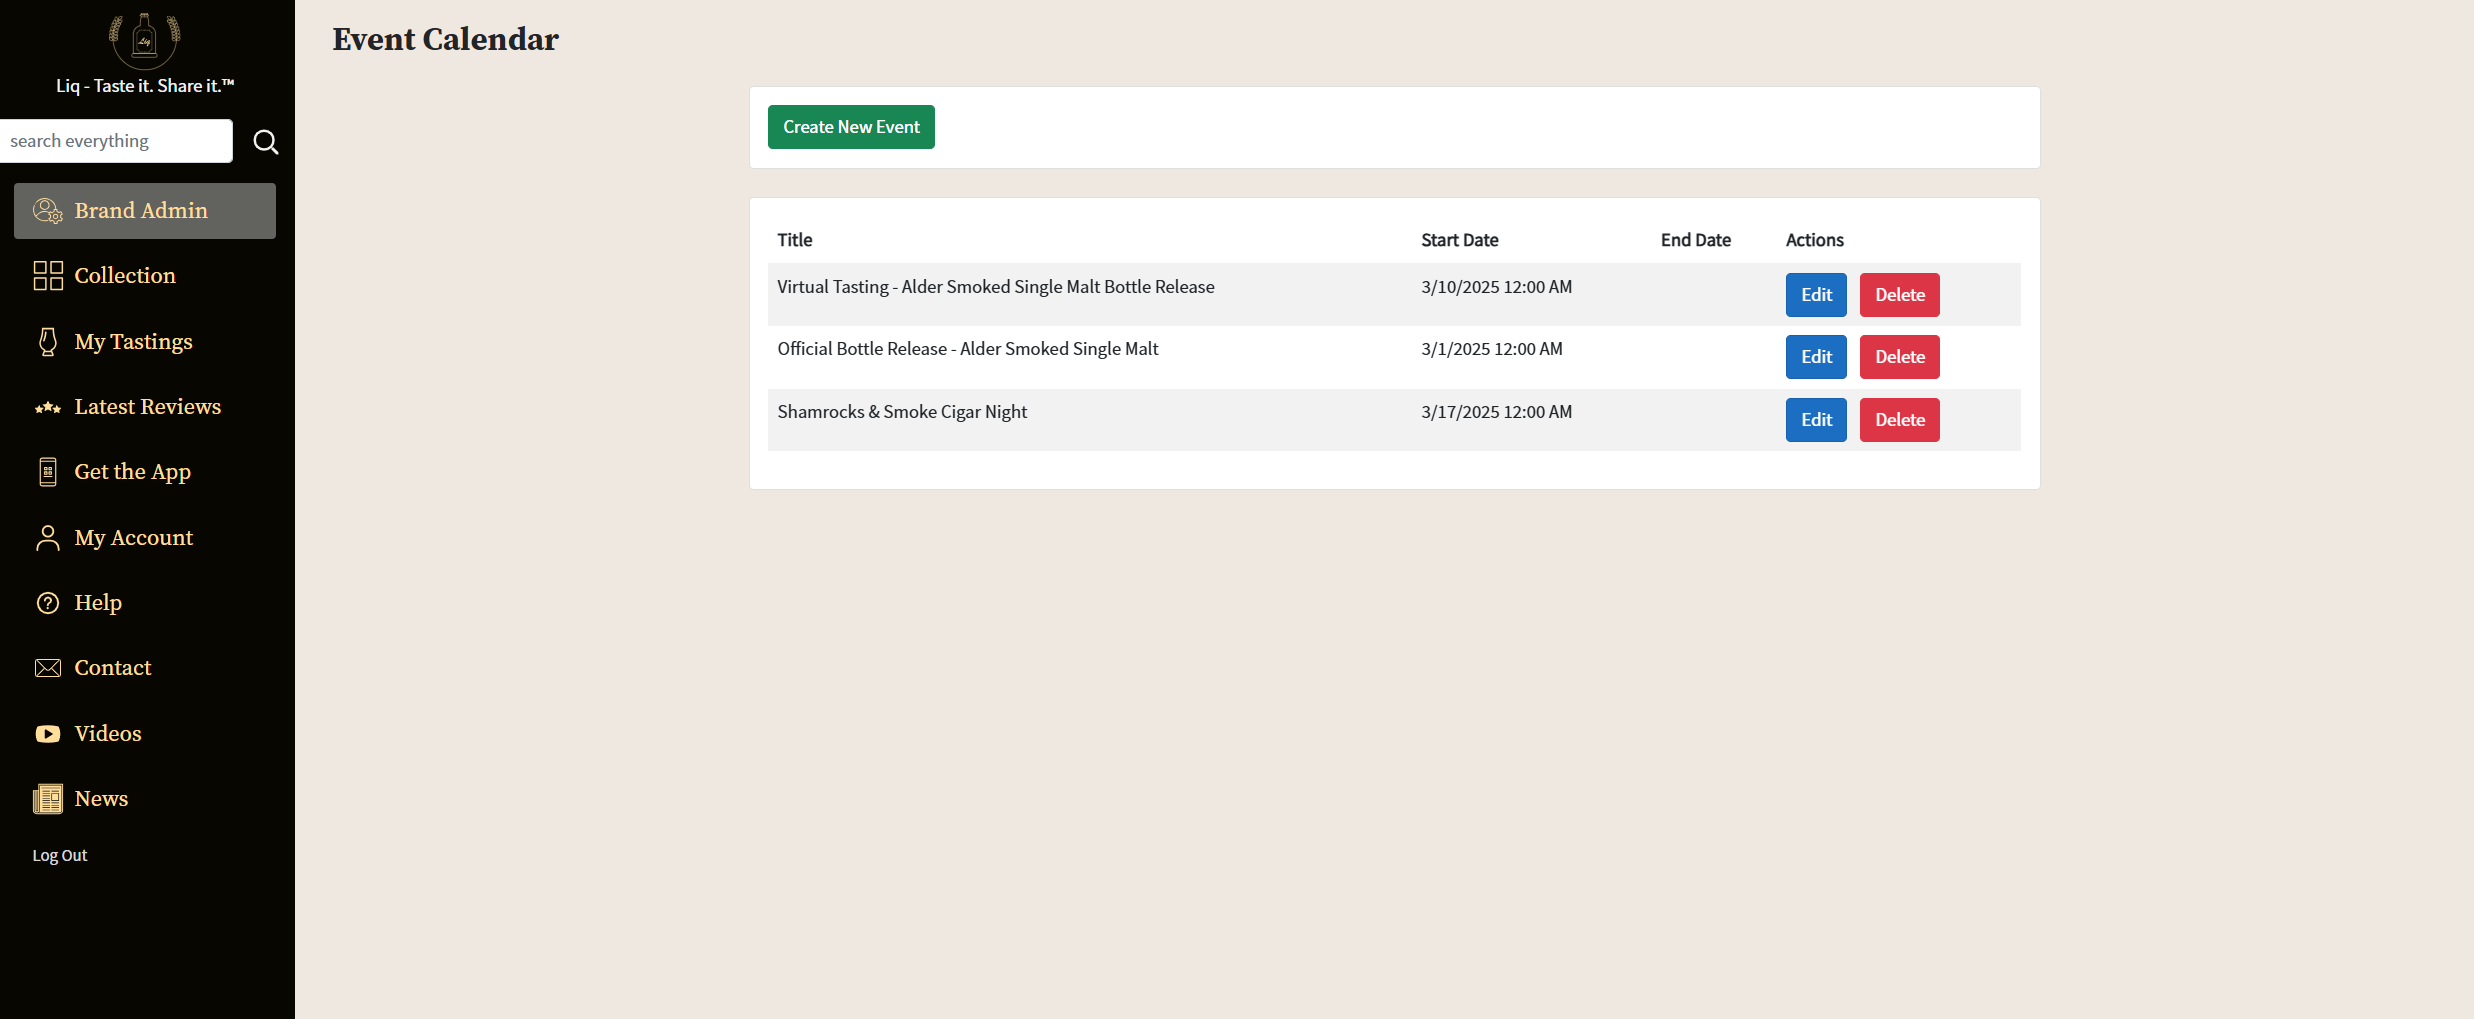
Prompt: “make this page look professional and make sure the Create form is only visible when creating and the Edit form is only visible when editing”
It even explained what it would do! (this is in Visual Studio, btw)

Certainly not a comprehensive redesign. It’s basic Bootstrap. But for quick tune-ups, especially when I’ve just done the bare minimum HTML + CSS, wow. I wonder if I could next try “Make this page look like the other pages” to implement a theme?
Have you tried this? Taken it to the next level? Lemme know…
Liq App Featured on Final Third Cigar and Whiskey Lounge Podcast
Posted: December 31, 2024 in UncategorizedTags: Aladino, app, Auri Rahimzadeh, bourbon, cigars, Final Third Cigar Lounge, Jack Daniels, Liq, liq.live, mezcal, tequila, whiskey
Liq, my free bourbon + whiskey + tequila + mezcal + other spirit collecting and tasting app, was recently featured on the way cool Final Third Cigar Lounge Podcast. We discuss Liq, Final Third’s recent Jack Daniels Single Barrel Rye pick, and experiment with how the barrel location during aging affects its taste.
Enjoy the video (below) or the Podcast! And check Liq out at https://liq.live.
