Posts Tagged ‘asp.net’

The built-in Facebook OWIN provider in ASP.NET MVC can open your website to the benefits of logging in via the social networking behemoth. Still, it’s limited when it comes to pulling in profile details such as photo, birthdate, gender, and so forth. I recently implemented retrieval of those profile properties, and will explain how you can do it, too! I feel the obvious benefit is your users don’t need to manually type in their profile details, should you have similar fields in your system.

I’m assuming you’ve created and configured a Facebook app via Facebook’s Dev center, and won’t be going into that process in this article.

Determine Which Profile Fields You Need

Before we write any code, you need to know to which profile details you desire access. Facebook used to be relatively open. Not anymore! Now you need to ask permission for a ton of items, and many are no longer available. Make sure you check permissions at least every 3 months, otherwise you may find your granted permissions are no longer, well, granted, or even accessible.

Here’s a link to everything you can get: https://developers.facebook.com/docs/facebook-login/permissions/

In my case, to access the Profile photo, name information, and some other basic items, I chose:

  • public_profile
  • email
  • user_photos
  • user_about_me

I probably don’t need all these right now, but I may in the future. I figured I’d ask ahead of time.

Once you have your list, continue to the fun coding part…

Enable the Facebook Provider in Startup.Auth.cs

If you haven’t already, you’ll need to enable the Facebook provider via Startup.Auth.cs. Make sure you do this *after* any cookie authentication, so “normal” username/password logins are serviced before Facebook takes over. This should already be the case, as the default ASP.NET MVC template includes the many optional providers afterwards by default.

I suggest keeping the App ID and Secret in your config file – or at least out of code – so you can swap for differing environments as necessary. The code snippet below enables Facebook authentication, and specifies the profile fields for which we’ll be asking read permission:

You don’t have to use what I chose – it’s just what I needed for my particular case. Facebook *does* change allowed permissions and profile item visibility somewhat often. Stay on top of their developer changes – otherwise your site login may unexpectedly break.

// Enable Facebook authentication with permission grant request.
// Otherwise, you just get the user's name.
var options = new FacebookAuthenticationOptions();
options.AppId = ConfigurationManager.AppSettings["Facebook.AppId"];
options.AppSecret = ConfigurationManager.AppSettings["Facebook.AppSecret"];
options.Scope.Add("public_profile");
options.Scope.Add("email");
options.Scope.Add("user_photos");
options.Scope.Add("user_about_me");
app.UseFacebookAuthentication(options);

Install the Facebook NuGet Package

In order to easily get access to the Facebook data, I used the Facebook.NET library. It’s easy enough to install:

Install-Package Facebook

Note: I used version 7.0.6 in this example. You should be able to find the latest version and changelog at https://www.nuget.org/packages/Facebook/7.0.10-beta

Handle the Facebook External Login Callback in AccountController.cs

Once Facebook has been configured, all requests from your website will direct to Facebook, where it will ask permission, and, if granted, will redirect back to the ExternalLoginCallback action in the Account controller. It is here that I suggest you retrieve the data you’ve requested from Facebook. You’ll then modify the associated ExternalLoginConfirmation View with fields to correct or remove any information from Facebook, then continue with the account creation process on your website. That’s the part where you’ll populate the ApplicationUser entity, or whatever you decided to call it.

It’s relatively simple, as shown in the code below. The steps are as follows:

  1. Get the Facebook OAuth token with a simple HttpClient call
  2. Make the request for Profile details using the Facebook.NET library
  3. Optionally, download the Profile photo and save it somewhere

Yes, I could split this out – refactor as you see fit, and feel free to share any optimizations.

Below is the change to ExternalLoginCallback to grab the data from Facebook after the redirect:

ExternalLoginCallback Code

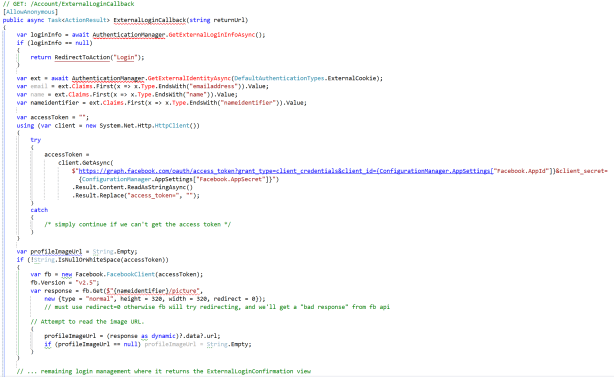
If you’d like to get the profile image, below is an example:

GetProfileImage Code


Moving Forward

I hope this article has helped answer your Facebook integration questions. If you would like additional details, please post in the comments, or message me on Twitter: @Auri

Thank you!

I recently ran into a need to use the LAME MP3 encoder in a customer’s website. Problem was, once I deployed to Azure, I received an error of “Unable to load DLL libmp3lame.32.dll”. Uh oh! “But it’s in the bin folder!” I screamed silently at Starbucks. So, I binged the issue and found a good answer on StackOverflow. I’m sharing here because it helped unstick me, and I imagine others may be running to this issue with libraries other than LAME.

I ended up adding the function to my Global.asax, in addition to importing namespaces System.IO and System.Linq:

/// <summary>
/// Updates PATH variable in hosting instance to allow referring to items in this project's /bin folder.
/// Very helpful with Azure.
/// </summary>
public static void CheckAddBinPath()
{
    // find path to 'bin' folder
    var binPath = Path.Combine(new string[] { AppDomain.CurrentDomain.BaseDirectory, "bin" });
    // get current search path from environment
    var path = Environment.GetEnvironmentVariable("PATH") ?? "";
 
    // add 'bin' folder to search path if not already present
    if (!path.Split(Path.PathSeparator).Contains(binPath, StringComparer.CurrentCultureIgnoreCase))
    {
        path = string.Join(Path.PathSeparator.ToString(), new string[] { path, binPath });
        Environment.SetEnvironmentVariable("PATH", path);
    }
}

Then in Application start I simply added:

// Sometimes files aren't loaded properly from bin. Hint to the app to load from /bin, too.
CheckAddBinPath();

I hope that helps!

I’m relatively new to Azure deployments, but the more I use them, the more I like the service. Unfortunately, it’s not WYSIWYG with deployments. What you see on IIS Express when development is not always what you’ll get after an Azure deployment. One issue I’ve come across is the MIME mappings aren’t the same, or don’t exist at all, and that’s preventing various file types, such as SVG images and WOFF2 fonts from being served. I also noticed that fixing Azure’s MIME mapping busted my AngularJS support in IIS Express – whoops!

Using the magic of web.config transforms, we can fix this for our release deployments. If you expand your web.config file, you’ll see web.Debug.config and web.Release.config. These files enable you to insert, replace, and remove settings based on your build configuration. Obviously, if you had multiple build configs, such as for different hosting environments, you’d insert those config names in addition web.*.config files.

To add SVG support, we need to insert our additional MIME types into the web.config. There’s no reason to do this in the master web.config, because it’s only necessary during release. This same tactic works very well for swapping the SMTP mail mailSettings section based on the hosting environment’s needs. For example, I swap localhost, where I use PaperCut to monitor sent email, to the actual settings upon deployment.

Below, you’ll see the fully modified web.Release.config from a recent deployment. This one worked perfectly for adding SVG and some missing font file extension support. You’ll notice I’m adding a new section under <system.webServer>. Note that I do not mark the webServer tag with an xdt:Transform. I don’t want to replace the entire section. I simply need to add the staticContent section to override some of the settings already configured in Azure. There are other options for xdt:Transform, such as Remove and Replace. This is a very powerful feature and I encourage you to learn more about it from Microsoft.

    <staticContent xdt:Transform="Insert">

I hope this helps!

Snippet

<?xml version="1.0"?>
 
<!-- For more information on using Web.config transformation visit http://go.microsoft.com/fwlink/?LinkId=301874 -->
 
<configuration xmlns:xdt="http://schemas.microsoft.com/XML-Document-Transform">
  <system.webServer>
    <!-- Add support for video files and other non-standard file request types. This breaks AngularJS support in IISExpress, hence why it's here instead. -->
    <staticContent xdt:Transform="Insert">
      <!-- if you don't remove certain extensions first, the site won't load, whoops! -->
      <remove fileExtension=".svg" />
      <remove fileExtension=".svgz" />
      <remove fileExtension=".eot" />
      <remove fileExtension=".ttf" />
      <remove fileExtension=".woff" />
      <remove fileExtension=".woff2" />
      <mimeMap fileExtension=".mp4" mimeType="video/mp4" />
      <mimeMap fileExtension=".ogv" mimeType="video/ogg" />
      <mimeMap fileExtension=".webm" mimeType="video/webm" />
      <mimeMap fileExtension=".svg" mimeType="image/svg+xml"/>
      <mimeMap fileExtension=".svgz" mimeType="image/svg+xml"/>
      <mimeMap fileExtension=".eot" mimeType="application/vnd.ms-fontobject" />
      <mimeMap fileExtension=".ttf" mimeType="application/octet-stream" />
      <mimeMap fileExtension=".woff" mimeType="application/font-woff" />
      <mimeMap fileExtension=".woff2" mimeType="application/font-woff2" />
    </staticContent>
  </system.webServer>
 
</configuration>

I went back and forth between my code and various Telerik and Stack Overflow demos of how the Kendo grid is supposed to refresh its datasource without reloading the entire grid. Finally, Telerik sent me a code example that included a function that’s not in their API documentation, but darn well should be. So, if you’re having the same issue I did, where you want to call read() on your grid’s datasource, but it simply isn’t working, here’s an example from Telerik that may help you.

The function: getKendoGrid()

Now, I keep my createDataSource() function around so I can swap out the data I’m paging. Their example uses some sample data, but you could simply use their example of creating a datasource to call your back-end JsonResult action in MVC and things can still work magically.

I hope this helps others Smile

<body>
  <div id="grid" />
  <script>
    function createDataSource() {
      return new kendo.data.DataSource({
        transport: {
          read: {
            url: "/echo",
            dataType: "json",
            method: "POST",
           
            // Simulate response
            data: {
              "json": JSON.stringify([{
                firstName: "John",
                lastName: "Smith",
                age: 25
              }])
            }
          }
        },
        pageSize: 10
      });
    }
   
    var ds = createDataSource();
   
    $("#grid").kendoGrid({
      dataSource: ds,
      autobind: false,
      scrollable: false,
      columns: ["firstName", "lastName", "age"]
    });
   
    $("#grid").getKendoGrid().dataSource.read();
  </script>
</body>
</html>

And here’s a colorized version:

image