Having submitted an app with In-App purchases – specifically, subscriptions – to Apple’s store, our development team at M3 learned a lot about what will prevent a successful app submission. I hope this compiled list helps you get your app approved quickly, and prevent weeks of headaches.
I will update this article from time to time as more lessons are learned. I hope this article – and all the developer experience I’m relaying on behalf of others and myself – helps you!
An In-App Purchase Must Be Approved Before the App is Released
An In-App Purchase must be in the “Approved” state before it can be used in your app. This means Apple must test any new In-App Purchase Product or Subscription in your app release before anyone can purchase it, including you.
You Must Test In-App Purchases Work – Use the Sandbox Account
As explained above, it can seem like a “chicken and egg” problem. How do you test a product in production when it first must pass testing to get into production? This is where Sandbox accounts come into play. Under Users & Access in App Store Connect, you can assign Apple IDs that are allowed to purchase.
Note that these purchases don’t cost anything, but they can also expire. Make sure you stay on top of your sandbox purchases. Also, make sure you track the original purchase IDs coming back from the API. These will come in handy later when you need to restore subscriptions, which is anothe requirement.
Your App Must Provide a Mechanism to Restore the Subscription
It’s not enough to simply check Apple’s server to see if there is a valid subscription. You must offer an option in the UI (user interface) to explicitly restore.
It’s possible you will still be rejected for this reason. That can be due to Apple’s tester not being able to find the option. So, when you submit your testing instructions, make sure you point out where the option is. If they still say it isn’t there, politely reply to them with a screen shot proving you have such a feature.
You Must Show What the Expired Subscription Experience Looks Like
Make sure you provide an account, with credentials, that can be used to show off the app when a subscription has expired. Just include the credentials in the testing instructions. This should be a different account than the sample credentials you provide Apple for general testing.
Your App Must Clearly Explain What Benefits a Subscription Has vs. a Free Account
You must clearly describe what you get with a free account vs. a paid account. If there is no obvious benefit, Apple may reject you.
Your App Must Clearly Explain The Renewal Terms and Price
You must also be clear about your renewal terms, such as monthly, yearly, and so forth, and pricing. If it’s not clear, Apple can reject you.
It Must be Easy to Cancel Within Your App
It’s not enough that Apple lets you cancel from the App Store UI. You must also provide a button to allow cancelling your subscription.
When Verifying a Subscription Exists, Check BOTH Production AND Sandbox Environments
Apple may subscribe via Sandbox. So, if you only check Production when restoring accounts, you will fail to be approved because Apple won’t be able to restore their subscription. Always check Production first, then fall back to Sandbox.
Note Subscriptions Are Tied to Apple Accounts, Not Your Service’s Accounts
This was a big one. You can only have one subscription of each type per Apple account. However, your service may support multiple accounts. Make sure you track which account from your service subscribed, and tie that to the Apple original subscription ID. If you don’t, it’s possible you’ll be handing out “free” accounts to creating additional accounts under the same Apple ID.
You Can’t Generate Promo Codes Until the App is Approved
Unlike Google, Apple will only let you generate promo codes AFTER the app has been approved. Also, for subscriptions, Apple limits you to 100 promo codes with a 30 day expiration. Make sure you factor this into your testing and soft rollout plans.
Create Separate Test Accounts for Apple to Use
Don’t give Apple accounts your developers are using. Give them accounts that are in the exact state you need them to see. Developer accounts are too “in flux” to be reliable, and your own developers may interfere with Apple’s testing.
Be Thankful for (and take advantage of) Apple’s Feedback System
Apple likely has access to more testers than you do. There are aspects of In App Purchases you may not know how to test, or that you had to test in the first place. So, if you feel your app is in a submittable state and want to see if you covered everything, submit a build to Apple. They can give you a sanity check / smoke test you didn’t miss anything. If you pass the In App Purchases part of Apple’s testing, the rest may be smoother sailing 😉
Ever want to run your AWS lambda functions locally so you can debug efficiently? Well, the documentation for doing so isn’t in one nice, convenient location. Still, the tools ARE THERE. You just need instructions on what to set up and how. That’s what this article will attempt to help you accomplish.
Assumptions
I’m assuming a Windows and Visual Studio environment here. If that’s not your go-to, I’m imagining the adjustments are small. If you’d like to share your adjustments, I’m happy to update this article.
I’m also assuming you started your project with the AWS Lambda Project (.NET Core, C#) template.
Pre-requisites
Before you can debug, the following must be installed:
Visual Studio 2022 or higher – look at the date this article was written
AWS Lambda Mock Test Tool – install the version appropriate for your project’s .NET target, such as -8.0 for .NET 8
Java 1.7 or higher Runtime, if debugging DynamoDb locally, otherwise no need
Lambda Mock Test Tool Install Shortcut
You can install the Mock Test Tool from the command line easily. Just open PowerShell and run the following command:
dotnet tool install -g Amazon.Lambda.TestTool-8.0
Note the -8.0 needs to match the .NET version. Here are some versions to choose from, which will update from time to time. See the Github repo in Pre-requisites for the latest table.
.NET Core Version
Tool NuGet Package
Tool executable
.NET Core 2.1 (Deprecated)
Amazon.Lambda.TestTool-2.1
dotnet-lambda-test-tool-2.1.exe
.NET Core 3.1 (Deprecated)
Amazon.Lambda.TestTool-3.1
dotnet-lambda-test-tool-3.1.exe
.NET 5.0 (Deprecated)
Amazon.Lambda.TestTool-5.0
dotnet-lambda-test-tool-5.0.exe
.NET 6.0
Amazon.Lambda.TestTool-6.0
dotnet-lambda-test-tool-6.0.exe
.NET 7.0 (Deprecated)
Amazon.Lambda.TestTool-7.0
dotnet-lambda-test-tool-7.0.exe
.NET 8.0
Amazon.Lambda.TestTool-8.0
dotnet-lambda-test-tool-8.0.exe
.NET 9.0
Amazon.Lambda.TestTool-9.0
dotnet-lambda-test-tool-9.0.exe
Configuring Your Project
In your project, you will need to make some adjustments in order to debug.
Update launchSettings.json
In the project’s launchSettings.json file, make sure you are pointing to the Mock Lamda Test Tool profile and environmentVariables are specified. Something like this:
The DYNAMODB_ENDPOINT is optional, and your tastes for naming environment variables may vary.
Make sure the workingDirectory and executablePath are set to the appropriate version of your installed .NET and Lambda Mock Test Tool versions.
Update aws-lambda-tools-defaults.json
You must also tell the Lambda Mock Test Tool where to find the function to point your requests. You can only test one function at a time (sorry), but it’s easy to update.
Populate the function-handler setting in the aws-lambda-tools-defaults.json file as follows:
{
  "Information": [
    "This file provides default values for the deployment wizard inside Visual Studio and the AWS Lambda commands added to the .NET Core CLI.",
    "To learn more about the Lambda commands with the .NET Core CLI execute the following command at the command line in the project root directory.",
    "dotnet lambda help",
    "All the command line options for the Lambda command can be specified in this file."
  ],
  "profile": "default",
  "region": "us-east-1",
  "configuration": "Release",
  "function-architecture": "arm64",
  "function-runtime": "dotnet8",
  "function-memory-size": 128,
  "function-timeout": 30,
  "function-handler": "assemblyName::fullClassPath::nameOfFunction",
  "framework": "net8.0",
  "package-type": "Zip"
}
See it there, on line 15? Populate it as follows:
assemblyName: The name of your assembly. For example, OhMyLambda.
fullClassPath: The full path of the class containing your function. For example, OhMyLambda.MyFunctionClass
nameOfFunction: The name of your function, such as Handler
So, if you had a class like this:
// Assembly attribute to enable the Lambda function's JSON input to be converted into a .NET class.
[assembly: LambdaSerializer(typeof(Amazon.Lambda.Serialization.SystemTextJson.DefaultLambdaJsonSerializer))]

namespace OhMyLambda.Functions;

public class MyFunctionClass(IAmazonDynamoDB dynamoDbClient)
{
    public MyFunctionClass() : this(CreateDynamoDbClient()) { }

    public async Task<APIGatewayProxyResponse> Handler(APIGatewayProxyRequest request, ILambdaContext context)
    {
          ... more code here ...
Before debugging, make sure you see Mock Lambda Test Tool as your startup option. You should also have DynamoDb running if it’s needed.
Starting DynamoDb
If you also need DynamoDb to be running, you should start it before debugging. If you have installed DynamoDb Local from the link above, you need to get AWS Credentials and THEN start it.
To get AWS credentials for the local instance, open PowerShell and run aws configure and use the following credentials:
AWS Access Key ID [None]: fakeMyKeyId
AWS Secret Access Key [None]: fakeSecretAccessKey
Default Region Name [None]: fakeRegion
Default output format [None]: (just hit enter)
This will take care of being able to access DynamoDb locally with the proper credentials
Once the credentials have been set, you can launch DynamoDb as follows:
I added this to a batch file to quickly run it from File Explorer.
This will launch DynamoDb. You can press Control-C to end its process when you’re done.
Debugging
You should be all set now. Simply launch the debugger and you should see the Mock Lambda Test Tool appear in your default web browser. It will look something like this:
If you don’t see your function details, or the top two dropdowns are empty, you have an error in your configuration. Make sure that function-handler is correct!
Triggering the Lambda
So how do you send the payload and trigger the Lambda? Amazon has you covered – just select API Gateway AWS Proxy from the Example Requests dropdown. Then, fill in the “body” with the proper JSON-formatted-as-string. Hit Execute Function, and the request will be made and should trigger your debug breakpoint, assuming you’ve set one.
The End
That’s it! You should be able to debug now! I hope this helped. If you have any updates or questions, feel free to hit me up. You can find me on LinkedIn: https://www.linkedin.com/in/aurirahimzadeh
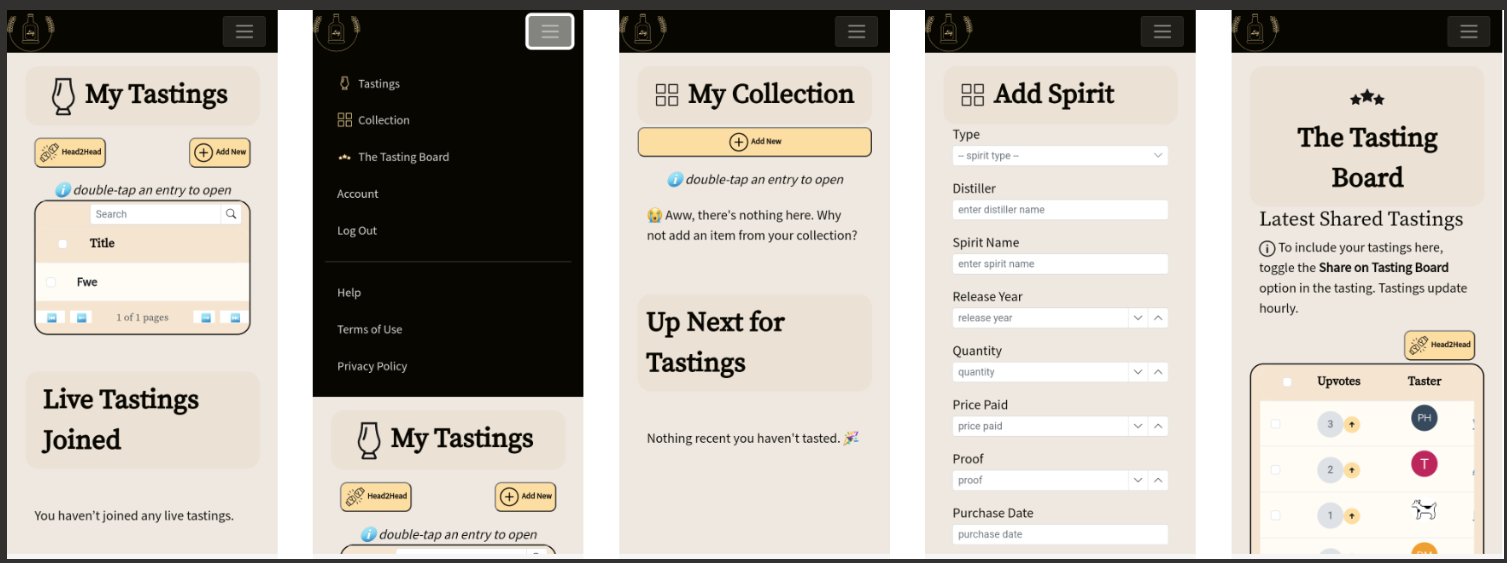
Finally… my bourbon, whiskey, tequila, mezcal, wine, whatever you want to drink + taste + collect app… Liq… is now available for both mobile platforms. What an adventure!
Originally, Liq was a website – https://liq.live. It was the easiest place to start, and start figuring out what people want. Plus, any updates I push would be immediately available to everyone. No waiting on app updates, supporting older versions, writing an API and more advanced caching infrastructure… And no app store reviews to get through, which can be troublesome in some cases.
But my users have spoken! “We want an app!” So I got to work a couple months ago and started building. Thankfully, most of the code was reusable. I found out quickly, the mobile app was the way to go. I could guarantee the experience. I could code for phones vs. tablets. And I could make it insanely simple to have such a useful tasting + collection tool anywhere users went.
Once it was done and tested – thanks Club Marzipan! – I was ready to submit. I’ve done this countless times. Every time, you cross your fingers… Let the story begin.
The iOS Story
Usually, Apple App Review is the tough part. Who knows what unknown rule you might break when submitting your first app release. Once you’re past that, the untrusting eyes are mostly off you. But still… you have to get over that first hurdle.
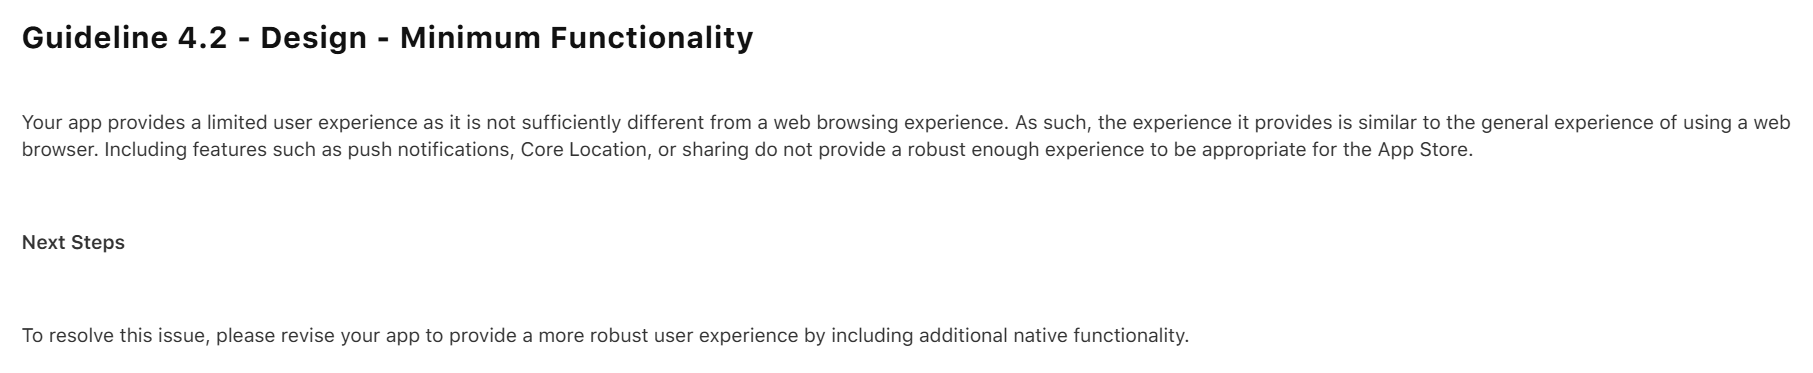
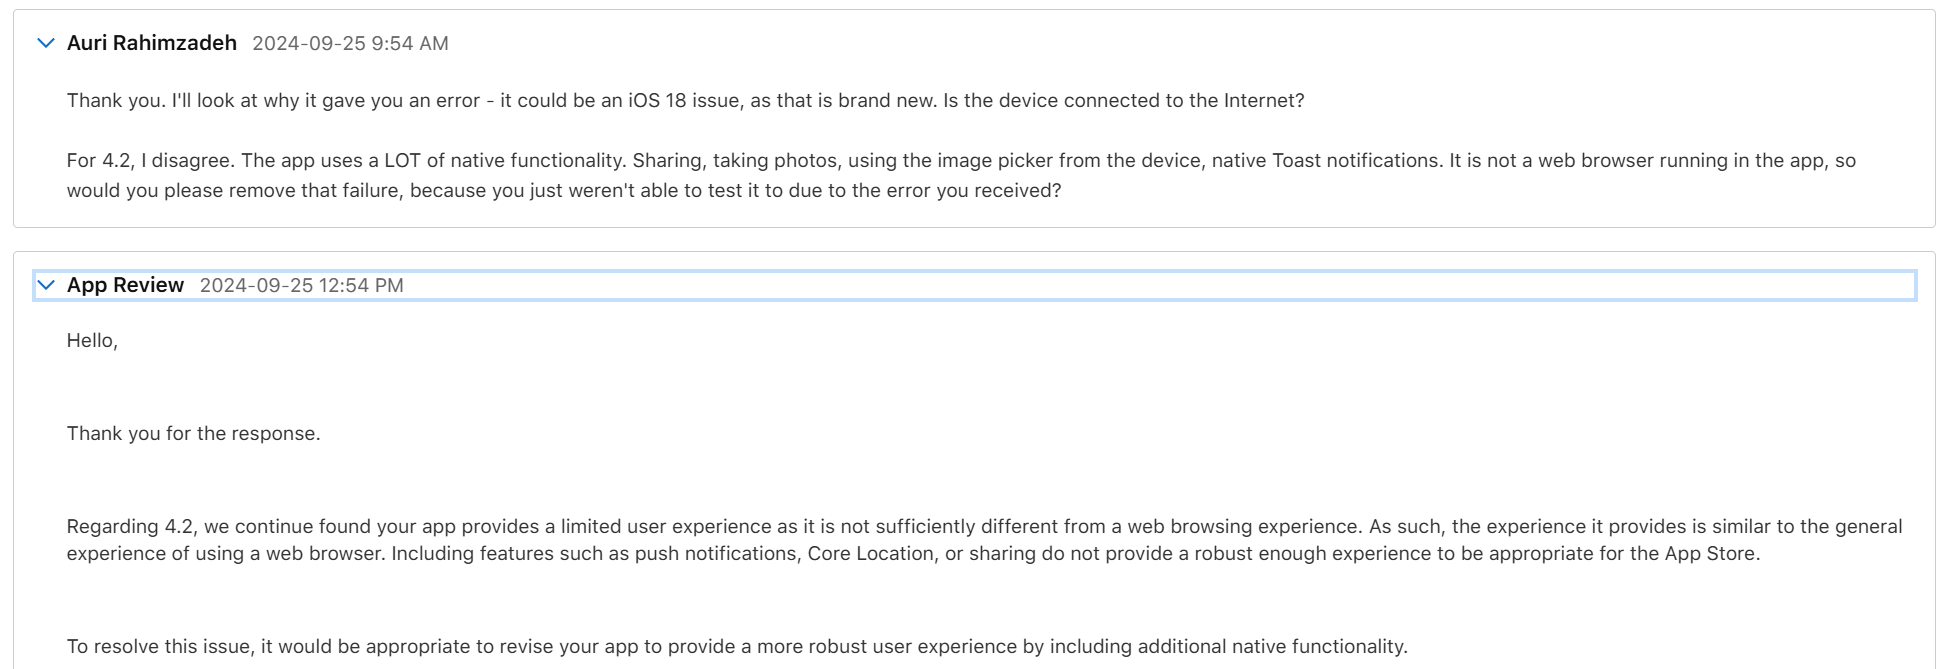
My initial submission was rejected. Apple found a bug I had never tested for, and they rightfully rejected the app. But not only did they reject it for the bug, they rejected it saying it’s nothing better than a website and I should add native features.
Well, that wasn’t fair, but I could see their point. Because of the bug, you couldn’t use the app. So, you wouldn’t see any of the features. I thanked them for reporting the bug, and that I disagreed about the “native” part. When working properly, Liq uses many native features. Native camera. Native photo access. Native sharing. Plus it’s, well, a native compiled app. Basically, every native feature Facebook uses except Location and Video, neither of which I need. Apple wrote back it doesn’t matter, but I ignored that – I told them “you’ll see in my next upload.”
I fixed the bug – again, thanks Apple, that was a good catch! – and re-uploaded. They came back about a day later with a new rejection reason. The bug was resolved, so that issue was removed, as was the “native” issue – phew! – that would have been an unnecessary rewrite. This time they pointed out I had no way to request account deletion. Fair point. I got to work.
I had the accout deletion fixed within a few hours. I tested the heck out of it. It worked great. I resubmitted and hoped for the best.
Two days later is was approved. w00t!
I did have some additional fixes. I let the original version get out there – it was only going to be out for a day – while I fixed some more bugs and tightened things up. Apple Reviews go much faster when you already a published verison of the app. I submitted the update and it was reviewed and approved the same day. Boom, proof.
Now, on to Android…
The Android Story
Usually, Google Play – the Android store – submission is a slam dunk. Google appears to use AI and another automated code-analysis system. I recall it being named something like The Bouncer. I don’t recall the exact name – it’s been a long time and I imagine things have changed. Anyway, given Apple’s issues were largely just Apple requirements, I figured I’d be reviewed within a day. You never know though!
I started to worry when the review had taken more than 2 days. A status of In Review for more than a few hours is uncommon. I was concerned. Alas, the rejection email came in. And it wasn’t what I expected:
First, I don’t know what “all parts of the metadata” means. I think it’s telling me my provided app screenshots and what’s in the app don’t match its description. Specifically, “track your bottles” and “see what you’ve tasted.” Let’s look at their screenshot:
So that’s their “proof” my app is misleading. But what’s this? Their screenshots show exactly what my app description details. Tastings and Collection. It’s all right there.
I’m guessing this is just a case of AI making a mistake judging my app. I don’t blame Google – they probably get a lot of submissions, and have minimal resources to look at them. Remember all those layoffs?
I submitted an appeal. They said it would take 2 days.
I received an email saying it might take longer than 2 days. OK, let’s be patient.
One week later, I finally received a notice that my appeal was accepted. All I had to do – though it wasn’t entirely clear in the email – was resubmit my app. I did that and started to wait.
Two days later, it still was In Review. “Oh, no…” I was thinking to myself… Not this again… Don’t reject me again, AI.
Thankfully, a few days after, my app was finally approved. Wow, unexpected. But I’m happy 😀🎉
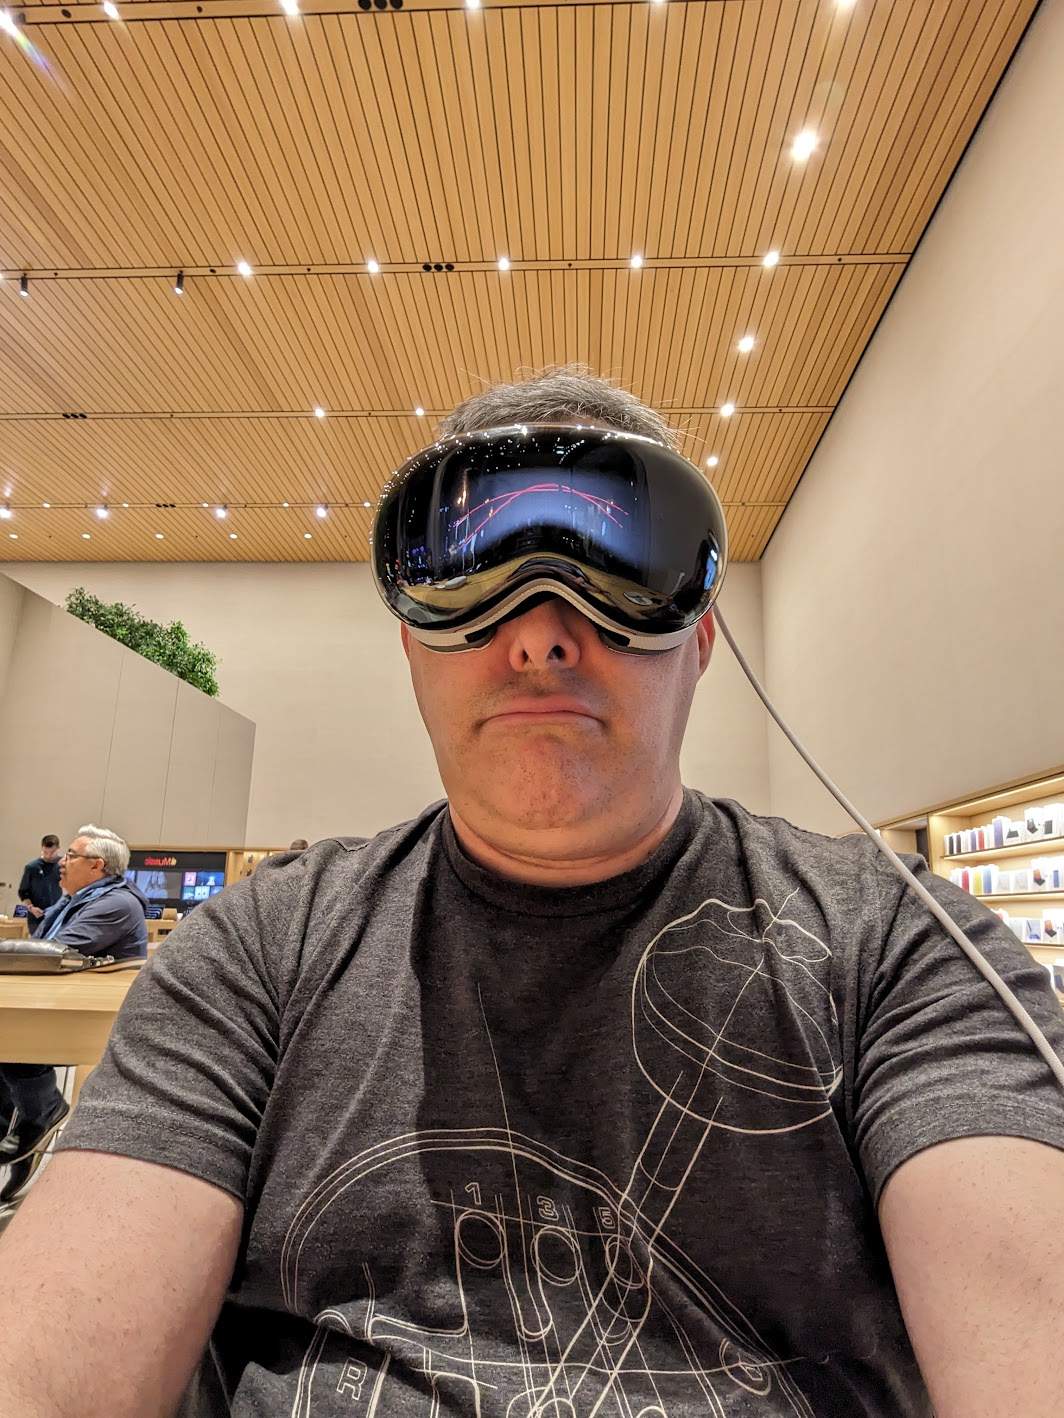
While in Nashville, having just torched my insides with a fiery hot chicken sandwich from Prince’s, I passed by the all-glass enclosed Apple store on the corner of 5th & Broadway. It was about 6pm, and observations would indicate the evening had already started in the morning for most people. It was my last night in town and the Apple store got me thinking about the Vision Pro, my Quest 3, the 250,000 units Apple had sold to date, and of the articles claiming you could get a demo. So I walked in and asked “Can I get a demo of the Vision Pro?” “Sure! We may have an appointment left,” the friendly associate exclaimed. 7pm was available. I handed them my deets, and went off to drop some shopping goodies off at my hotel a few blocks away.
The Pre-Demo Setup
Before I even left the store, Apple had texted me a pre-demo survey. It was primarily concerned with whether I wore glasses (I do now), and whether I used them for near or far sightedness, or both. I answered the questions and Apple told me I was all set.
Apple’s pre-demo survey recommended I use the Zeiss inserts.
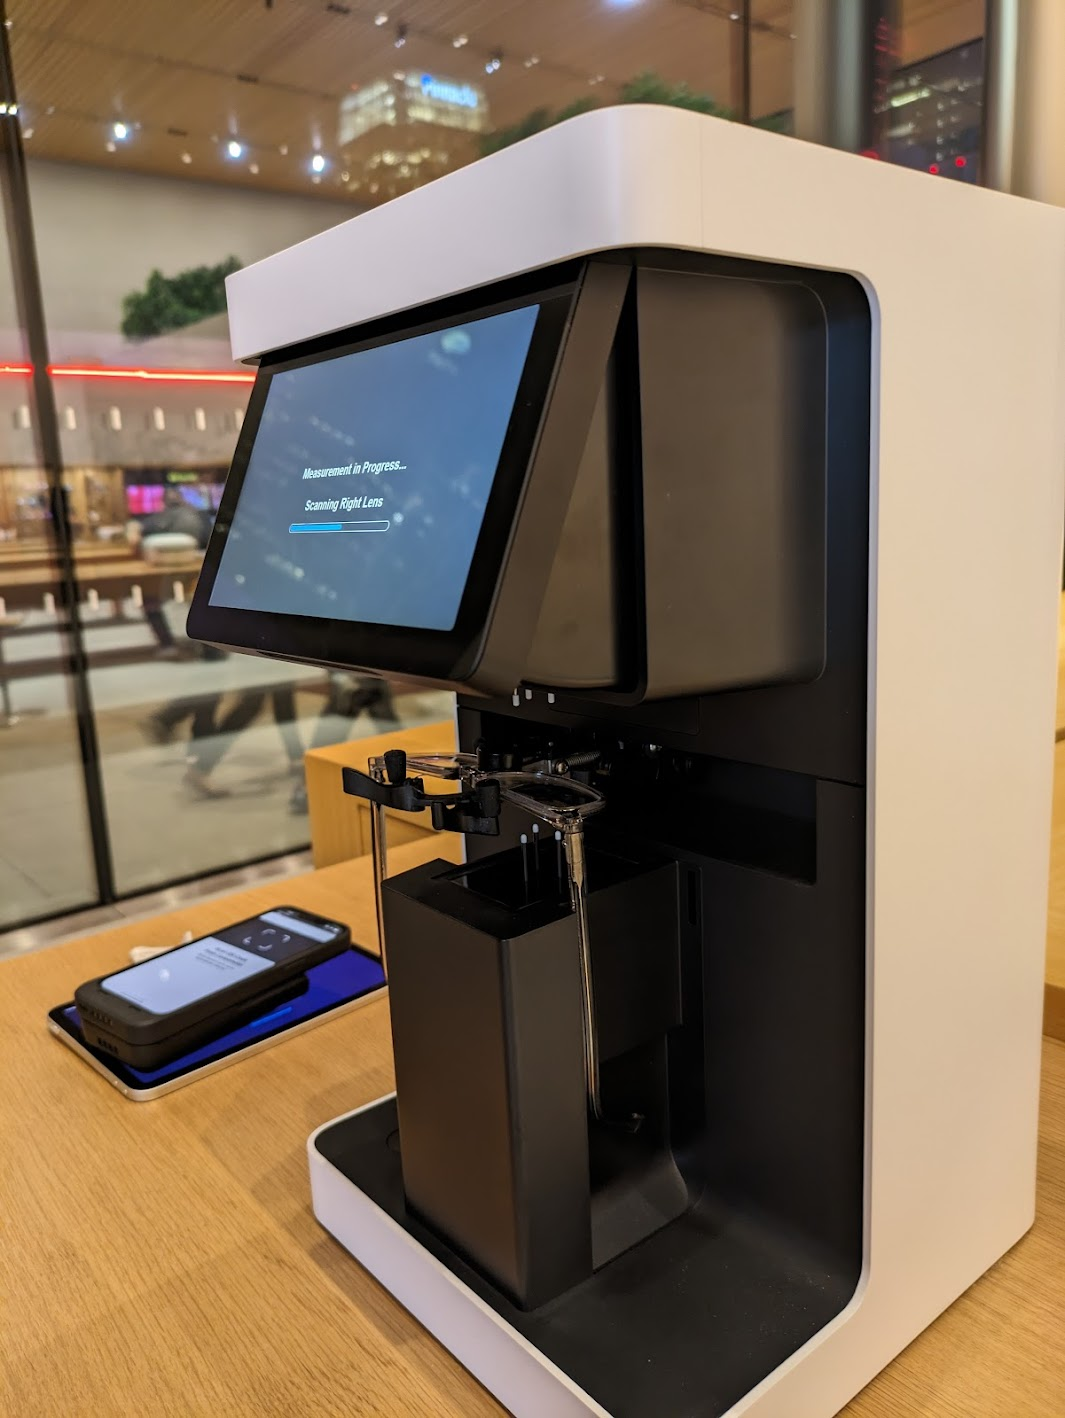
I strolled back into the store close to 7pm. They greeted me quickly with “You’re back!” Well, “I’m a man of my word” I exhorted, and followed them to the back of the store for the demo. Sam would be talking me through the demo. But first they needed my glasses so they could measure them with a fancy, expensive looking measurement machine. I think I’ve seen the same device at Warby Parker. They needed this to set up the Vision Pro for my exact prescription. This begged the question, “So what if my prescription changes? Do I need a new set of inserts?” “Yes, you would need to order new inserts” she explained. I didn’t see her add any inserts, so I was a bit confused by this, but why die on that hill? My guess is the Vision Pro adjusts by itself once provided the script details, but who knows. I sure hope I wouldn’t need to buy new adapters, err “inserts,” after already spending thousands of dollars on this thing. And of course – at this time – you can only buy Apple’s special Zeiss inserts, which I’m sure are a pretty penny.
The lens scanning machine.
After my eyes were ready, I also had to use an iPhone to scan my face. This process wasn’t working well until I moved to the solid-colored wall. The app just kept missing the scan. Sam was a bit frustrated as well, but she kept her cool.
Now, keep in mind, I’ve owned a Meta Quest 3 for a few months now. I was 100% comparing the setup process of that under $500 device to the setup process of a $3,500 (base!!) device here. With the Quest, I just put the unit on my head after some simple setup, and just kept my glasses on. I’m curious how much of this pomp and circumstance is actually necessary, or might be removed in a future software update for the Vision Pro.
Seeing all the work and equipment that went into just getting the unit to be “ready for me” helped me understand the price point. The optical equipment, the personnel, the technology for such a customized experience, has to come from somewhere. Given Apple would have raked in around $1.125B after selling 250K units, I hope they’ve recouped their costs. Now if only there were an iFixit teardown… Oh wait, there is!😀
Note that the entire demo was done while in a sitting position. I was sitting on a chair next to a wooden table. One other person was experiencing a demo at the same time.
Fit and Finish
Sam showed me what the buttons do – a button for the see-through mode, and a “digital crown” like the Apple watch. She also showed me the exact way to place the Vision Pro on my head. Thumb under the nosepiece, and four fingers on the top. Don’t touch the front! I asked what would happen if I did – would it just look ugly? She said yeah, it wouldn’t look good, but otherwise probably nothing. I followed her advice and put the unit on my head. I used the right-hand dial to tighen the unit as close as possible to my liking. Note that, because of the Zeiss inserts, I did not need my glasses on for the demo.
The “eyes” passthrough wasn’t part of the demo.
Once the Vision Pro was on my noggin’ I realized how heavy it is. I have a Quest 3 at home. This unit clearly felt heavier. It wasn’t uncomfortable, but it did feel like I had a decent size computer on my head, which of course I did. Sam suggested I move the strap around a bit. After somem finagling, I figured this was as good as it was going to get. It didn’t feel like it was going to fall off. It just felt front-heavy, like the top-heavy feeling I get when my bourbon-belly body is on rollerblades. I did a search, and the Quest 3 is around 515 grams, while the Vision Pro is around 532.
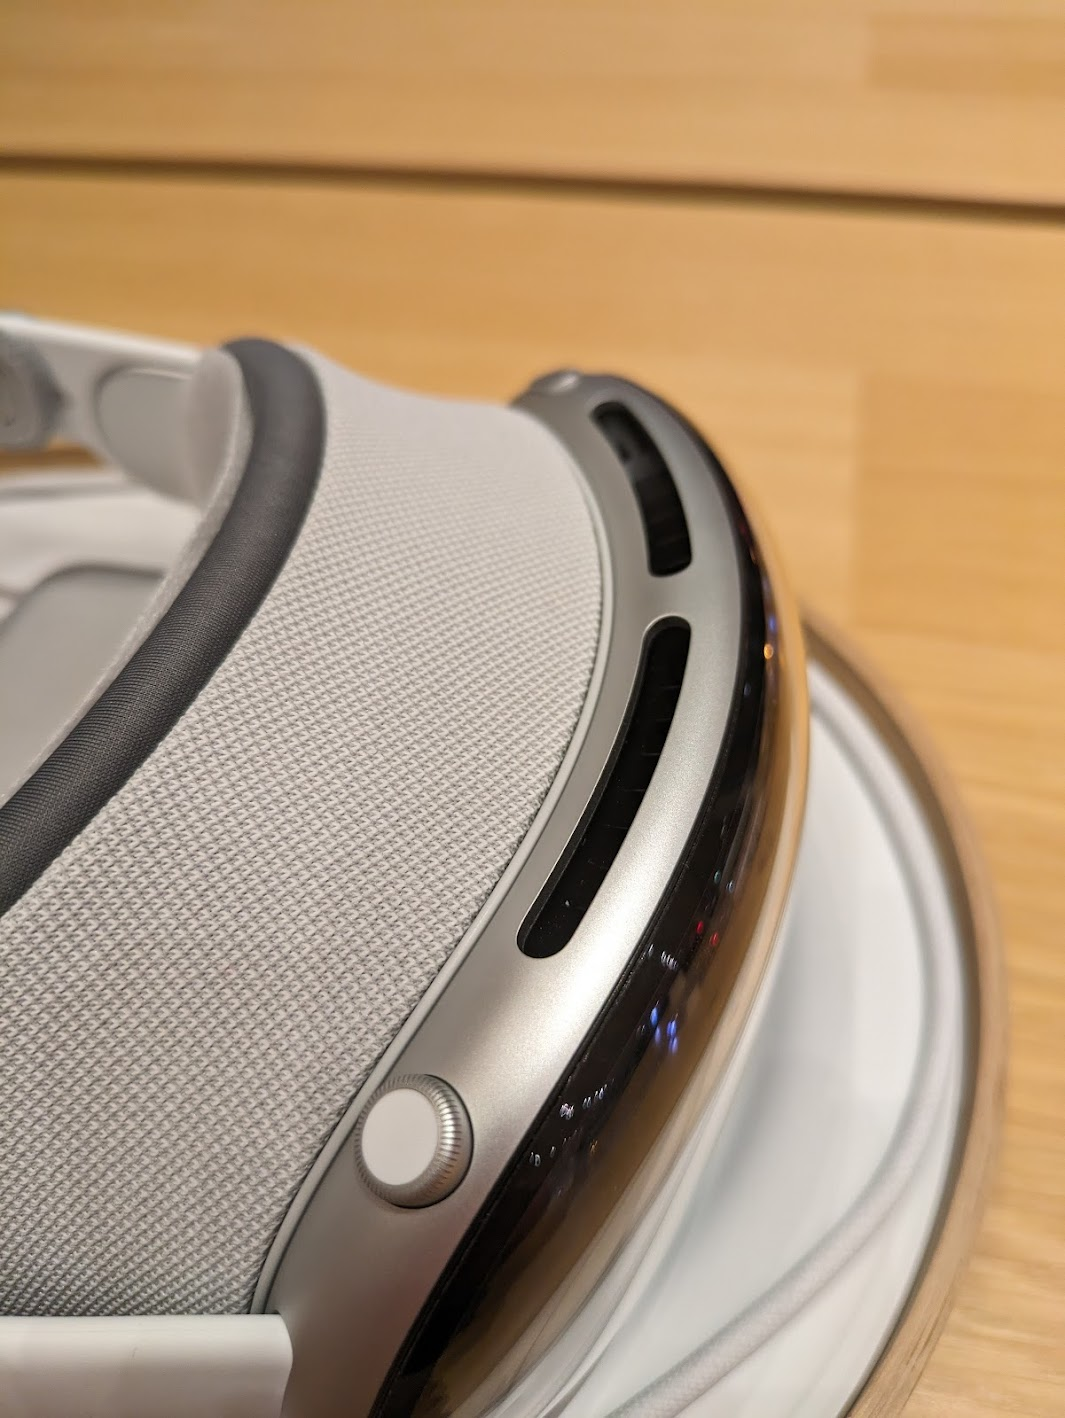
Moving my fingers around I also found the digital crown to be too small. I would use this control device later, and I have to tell you, it needs to be bigger. When you can’t see something, and you want to do small movements with it, and it’s already small, it’s frustrating. Yes, it’s cool, and it fits with the Apple ecosystem, but this needed to be adjusted.
The Digital Crown.
Now, the quality of the materials is top-notch. The strap was incredibly comfortable and disappeared as I used the product. Everything looks clean and precisely engineered. Even the carrying case looks like a high-end The North Face affair. The heaviness did not disappear, however.
The Demo
I should have mentioned earlier that Sam explained she could see everything I was seeing. She had an iPad wirelessly streaming the feed from the Vision Pro. She also had an iPhone that appeared to have the demo script. It was clear Apple wants this demo staged and not free-form. When I would pinch and zoom or move a window before being prompted, Sam would gently verbally nudge me with “Please wait for me.” Sorry, Sam!
First things first was the setup mode. The Vision Pro walked me through mapping my touching and vision. The vision part was interesting – I had to look at each dot on the screen and then pinch my fingers together to “tap” it. Moving my eyes, not necessarily my head, would move an invisible pointer. At the center of my vision – what I’m looking at – becomes what’s selected. It was also incredibly clear and vibrant – so whatever the Zeiss and vision calibration did, it did it well.
The experience is also fascinating from a UI and UX perspective. The center stays focused while items in my “peripheral” vision go out of focus when I move my head, coming into slightly better focus when I stop. In practice, this worked very well. However, the selecting and tapping part was not 100%. I’d say 3 out of 10 times – 30% – when I tried tapping something, the Vision Pro wouldn’t register the tap. Perhaps my hand was under the demo table and I didn’t realize it – but moving my hand closer to the device or further in front of me seemed to solve the issue. I also had to ensure I didn’t lose focus on what I wanted to tap, or I would “miss” or tap the wrong item. After some time using this, I’m sure it would become natural. For the most part it was – but it was clear after 30 minutes Apple has some tweaking to do in its UX, and I can see why this is a scripted demo. But still, damn, it’s amazing.
Once setup was complete, the Apple logo appeared, and I was greeted with the Home Screen. Yes, it looks like the typical iOS home screen layout, just in front of you with your surroundings in semi-transparent fashion in the background. You can tune out your surroundings by rotating the digital crown. I was only allowed to use on of the virtual backgrounds. Sam wouldn’t let me play with others, and she could clearly see via her iPad if I broke the rules. What I did experience, though, was a calming lakeside landscape. It even started raining while I was “there” and that was quite cool, and would have been calming had I not been in the middle of an Apple store. The speakers were loud enough for me to hear the raindrops, but I wasn’t there for that experience. Before you ask – no, I didn’t get a chance to set up the see-through mode that shows my eyes. That’s not part of the demo.
There are three basic gestures on the Vision Pro: Tap, Tap and Drag, and Pinch/Pull to Zoom. The first two are single-hand gestures performed with your dominant hand. The latter requires both hands, and gives you the feeling you’re in [insert Sci-Fi movie here] and manipulating virtual screens in the clear space in front of you. Yeah, it’s pretty cool. Another verbal wrist slap from Sam for me getting ahead of the game.
Demo 1 – Photos
The first demo was launching the classic Apple Photos app. There were many to choose from. Some were “flat” while others had the 3D depth old 3D Android phones were capable of many years ago. Remember the HTC Evo 3D? The flat photo was, well, a photo, and I could zoom in and out as expected. It was perfectly clear, and the colors were sharp and realistic. The 3D photo had true depth, and was shot on an iPhone 15 Pro. Both the 15 Pro and Pro Max support creating 3D and immersive content for the Vision Pro. Apple’s pushing those devices as content creation catalysts, understandbly. Because it was a scripted store demo, I didn’t ask for additional details like format support and technical details. My understanding is other 3D formats are supported, so you’re not limited to just Apple ecosystem solutions.
Demo 2 – Videos
Now for the fun part – video. There was no demo of a flat video here, and that’s fine. Who cares? Every headset does it. You’re not spending $3,500+ for a simple movie theater. There were two demos – one 3D video that wasn’t immersive, meaning it didn’t surround you, and another immersive sports video. The 3D video was cool – a family blowing out the candles on a cake. The frame rate seemed low, maybe 30fps, and reminded me of 3D video from those old 3D Android phones I talked about. It was neat that it was “large” in front of me, but it wasn’t mind-blowing due to having seen it before. Now, I’d like to know if the Quest 3 can do the same. Sam did not appreciate that I played the video more than once. To be fair, she had a lot of patience with me – thank you Sam!
The real treat was the immersive video compilation. It had many immersive videos, all being narrated by someone telling me how great “living the action” is. One was shot with a 360 degree (I think) camera placed on a soccer goal and I could see the game and the ball being kicked into the net. Another was a mountain landscape and I was watching the climber. Another was shot behind first base during a double play. You get the point – incredible action sequences to make you feel like you are there. And it did. It was exhilarating. I recall Sam explaining it was all 8K video. I asked if the screens themselves were 8K, but she wasn’t sure. The detail was phenomenal. Absolutely stunning.
Is there a new market here?
My first thought was Apple TV Plus – what if they started offering this type of content? Is that where it’s headed? I don’t know if it’s viable. Many of you may remember the many, many, MANY failures of trying to bring 3D into the home. Projectors, TVs, special glasses – and the fact 30% of human beings can’t watch 3D content without getting nauseous – it never worked. But they also didn’t have the content, other than more expensive 3D versions of Blu-ray discs. Could Apple stream this type of content? Could they convince people to wear these headsets while watching events such as concerts? I’m not convinced about sports, as I can’t see a bunch of people wearing headsets and drinking beer… Now that I’d like to see. If people generally look funny in VR, that would be a hoot. My point is, Apple certainly has the market position and technologies to make something happen here. What, I’m not yet sure… And Meta may be willing to play ball. If the monopoly regulators have their way, it may be a perfect match…
Demo 3 – Web Browsing and Compatible Apps
The last demo was showing that I could browse the web (Safari, yay?) and run “compatible apps” from the App Store. Meh. It’s iOS, so no surprises here. Cool, but no compelling killer app. The demo app Sam wanted me to run was a cooking app. I won’t be wearing a $3,500 + tax headset near the stove.
The Missing Demo
The Vision Pro content demos were impressive, to be sure. But where was the killer app to sell me on this $3,500 device? Sam kept telling me how this was a “Spatial Computing” device. But never did I see an example of spatial computing. I saw spatial consuming but not spatial creating. I would love to see the results of a survey of the 250,000 purchasers of this product explaining why… and what their income bracket is.
Final Thoughts
I took the Vision Pro off my head and handed it back to Sam. I did this the proper way… thumb under the nosepiece and four fingers on top. I thanked her for the experience and agreed it was quite impressive. I asked how many of these they sold each day. She couldn’t say, other than some people come in and simply buy one outright, no demo needed. It wouldn’t have been fair to ask her why – she’s just selling the unit, and knows fervent Apple fans with an Apple Credit Card are often willing to buy more Apple products (I jest).
But after the demo, I had no incentive to purchase the unit. There was nothing about it, at least during this entertaining 30 minute demo, that left a compelling reason on the table. Certainly not one that made me go “Gosh, I wish my Quest 3 did that!” I do need to determine if the Quest 3, at 1/6 the price, can do 3D video (UPDATE: It does!). But the Vision Pro demo was all about content consumption, and the Quest 3 does effectively the same thing in spades. Oh, and I can play VR games made specifically for its platform (noticeably absent from the Apple demo, but also understandable given the time constraints).
I also left with the feeling of possibility. What the Vision Pro represents, and what could come from such technology, finally, in the content consumption space. And maybe, eventually, in the content creation space, if Apple’s professional applications arm releases whatever they’ve got cooking. Who cares what you call it – spatial computing, VR, or otherwise – if you build something truly compelling.
Either way, the demo was worth it, I got my technologist buzz and my analyst gears working, and still have $3,500 to spend on something else.
CEATEC, the Combined Electronics and Technology exhibition in Makuhari, Japan is this week. The latest innovations from Japanese companies are showcased here, often many months before Americans get a taste. I’ll be posting a reporter’s notebook in a bit. For now, enjoy clicking through videos and photos of cool things found on the show floor!
Panasonic’s Cocotto Children’s Companion Robot
Bowing Vision Violin Improvement Sensors & App
Hitachi Robot for the Elderly, and those with Dimentia
Omron “Ping Pong” Robot, Now with “Smash” Shot Abilities
au’s AR Climbing Wall
Unisys’ Manufacturing Robot That Follows Lines
VR Racer
Takara Tomy Programmable Robot
Dry Ice Locomotion
Airline Customer Service Bot Attendant
Feel the Biker’s Heartbeat
Wind Sensors Paired with Fun Animations
The Trouble with Tribbles – Qoobo Robot
Spider-Like Robot from Bandai
Semi-Transparent Display with Water Effect
Bandai BN Bot
Model Train
Kunshan Plasma
The Many Faces of Robots at CEATEC
There were MANY robots at CEATEC. Many just sit there and answer basic questions. Still, some, like Omron’s Ping Pong robot, can learn and adapt and make a difference.
I recently penned a blog post for Eleven Fifty Academy about how the Crime Watch app came to be. I meet aspiring developers all the time, many with great ideas they want to bring to life through code.