I’m often asked what bourbon or whiskey to buy as a gift. So, I added a Bourbon Bartender video explaining how to tackle that topic. Enjoy!
I recently ran into an issue with Amazon’s “Login with Alexa” – aka LWA – SDK in our Android app. Before releasing to Google Play, I fully tested the app. Logging in with Alexa worked flawlessly, and I was able to register my Amazon Alexa device.
Everything was looking good in the app, so I uploaded it to Google Play and released it to Production. A few hours later, the app was approved, and available for download to Android apps around the world. w00t!
A week or so later, a partner was testing the app and said “Hey, Amazon login doesn’t work!” Considering I had tested this 7 ways to Sunday, I found that hard to believe. But still, I had to test it.
Sure enough, I downloaded the app from Google Play, went to login with Alexa, and received an error: “Cannot connect to Amazon Alexa.”
WHAT?!?! It worked with the exact same APK I had uploaded. What the heck changed? Certainly, Google doesn’t change the code upon uploading, do they? How could they? Conspiracy theories aside, my team started looking into it.
When we’d logcat the PROD version, we’d see these telling entries:
2021-07-08 10:01:58.966 17695-6047/? I/com.amazon.identity.auth.device.api.authorization.AuthorizationManager: com.our.appname calling authorize
2021-07-08 10:01:58.972 17695-6047/? W/com.amazon.identity.auth.device.appid.APIKeyDecoder: Failed to decode: Decoding failed: certificate fingerprint can't be verified! pkg=com.our.appname
2021-07-08 10:01:58.972 17695-6047/? W/com.amazon.identity.auth.device.appid.APIKeyDecoder: Unable to decode APIKey for pkg=com.our.appname
It turns out, our signing process was the culprit. Our production LWA API key was generated in the Amazon developer portal using our original keystore’s thumbprint and SHA-256 hash. However, we use Google’s managed key service, which maintains the app signing key in Google Play. This is important, just in case you ever lose your keystore. Old timer Android devs know this nightmare…
So how do we fix this? How do we use a different LWA API key when releasing to Google Play, yet still enable our beta testers to use our sideloaded Dev builds? We definitely don’t want to lose our CI/CD pipeline to a manual process!!
Android build variants to the rescue.
The LWA API key is generally stored under assets/api_key.txt. However, that one was only the debug key. We needed one for both our debug and release build configurations. Luckily, you can simply add build folders for this and Android’s build system will take care of the rest! You don’t need to work with Gradle source sets!
To fix this, under the src/ folder, we added two new folders:
These are in addition to the typical:
As long as “replacement” entries exist in the build configuration-specific folders, the Android compiler will choose those assets over those under main/.
There’s more information about how to do this via the Android Studio UI here. Just keep in mind the UI approach is a slow process. Sometimes menu options you’re expecting don’t appear until gradle has finished doing its job.
Alright, to solve this problem, we need a new LWA API key based on our Google Play signing key. Thankfully, Google makes this easy to obtain.
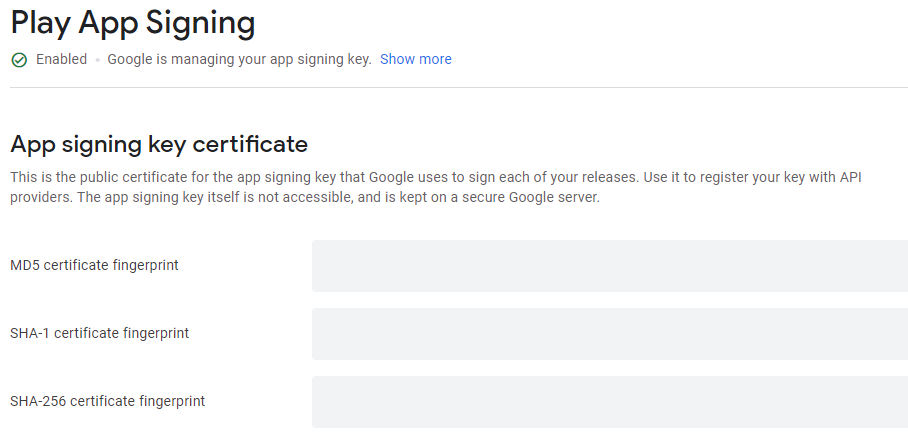
We retrieved our Google Play thumbprint and hash from the Google Play Developer Console and going to <AppName> > Setup > App Integrity, and found our MD5 certificate fingerprint and SHA-256 certificate fingerprint:
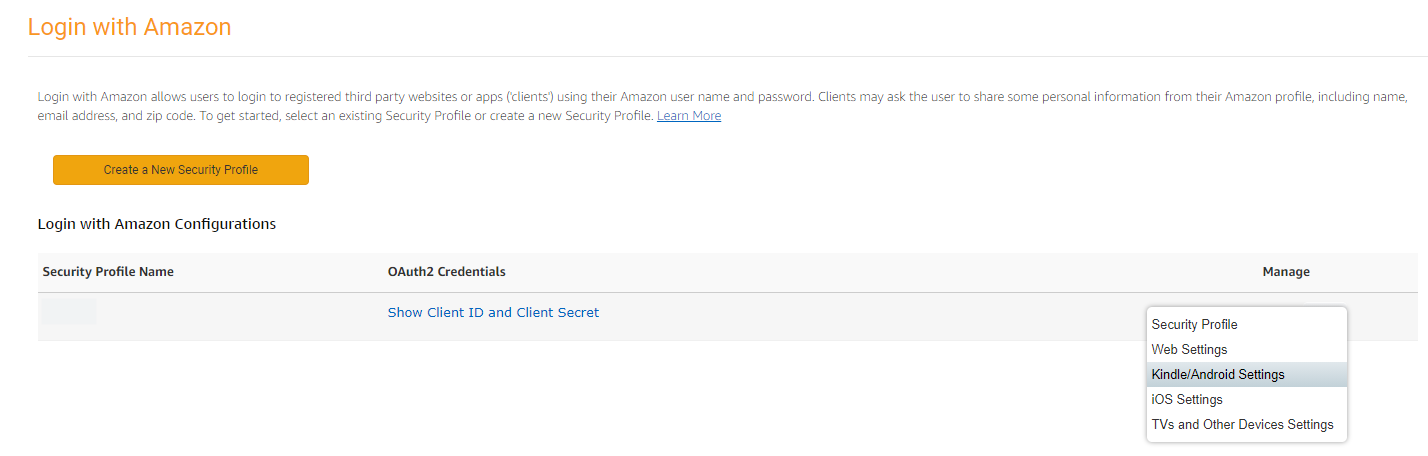
Then we moseyed on over to the Login with Alexa Console, chose Kindle/Android Settings for our security profile, and added a second key:
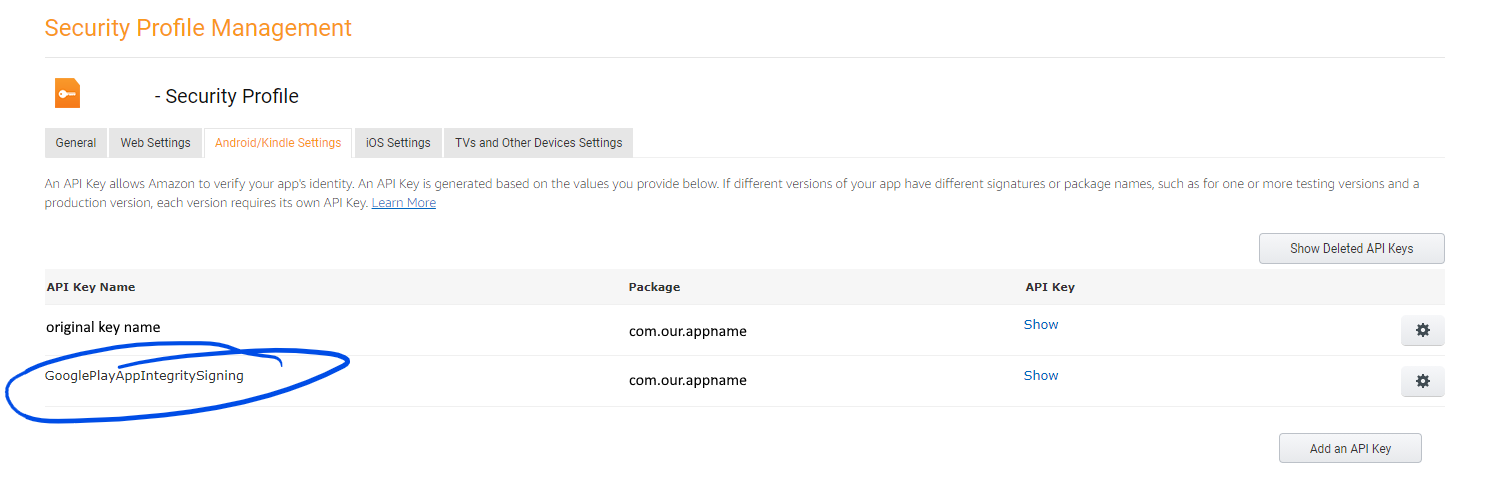
Once we had the new API key – which you can retrieve by clicking Show – we added a new api_key.txt file under src/release/assets and inserted the new key there.
We then moved the non-Production API key from src/main/assets/api_key.txt to src/debug/assets. It no longer needed to be located under src/main/assets because we only want the configs for debug and release. If you have other build configs, you may need to create additional folders.
This enabled our CI/CD pipeline to continue to distribute DEV builds that work, and to also generate PROD builds we could successfully distribute via Google Play.
I hope this helps anyone else having the same issue!
A friend with a hearing aid was having issues after upgrading to a new Android phone. He could pair the device with his phone, but couldn’t make or receive phone calls. What the heck – he used the app, and nothing worked like before! I worked on it for about an hour, and finally figured it out… What a terrible experience for him, so I hope this helps others. It boils down to the hearing aid requiring two different Bluetooth connections to make things work. This is very common with headphones, actually.
For those interested in the root of the issue: You have to set up the Bluetooth Classic connection before the Bluetooth Low Energy – a.k.a. BLE – connection. If you set them up in the opposite order, the hearing aids stop advertising Bluetooth Classic and you’re stuck with being frustrated. It’s probably a firmware issue Phonak needs to address. Unfortunately, that requires taking the device to a service center – not an optimal solution for those needing hearing aids.
This article assumes you already have the Phonak app installed on the new phone.
Step 1 – Unpair the Hearing Aids From The Previous Device
Make sure your hearing aids are no longer paired to the old device. In the Phonak app, choose Forget Device. I’m not sure of the actual verbiage, as I’m writing this without having the app handy. Then, under Bluetooth Settings in Android, tap the widget wheel next to all the Phonak entries, and choose Forget Device or Unpair Device.
Step 2 – Factory Reset the Hearing Aids
Make sure the hearing aids are off. You can do this by holding the power button on each bud until the light turns red and letting go. Once they’re off, count 5 seconds. Now, on each bud, hold the power button until the orange light turns on and then off – don’t let go until it turns OFF. Then, power down the ear bud again.
Step 3 – Power On the Hearing Aids
Now that they’re reset, power them on again. You can do this by holding the power button until the green light flashes, then letting go.
Step 4 – Pair Bluetooth Classic
Do *not* launch the app first. Go to Bluetooth settings on your phone, then Scan for devices, and choose the Phonak device that has a headphone icon next to it. You’ll see a couple icon types – but you need the one entry that has the headphone icon. This indicates the “Bluetooth Classic” connection, if you’re interested in such technical details. Accept the pairing request prompts that will show up after you tap to pair. If prompted to make/receive phone calls with the device, confirm you want to do so.
Step 5 – Pair Bluetooth LE
Now that you’ve paired Bluetooth Classic, launch the Phonak app and run through its setup process.
Step 6 – Done!
You should be good to go. I hope this helps those of you frustrated by such a crazy experience.
So I recently ran into an issue where Microsoft AppCenter wouldn’t build my Android APK… It would find the source, build successfully, then fail to find the resulting APK.
If you’re running into this issue, try the following:
This is based on @johnclarete’s idea, which I had to modify due to it relying on Flutter’s config.
Find the android { part of the file and paste in the buildTypes part:
android {
compileSdkVersion 30
buildTypes {
appcenter {
applicationVariants.all { variant ->
variant.outputs.all {
def currentFile = new File(outputFileName)
def filename = currentFile.getName()
outputFileName = "../../../../../Application/Application/build/outputs/apk/${filename}"
}
}
}
}

That worked for me. I hope this helps others.
My friend Mark and I recently installed a VR pulley system. It’s a much less expensive alternative to Wireless VR solutions, none of which exist for Windows Mixed Reality, which is my headset type.
You can watch the video below:
Special thanks to Thrill for his three-axis pulley suggestion.
A friend reached out today and asked “Hey, I need my splash screen to be themed based on whether Dark Mode is selected on the Android device.” I had never done that before, so I was curious how it should be done.
Dark Mode is new to Android 10, a.k.a. Android Q. Not as tasty, but hey, gotta ship something. It has a range of benefits, such as lower energy consumption, looking cool, and frustrating developers without budget for theme-aware apps.
It turns out, after some sleuthing, it’s relatively straightforward.
First, this article assumes you’re following the “splash screen as a theme” approach, which you can learn more about here. The example is for Xamarin.Forms, but the same approach applies to regular Android development.
Basically, you have a “splashscreen” style, and you set it as your app’s theme in the Android manifest. Then, you “swap” to the real theme in MainActivity. For example, what I use in an app, located in resources/values/styles.xml:
<!-- Splash screen style --> <style name="splashscreen" parent="Theme.AppCompat.DayNight"> <item name="android:windowBackground">@drawable/splash</item> <item name="android:windowNoTitle">true</item> <item name="android:windowIsTranslucent">false</item> <item name="android:windowIsFloating">false</item> <item name="android:backgroundDimEnabled">true</item> </style>
Note my drawable. I want a different drawable for my dark vs. light (normal) theme. Here’s what is different:
In this example, I haven’t yet added the other folder variations, but you get the point.
The theme swap code in MainActivity is as follows:
protected override void OnCreate(Bundle savedInstanceState)
{ TabLayoutResource = Resource.Layout.Tabbar; ToolbarResource = Resource.Layout.Toolbar; // Swap back to the normal app theme. We used Splash so we didn't have to create a special activity. // Cute hack, and better approach. // Idea from URL: https://xamarinhelp.com/creating-splash-screen-xamarin-forms/ Window.RequestFeature(WindowFeatures.ActionBar); SetTheme(Resource.Style.MainTheme);
That’s all there is to it. If Dark mode is enabled, the splash.png from the -night folder will be used, otherwise the normal image will takes its rightful place.
If you have any questions, please hit me up in the comments.
Special thanks to this StackOverflow article for the –night hint.
More info on Android Dark Theme can be found here.
This past week, I had the opportunity to write an app to handle scanning in patients for CoViD testing in our city, Fishers, Indiana. Fishers is one of the top 10 places to raise a family in the United States. Reinforcing that reputation, the city is providing free CoViD testing to all 90,000 residents, free of charge. The process is simple:
Seems simple, right? Our city isn’t using the painful “touch the back of your eyeball” technique, either. Instead, it’s at the front of the nasal cavity – simple, painless, and you get results. It also ensures contact tracing where there are infections, so as a community we can help prevent the spread of disease.
The problem is, roughly a week ago, Step 3 didn’t exist. The patient ID was from a survey with a QR code. The kit didn’t have any identifier whatsoever – it’s just one of many bagged kits in a box. And this data was being manually entered by other entities running similar tests. To give you an idea of how prone to error this process is, consider the patient ID looks like this:
Any chance for typos much? And that doesn’t solve the kit identifier problem – because there isn’t one.
So, last Saturday, I received an email from our City’s IT Director. He wanted to know if I knew anyone who could marry the patients’ ID with the kit ID for proper tracking. If you know me, this type of project is right up my alley. This project screamed MOBILE APP! I said “I’ll do it!” It would be like a weekend hackathon!
Most cities aren’t offering CoViD testing, and not a single state is offering such a service to all residents. Fishers is different – we’re a “vibrant, entrepreneurial city,” as our awesome forward-thinking mayor, Scott Fadness, often exclaims. His team takes novel approaches to addressing community needs, and this was no different.
Where there is testing, as I understand it, it’s with PCs and handheld scanners. What a nightmare it must be to keep such a setup running – with a laptop, with software that’s manually installed, and patients scanned with a handheld that can’t scan through glass. I’ve worked with those setups before – the technology issues are a huge PITA. Let alone deploying updates in any timely fashion!
We decided at the get-go a mobile app would be the right approach. When asked about barcode scanners, I explained “We don’t need one.” The built-in cameras on modern day cell phones are more than capable of scanning any type of barcode, QR code, and so forth. As an added bonus, any cell phone we use will have Internet connectivity, with Wi-Fi as a backup. The beauty of it is one single device, one single app, everything self-contained and easy to use.
The beauty of it is one single device, one single app, everything self-contained and easy to use.
After our initial discussion, and a bit of back and forth, this was the decided-upon workflow:
And this was the mockup:
Figure: Rough brain dump with ideas.
Initially, we talked about generating the Kit barcode on the mobile device, then printing it to a wireless printer in the testing bay. This certainly seemed possible. However, the more I thought about it, the more I realized we could simply pre-print the labels and affix them as needed. This would provide some obvious benefits:
The key is to get the patients in, tested, and out as efficiently as possible. The simpler we kept the process, the less could go wrong. So, on-demand printing was eliminated, and we’d simply pre-print labels instead. They’d be affixed to the test kit and then assigned to a patient.
Determining the app dvelopment approach, I took into consideration every mobile app I’ve built generally has had three primary needs that must be addressed:
For Need 1, we knew we had a QR Code. BUT how would we know it’s valid? How would we get the patient data? Well, it just so happened the survey provider had an API. Sweet! We hopped on a call with them and they provided an API key and documentation. That’s how API access should work! They even provided a RegEx to validate the scanned patient ID, which internally to then was actually just a survey ID.
What about the kits? We decided to use a CODE39 barcode font and print on standard Avery labels. We came up with a standard naming and numbering convention, a RegEx to validate, and would pre-print them – a few hundred per day. This would ensure the labels were verifiable after scanning, and that printing wouldn’t be an issue each day. We’d take care of technology problems beforehand – such as printer issues – so they wouldn’t impact patient processing.
Figure: A combination of Excel to generate the labels following the naming convention, plus mail merge to insert into on the off-the-shelf labels.
OK, now for Need 2… We can get the data, but we have to store it somewhere. Initially, we thought about building a separate back-end. The survey provider, Qualtrics, explained we could send the data back to their system and store it with the initial survey. Well, that was much better! No new storage API development was needed, as they already had the infrastructure in place. Building a new, solid, secure API in a short period of time would have been no small task.
For Need 3, the user experience, I borrowed my grandfather’s phrase: It must require a PH, D. Push Here, Dummy. I wanted “three taps and a send,” as follows:
It must require a PH, D. Push Here, Dummy.
That’s it – no chance for typos, and verification at every step, helping things go right. Little animations would show when a step had been completed, and scans could be done in any order.
Figure: Texting back and forth, getting our bases covered.
We’re building a mobile app here, and we may need it for multiple platforms. iOS – both iPhone and iPad, Android, and perhaps even Windows. Building each platform separately would take a lot of time to complete – time we didn’t have. It was April 25, we needed to be testing by April 27, and we were going live May 1.
The right choice was Xamarin with Xamarin.Forms – Microsoft’s cross-platform mobile framework. It’s similar to React Native, but you have full access to the underlying platform APIs. That’s because you’re building a real native app, not an interpreted overlay. With a single solution, we could build the iOS, Android, and UWP (Windows) apps, with 90% or more code sharing. I’m a Xamarin certified mobile developer, so this was going to be fun!
Figure: The Xamarin app in Visual Studio.
Within a few hours, I had an alpha version of the app running. It was rough, and didn’t have the best UI, but it was scanning and talking with the Qualtrics API. Hey, once the base stuff’s working, you can make it look pretty!
The app consisted of a few core components:
Figure: Build 1 of the app. I first tested with my Android device, then rolled out to iOS, testing on both an iPhone and iPad.
I also had to ensure scanning went off without a hitch. After all, that’s what this app is doing – getting all the data quickly, then tying it together. I configured the scanning solution to only scan QR codes when scanning the patient ID, and only CODE39 barcodes when scanning kits. That way, if the codes were next to each other, the tech wouldn’t scan the wrong item and cause confusion. Remember, the technicians are medical techs, not computer techs – any technology problem could stop the patient processing flow. We needed to ensure the technology didn’t get in the way. You do that by testing thoroughly, and keeping the end user in mind.
Figure: QR code and CODE39 barcodes for testing.
Once the UI was working, I added final touches to the UX to make it friendly and easy to use:
So the app was in a good state. How were we going to get it on devices? This isn’t an app that we want in the App Store. It’s not a general consumer app – at least, not yet. TestFlight to the rescue! We’d push it to Apple’s TestFlight app testing service, then enroll all the iOS devices. That would ensure that, as we tweaked the app, we could quickly push the updates without any messy manual installs.
For those that have deployed iOS apps before, you know this isn’t a fast process. The first version of any app into TestFlight must be reviewed by Apple. I uploaded the first version and waited…
Roughly a day later, Apple rejected the app. BUT WHY? Well, we hadn’t provided any sample QR codes or bar codes to scan, so they rejected it. UGH! Really?? I didn’t even know that was a testing requirement! You learn something new every day… So I sent a URL with some examples to test with, as you can’t upload files to the testing site, and waited. Hours later, thankfully, Apple approved the app for testing!
Figure: Apple beta review rejection email.
We enrolled the various iPhones and iPads in TestFlight and we were able to start testing. Other than a restriction with SSL over the City’s network, which was quickly resolved, we had our devices ready to go. Not bad for under 48 hours!!
Note that, once an app is in TestFlight, additional builds go through almost instantly. This ensured we could tweak as needed and not wait 24+ hours to validate each time.
Figure: We could release updates with velocity after the initial approval.
We wanted to make sure the app worked without a hitch. A day before release, we had a “dress rehearsal.” Everyone would be ready for the testing, and we’d introduce the app. It’s a small part, but it ties it all together. Tracy, the I.T. Director, and I had been testing in earnest prior to this time, and we were feeling pretty good about it.
That morning, I walked the users through the app, joking about the PH, D requirement. Prior to my arrival, they had been testing the process on one of our citizens, who must have been quite tired from all the work:
The pressing questions were:
Here are a few photos from that morning – that was a lot of fun!
Day 1 was here, and real citizens were about to get tested. I slept well the night before, knowing we had tested thoroughly. We only had one hiccup: The QR code in the email was different than the QR code on the confirmation website. This was causing validation errors, as the website QR code’s patient ID couldn’t be found in the system. Not an app issue, but that doesn’t matter.
Figure: Ruh-roh! The QR codes weren’t matching between different sources. Yellow alert!
The survey provider quickly addressed the issue and we were good to go. It wasn’t a big deal – they provided a website to manually enter the patient ID for scanning with a properly generated QR code, and it barely impacted patients. Day 1 was a rousing success!
Going from no-app to app being used with patients in less than one week was an incredible experience. It feels great to help the community during this period of uncertainty. I’m grateful our city wanted to make the process as seamless as possible, using technology to help things go right, and providing the opportunity me to assist. I’m thankful that, once again, Xamarin was a great solution.
I’ll probably have a technology walk-through in the near future – I didn’t want to concentrate on the underpinnings of the application for this article. I’ll leave that to a discussion for the Indy Xamarin Meetup.
Figure: The final app, with my info scanned in.
I recently started in the Fishers Youth Mentoring Initiative, and my mentee is a young man in junior high who really likes lizards. He showed me photos of them on his iPad, photos of his pet lizard, and informed me of many lizard facts. He’s also a talented sketch artist – showcasing many drawings of Pokemon, lizards and more. Oh, yeah, he’s also into computers and loves his iPad.
Part of the mentoring program is to help with school, being there as they adjust to growing up, and both respecting and encouraging their interests.
It just so happens that he had a science project coming up. He wasn’t sure what to write about. His pet lizard recently had an attitude shift, and he figured it was because it wasn’t getting as much food week over week. Changing that, he realized its attitude changed. So, he wanted to cover that somehow.
Seeing his interest in lizards, drawing, and computers I asked if we could combine them. I suggested we build an app, a “Reptile Tracker,” that would help us track reptiles, teach others about them, and show them drawings he did. He loved the idea.
We only get to meet for 30 minutes each week. So, I gave him some homework. Next time we meet, “show me what the app would look like.” He gleefully agreed.
One week later, he proudly showed me his vision for the app:
![]()
I said “Very cool.” I’m now convinced “he’s in” on the project, and taking it seriously.
I was also surprised to learn that my expectations of “show me what it would look like” were different from what I received from someone both much younger than I and with a different world view. To him, software may simply be visualized as an icon. In my world, it’s mockups and napkin sketches. It definitely made me think about others’ perceptions!
True to software engineer and sort-of project manager form, I explained our next step was to figure out what the app would do. So, here’s our plan:
Alright, time for the next assignment. My homework was to figure out how to do it. His homework was to draw up the Lizard, Snake, and Turtle that will be shown in the app.
Challenge accepted!
I quickly determined a couple key design and development points:
The weekend came, and I finally had time. I had been thinking about the app the remainder of the week. I woke up early Saturday and drew up a sketch of the tracking page, then went back to sleep. Later, when it was time to start the day, I headed over to Starbucks…

I broke out my shiny new MacBook Pro and spun up Visual Studio Mac. Xamarin Forms was the perfect candidate for this project – cross platform, baby! I started a new Tabbed Page project, brought over some code for taking photos with the Xam.Plugin.Media plugin and resizing them, and the beta Xamarin.Essentials plugin for eventual geolocation and settings support. Hey, it’s only the first week ![]()
Side Note: Normally I would use my Surface Book. This was a chance for me to seriously play with MFractor for the first time. Yay, even more learning this weekend!
Now that I had the basics in there, I created the interface for the Image Recognition Service. I wanted to be able to swap it out later if Azure didn’t cut it, so Dependency Service to the rescue! Here’s the interface:
using System.IO;
using System.Threading.Tasks;
using Microsoft.Azure.CognitiveServices.Vision.ComputerVision.Models;
namespace ReptileTracker.Services
{
public interface IImageRecognitionService
{
string ApiKey { get; set; }
Task<ImageAnalysis> AnalyzeImage(Stream imageStream);
}
}
Now it was time to check out Mike’s article. It made sense, and was close to what I wanted. However, the packages he referenced were for Microsoft’s Project Oxford. In 2018, those capabilities have been rolled into Azure as Azure Cognitive Services. Once I found the updated NuGet package – Microsoft.Azure.CognitiveServices.Vision.ComputerVision – and made some code tweaks, I ended up with working code.
A few developer notes for those playing with Azure Cognitive Services:
And here’s the implementation. Note the implementation must have a parameter-less constructor, otherwise Dependency Service won’t resolve it.
using Microsoft.Azure.CognitiveServices.Vision.ComputerVision;
using Microsoft.Azure.CognitiveServices.Vision.ComputerVision.Models;
using System;
using System.Collections.Generic;
using System.Diagnostics;
using System.IO;
using System.Threading.Tasks;
using ReptileTracker.Services;
using Xamarin.Forms;
[assembly: Dependency(typeof(ImageRecognitionService))]
namespace ReptileTracker.Services
{
public class ImageRecognitionService : IImageRecognitionService
{
/// <summary>
/// The Azure Cognitive Services Computer Vision API key.
/// </summary>
public string ApiKey { get; set; }
/// <summary>
/// Parameterless constructor so Dependency Service can create an instance.
/// </summary>
public ImageRecognitionService()
{
}
/// <summary>
/// Initializes a new instance of the <see cref="T:ReptileTracker.Services.ImageRecognitionService"/> class.
/// </summary>
/// <param name="apiKey">API key.</param>
public ImageRecognitionService(string apiKey)
{
ApiKey = apiKey;
}
/// <summary>
/// Analyzes the image.
/// </summary>
/// <returns>The image.</returns>
/// <param name="imageStream">Image stream.</param>
public async Task<ImageAnalysis> AnalyzeImage(Stream imageStream)
{
const string funcName = nameof(AnalyzeImage);
if (string.IsNullOrWhiteSpace(ApiKey))
{
throw new ArgumentException("API Key must be provided.");
}
var features = new List<VisualFeatureTypes> {
VisualFeatureTypes.Categories,
VisualFeatureTypes.Description,
VisualFeatureTypes.Faces,
VisualFeatureTypes.ImageType,
VisualFeatureTypes.Tags
};
var credentials = new ApiKeyServiceClientCredentials(ApiKey);
var handler = new System.Net.Http.DelegatingHandler[] { };
using (var visionClient = new ComputerVisionClient(credentials, handler))
{
try
{
imageStream.Position = 0;
visionClient.Endpoint = "https://eastus.api.cognitive.microsoft.com/";
var result = await visionClient.AnalyzeImageInStreamAsync(imageStream, features);
return result;
}
catch (Exception ex)
{
Debug.WriteLine($"{funcName}: {ex.GetBaseException().Message}");
return null;
}
}
}
}
}
And here’s how I referenced it from my content page:
pleaseWait.IsVisible = true; pleaseWait.IsRunning = true; var imageRecognizer = DependencyService.Get<IImageRecognitionService>(); imageRecognizer.ApiKey = AppSettings.ApiKey_Azure_ImageRecognitionService; var details = await imageRecognizer.AnalyzeImage(new MemoryStream(ReptilePhotoBytes)); pleaseWait.IsRunning = false; pleaseWait.IsVisible = false; var tagsReturned = details?.Tags != null && details?.Description?.Captions != null && details.Tags.Any() && details.Description.Captions.Any(); lblTags.IsVisible = true; lblDescription.IsVisible = true; // Determine if reptiles were found. var reptilesToDetect = AppResources.DetectionTags.Split(','); var reptilesFound = details.Tags.Any(t => reptilesToDetect.Contains(t.Name.ToLower())); // Show animations and graphics to make things look cool, even though we already have plenty of info. await RotateImageAndShowSuccess(reptilesFound, "lizard", details, imgLizard); await RotateImageAndShowSuccess(reptilesFound, "turtle", details, imgTurtle); await RotateImageAndShowSuccess(reptilesFound, "snake", details, imgSnake); await RotateImageAndShowSuccess(reptilesFound, "question", details, imgQuestion);
That worked like a champ, with a few gotchas:
Before I get into the results, I wanted to point out I spent significant time prettying things up. I added animations, different font sizes, better icons from The Noun Project, and more. While the image recognizer only took about an hour, the UX took a lot more. Funny how that works.
So I was getting results. I added a few labels to my view to see what was coming back. Some of them were funny, others were accurate. The tags were expected, but the captions were fascinating. The captions describe the scene as the Computer Vision API sees it. I spent most of the day taking photos and seeing what was returned. Some examples:
Most of the time, as long as the subjects were clear, the scene recognition was correct:

Or close to correct, in this shot with a turtle at Petsmart:

Sometimes, though, nothing useful would be returned:

I would have thought it would have found “White Castle”. I wonder if it won’t show brand names for some reason? They do have an OCR endpoint, so maybe that would be useful in another use case.
Sometimes, even though I thought an image would “obviously” be recognized, it wasn’t:

I’ll need to read more about how to improve accuracy, if and whether that’s even an option.
Good thing I implemented it with an interface! I could try Google’s computer vision services next.
We’re not done with the app yet – this week, we will discuss how to handle the scoring. I’ll post updates as we work on it. Here’s a link to the iOS beta.
Some things I’d like to try:
Please let me know if you have any questions by leaving a comment!
Want to learn more about Xamarin? I suggest Microsoft’s totally awesome Xamarin University. All the classes you need to get started are free.
Update 2018-11-06:
I ran into this issue this week. I would define the Source as a URL and then, nothing…
It turns out, with FFImageLoading, an indispensable Xamarin.Forms plugin available via NuGet, you must also set the ErrorPlaceholder property if loading your image from a URL. That did the trick – images started loading perfectly!
I’ve reported what I think is a bug. I haven’t yet looked at their code.
Here’s an example of how I fixed it:
Working Code:
<ff:CachedImage
Source="{Binding ModelImageUrl}"
ErrorPlaceholder="icon_errorloadingimage"
DownsampleToViewSize="True"
RetryCount="3"
RetryDelay="1000"
WidthRequest="320"
HeightRequest="240"
Aspect="AspectFit"
HorizontalOptions="Center"
VerticalOptions="Center" />
Non-Working Code, note the missing ErrorPlaceholder property:
<ff:CachedImage
Source="{Binding ModelImageUrl}"
DownsampleToViewSize="True"
RetryCount="3"
RetryDelay="1000"
WidthRequest="320"
HeightRequest="240"
Aspect="AspectFit"
HorizontalOptions="Center"
VerticalOptions="Center" />
I hope that helps others with the same issue. Enjoy!