Are you having a bad day? Been working on a problem for hours, days. No matter what you do, what approach you take, the issue won’t budge? Even Copilot/Claude/etc. can’t fix it?
Well, friend — GO GET YOURSELF A WIN!
Stop. Stop what you’re doing right now. Go do something else you KNOW you can work on AND get a WIN. It sounds cheap, but it’s cathartic.
Getting the win motivates you to get over the loss. It treats your imposter syndrome.
We fail all the time as developers. And sadly school teaches people to win — to get A’s. It should be teaching us how to learn from losses — because those can happen a lot more in life than wins.
The beauty is we’re in a career where failure is expected. Definitely not like being a doctor!
It doesn’t matter how many F’s you get as long as you get an A. Sometimes you need to get yourself some A’s to get yourself out of the funk.
To change your focus.
So, the next time you’re stuck and the universe is pushing against you, learn to stop.
Go get a win.
Then pick up the troubling problem a day later.
And maybe that will get you another win.
This approach has worked for me many times, and for other devs I’ve suggested it to.
Did it work for you? Let me know what you think in the comments.
Having submitted an app with In-App purchases – specifically, subscriptions – to Apple’s store, our development team at M3 learned a lot about what will prevent a successful app submission. I hope this compiled list helps you get your app approved quickly, and prevent weeks of headaches.
I will update this article from time to time as more lessons are learned. I hope this article – and all the developer experience I’m relaying on behalf of others and myself – helps you!
An In-App Purchase Must Be Approved Before the App is Released
An In-App Purchase must be in the “Approved” state before it can be used in your app. This means Apple must test any new In-App Purchase Product or Subscription in your app release before anyone can purchase it, including you.
You Must Test In-App Purchases Work – Use the Sandbox Account
As explained above, it can seem like a “chicken and egg” problem. How do you test a product in production when it first must pass testing to get into production? This is where Sandbox accounts come into play. Under Users & Access in App Store Connect, you can assign Apple IDs that are allowed to purchase.
Note that these purchases don’t cost anything, but they can also expire. Make sure you stay on top of your sandbox purchases. Also, make sure you track the original purchase IDs coming back from the API. These will come in handy later when you need to restore subscriptions, which is anothe requirement.
Your App Must Provide a Mechanism to Restore the Subscription
It’s not enough to simply check Apple’s server to see if there is a valid subscription. You must offer an option in the UI (user interface) to explicitly restore.
It’s possible you will still be rejected for this reason. That can be due to Apple’s tester not being able to find the option. So, when you submit your testing instructions, make sure you point out where the option is. If they still say it isn’t there, politely reply to them with a screen shot proving you have such a feature.
You Must Show What the Expired Subscription Experience Looks Like
Make sure you provide an account, with credentials, that can be used to show off the app when a subscription has expired. Just include the credentials in the testing instructions. This should be a different account than the sample credentials you provide Apple for general testing.
Your App Must Clearly Explain What Benefits a Subscription Has vs. a Free Account
You must clearly describe what you get with a free account vs. a paid account. If there is no obvious benefit, Apple may reject you.
Your App Must Clearly Explain The Renewal Terms and Price
You must also be clear about your renewal terms, such as monthly, yearly, and so forth, and pricing. If it’s not clear, Apple can reject you.
It Must be Easy to Cancel Within Your App
It’s not enough that Apple lets you cancel from the App Store UI. You must also provide a button to allow cancelling your subscription.
When Verifying a Subscription Exists, Check BOTH Production AND Sandbox Environments
Apple may subscribe via Sandbox. So, if you only check Production when restoring accounts, you will fail to be approved because Apple won’t be able to restore their subscription. Always check Production first, then fall back to Sandbox.
Note Subscriptions Are Tied to Apple Accounts, Not Your Service’s Accounts
This was a big one. You can only have one subscription of each type per Apple account. However, your service may support multiple accounts. Make sure you track which account from your service subscribed, and tie that to the Apple original subscription ID. If you don’t, it’s possible you’ll be handing out “free” accounts to creating additional accounts under the same Apple ID.
You Can’t Generate Promo Codes Until the App is Approved
Unlike Google, Apple will only let you generate promo codes AFTER the app has been approved. Also, for subscriptions, Apple limits you to 100 promo codes with a 30 day expiration. Make sure you factor this into your testing and soft rollout plans.
Create Separate Test Accounts for Apple to Use
Don’t give Apple accounts your developers are using. Give them accounts that are in the exact state you need them to see. Developer accounts are too “in flux” to be reliable, and your own developers may interfere with Apple’s testing.
Be Thankful for (and take advantage of) Apple’s Feedback System
Apple likely has access to more testers than you do. There are aspects of In App Purchases you may not know how to test, or that you had to test in the first place. So, if you feel your app is in a submittable state and want to see if you covered everything, submit a build to Apple. They can give you a sanity check / smoke test you didn’t miss anything. If you pass the In App Purchases part of Apple’s testing, the rest may be smoother sailing 😉
Have you run into a FileNotFoundException when attempting to generate a JWT token using ECDsa.Create()? Well, you’re not alone… This will work locally, but not work in Azure. Especially on certain Azure instance types.
I ran into this issue when attempting to create a JWT token for Apple In-App Purchase API access.
Easy fix, though! Under App Settings in Environment Variables add the following setting:
WEBSITE_LOAD_USER_PROFILE = 1
This is because, even though it’s not reading a file, it throws that error. It’s silly, I know, but hey…
Additional info gleaned from Copilot:
🧠 What’s Likely Happening
The ECDsa implementation on Windows relies on CNG (Cryptography Next Generation), which sometimes expects access to user profile directories or system-level key stores—even if you’re passing in a byte array.
On S0 App Service plans, the environment may lack access to certain native crypto libraries or user profile loading, causing CngKey.Import() to throw a "File Not Found" error.
✅ Additional Tips
Make sure your private key is in PKCS#8 format and uses a supported curve like nistP256.
If you’re using .NET 6 or later, consider switching to OpenSSL-based implementations via Linux App Service plans, which tend to be more predictable for ECC operations.
For Elastic Premium plans, this issue is even more persistent unless the workaround is applied.
I had this issue after switching from an Azure app service to DiscountASP.net. I just had to add the following to the web.config to fix the IIS config:
The first time I tried this it did not work. However, I emailed support and they explained THEY had to fix it “at the root.” So, for what it’s worth this does work, but in a shared hosting environment, you may need to put it in the server’s web.config, possibly replacing the rule name to what’s appropriate for your hosting provider.
Ever want to run your AWS lambda functions locally so you can debug efficiently? Well, the documentation for doing so isn’t in one nice, convenient location. Still, the tools ARE THERE. You just need instructions on what to set up and how. That’s what this article will attempt to help you accomplish.
Assumptions
I’m assuming a Windows and Visual Studio environment here. If that’s not your go-to, I’m imagining the adjustments are small. If you’d like to share your adjustments, I’m happy to update this article.
I’m also assuming you started your project with the AWS Lambda Project (.NET Core, C#) template.
Pre-requisites
Before you can debug, the following must be installed:
Visual Studio 2022 or higher – look at the date this article was written
AWS Lambda Mock Test Tool – install the version appropriate for your project’s .NET target, such as -8.0 for .NET 8
Java 1.7 or higher Runtime, if debugging DynamoDb locally, otherwise no need
Lambda Mock Test Tool Install Shortcut
You can install the Mock Test Tool from the command line easily. Just open PowerShell and run the following command:
dotnet tool install -g Amazon.Lambda.TestTool-8.0
Note the -8.0 needs to match the .NET version. Here are some versions to choose from, which will update from time to time. See the Github repo in Pre-requisites for the latest table.
.NET Core Version
Tool NuGet Package
Tool executable
.NET Core 2.1 (Deprecated)
Amazon.Lambda.TestTool-2.1
dotnet-lambda-test-tool-2.1.exe
.NET Core 3.1 (Deprecated)
Amazon.Lambda.TestTool-3.1
dotnet-lambda-test-tool-3.1.exe
.NET 5.0 (Deprecated)
Amazon.Lambda.TestTool-5.0
dotnet-lambda-test-tool-5.0.exe
.NET 6.0
Amazon.Lambda.TestTool-6.0
dotnet-lambda-test-tool-6.0.exe
.NET 7.0 (Deprecated)
Amazon.Lambda.TestTool-7.0
dotnet-lambda-test-tool-7.0.exe
.NET 8.0
Amazon.Lambda.TestTool-8.0
dotnet-lambda-test-tool-8.0.exe
.NET 9.0
Amazon.Lambda.TestTool-9.0
dotnet-lambda-test-tool-9.0.exe
Configuring Your Project
In your project, you will need to make some adjustments in order to debug.
Update launchSettings.json
In the project’s launchSettings.json file, make sure you are pointing to the Mock Lamda Test Tool profile and environmentVariables are specified. Something like this:
The DYNAMODB_ENDPOINT is optional, and your tastes for naming environment variables may vary.
Make sure the workingDirectory and executablePath are set to the appropriate version of your installed .NET and Lambda Mock Test Tool versions.
Update aws-lambda-tools-defaults.json
You must also tell the Lambda Mock Test Tool where to find the function to point your requests. You can only test one function at a time (sorry), but it’s easy to update.
Populate the function-handler setting in the aws-lambda-tools-defaults.json file as follows:
{
  "Information": [
    "This file provides default values for the deployment wizard inside Visual Studio and the AWS Lambda commands added to the .NET Core CLI.",
    "To learn more about the Lambda commands with the .NET Core CLI execute the following command at the command line in the project root directory.",
    "dotnet lambda help",
    "All the command line options for the Lambda command can be specified in this file."
  ],
  "profile": "default",
  "region": "us-east-1",
  "configuration": "Release",
  "function-architecture": "arm64",
  "function-runtime": "dotnet8",
  "function-memory-size": 128,
  "function-timeout": 30,
  "function-handler": "assemblyName::fullClassPath::nameOfFunction",
  "framework": "net8.0",
  "package-type": "Zip"
}
See it there, on line 15? Populate it as follows:
assemblyName: The name of your assembly. For example, OhMyLambda.
fullClassPath: The full path of the class containing your function. For example, OhMyLambda.MyFunctionClass
nameOfFunction: The name of your function, such as Handler
So, if you had a class like this:
// Assembly attribute to enable the Lambda function's JSON input to be converted into a .NET class.
[assembly: LambdaSerializer(typeof(Amazon.Lambda.Serialization.SystemTextJson.DefaultLambdaJsonSerializer))]

namespace OhMyLambda.Functions;

public class MyFunctionClass(IAmazonDynamoDB dynamoDbClient)
{
    public MyFunctionClass() : this(CreateDynamoDbClient()) { }

    public async Task<APIGatewayProxyResponse> Handler(APIGatewayProxyRequest request, ILambdaContext context)
    {
          ... more code here ...
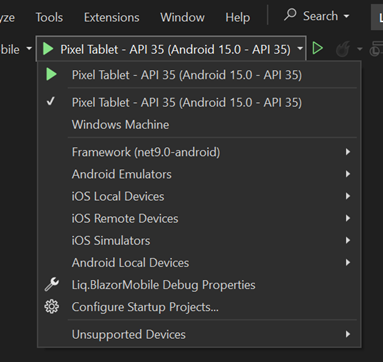
Before debugging, make sure you see Mock Lambda Test Tool as your startup option. You should also have DynamoDb running if it’s needed.
Starting DynamoDb
If you also need DynamoDb to be running, you should start it before debugging. If you have installed DynamoDb Local from the link above, you need to get AWS Credentials and THEN start it.
To get AWS credentials for the local instance, open PowerShell and run aws configure and use the following credentials:
AWS Access Key ID [None]: fakeMyKeyId
AWS Secret Access Key [None]: fakeSecretAccessKey
Default Region Name [None]: fakeRegion
Default output format [None]: (just hit enter)
This will take care of being able to access DynamoDb locally with the proper credentials
Once the credentials have been set, you can launch DynamoDb as follows:
I added this to a batch file to quickly run it from File Explorer.
This will launch DynamoDb. You can press Control-C to end its process when you’re done.
Debugging
You should be all set now. Simply launch the debugger and you should see the Mock Lambda Test Tool appear in your default web browser. It will look something like this:
If you don’t see your function details, or the top two dropdowns are empty, you have an error in your configuration. Make sure that function-handler is correct!
Triggering the Lambda
So how do you send the payload and trigger the Lambda? Amazon has you covered – just select API Gateway AWS Proxy from the Example Requests dropdown. Then, fill in the “body” with the proper JSON-formatted-as-string. Hit Execute Function, and the request will be made and should trigger your debug breakpoint, assuming you’ve set one.
The End
That’s it! You should be able to debug now! I hope this helped. If you have any updates or questions, feel free to hit me up. You can find me on LinkedIn: https://www.linkedin.com/in/aurirahimzadeh
Did you know the same bottle of bourbon can taste spicy or sweet depending on where it’s aged? I ran this experiment to show you how easy it is to find just the right taste profile with Four Roses Single Barrel and a little bit of label reading. All the same “bottle” at 100 proof, just different aging locations, and a world of difference. Dive in and learn how to tune in your tastes…
This is also my first attempt at a vertical video… Still learning how best to deliver in that format. Remember when that used to be verboten, aka VVS (Vertical Video Syndrome)?
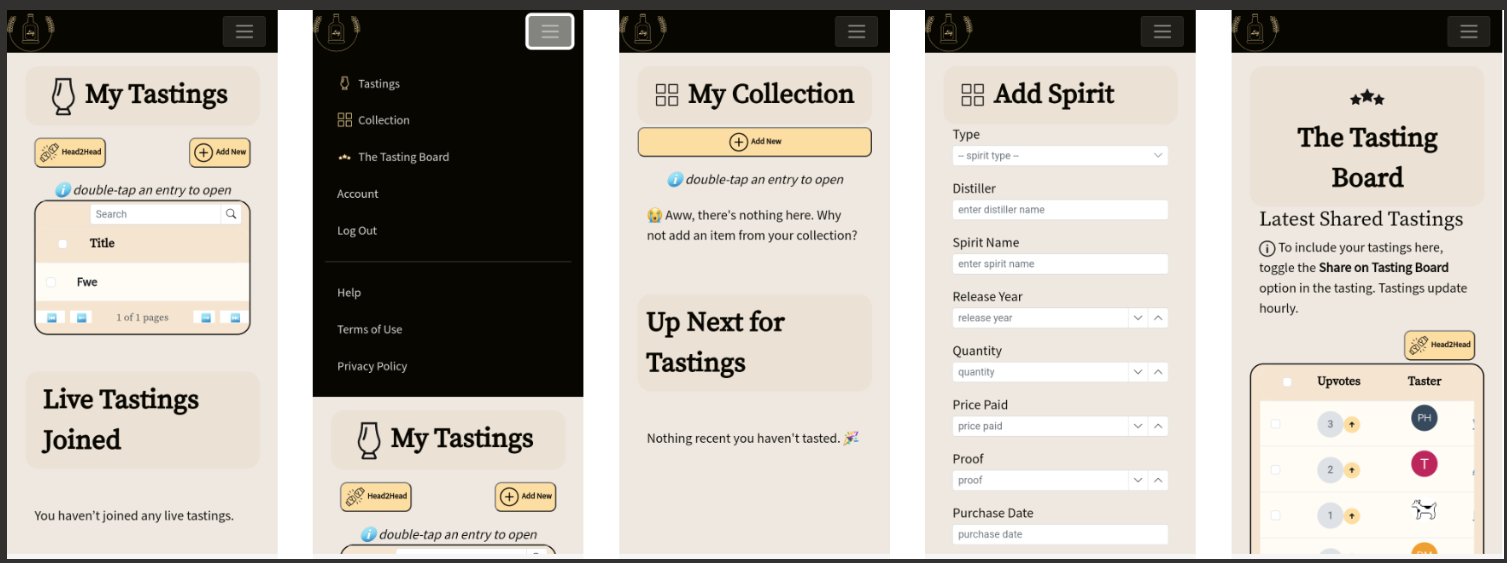
Liq, my free bourbon + whiskey + tequila + mezcal + other spirit collecting and tasting app, was recently featured on the way cool Final Third Cigar Lounge Podcast. We discuss Liq, Final Third’s recent Jack Daniels Single Barrel Rye pick, and experiment with how the barrel location during aging affects its taste.
Finally… my bourbon, whiskey, tequila, mezcal, wine, whatever you want to drink + taste + collect app… Liq… is now available for both mobile platforms. What an adventure!
Originally, Liq was a website – https://liq.live. It was the easiest place to start, and start figuring out what people want. Plus, any updates I push would be immediately available to everyone. No waiting on app updates, supporting older versions, writing an API and more advanced caching infrastructure… And no app store reviews to get through, which can be troublesome in some cases.
But my users have spoken! “We want an app!” So I got to work a couple months ago and started building. Thankfully, most of the code was reusable. I found out quickly, the mobile app was the way to go. I could guarantee the experience. I could code for phones vs. tablets. And I could make it insanely simple to have such a useful tasting + collection tool anywhere users went.
Once it was done and tested – thanks Club Marzipan! – I was ready to submit. I’ve done this countless times. Every time, you cross your fingers… Let the story begin.
The iOS Story
Usually, Apple App Review is the tough part. Who knows what unknown rule you might break when submitting your first app release. Once you’re past that, the untrusting eyes are mostly off you. But still… you have to get over that first hurdle.
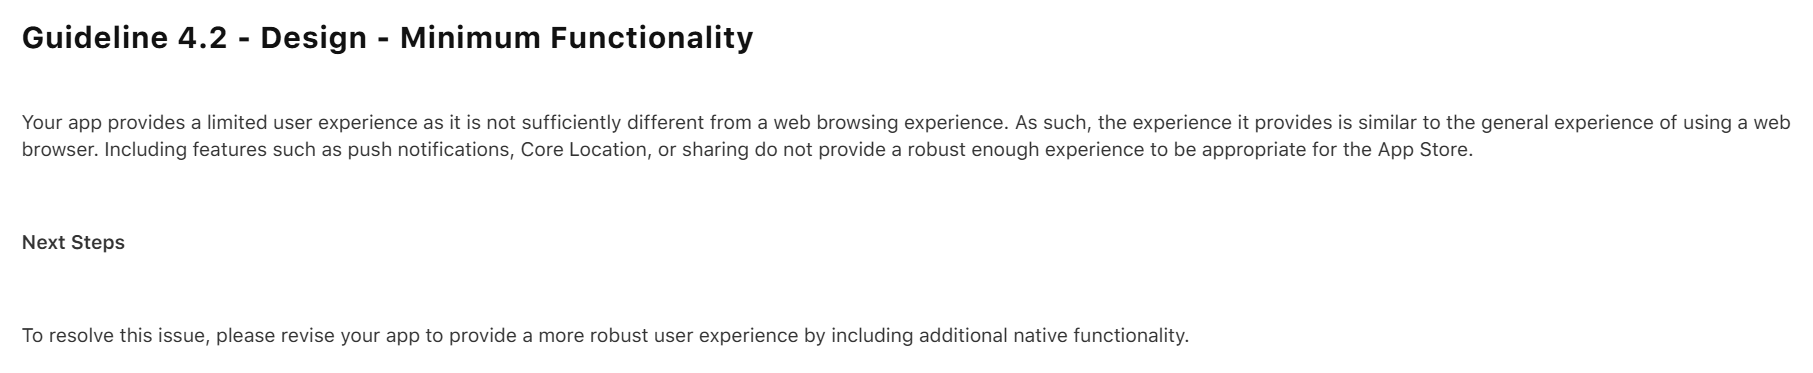
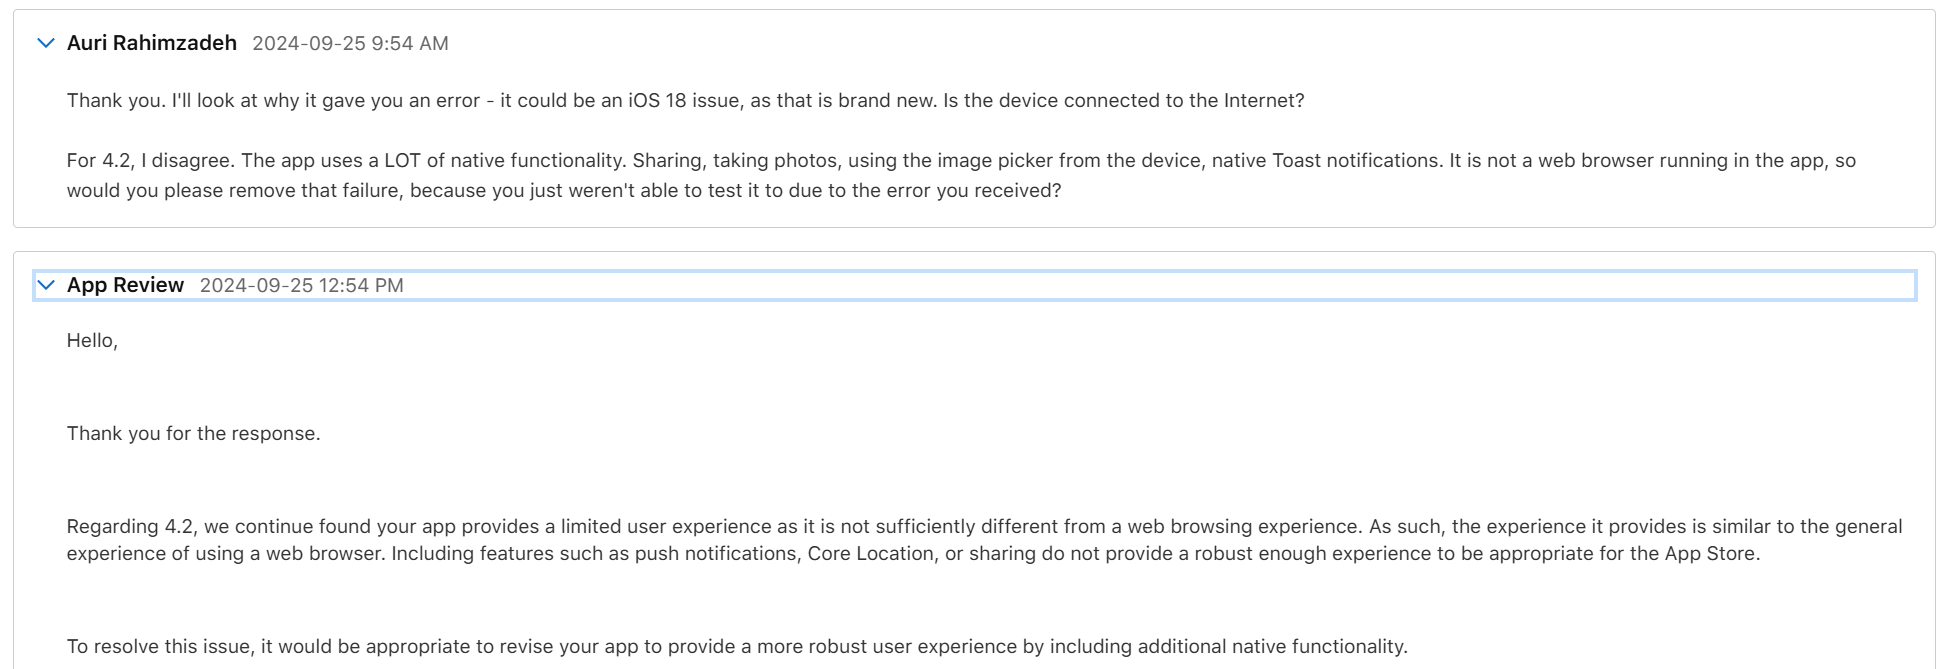
My initial submission was rejected. Apple found a bug I had never tested for, and they rightfully rejected the app. But not only did they reject it for the bug, they rejected it saying it’s nothing better than a website and I should add native features.
Well, that wasn’t fair, but I could see their point. Because of the bug, you couldn’t use the app. So, you wouldn’t see any of the features. I thanked them for reporting the bug, and that I disagreed about the “native” part. When working properly, Liq uses many native features. Native camera. Native photo access. Native sharing. Plus it’s, well, a native compiled app. Basically, every native feature Facebook uses except Location and Video, neither of which I need. Apple wrote back it doesn’t matter, but I ignored that – I told them “you’ll see in my next upload.”
I fixed the bug – again, thanks Apple, that was a good catch! – and re-uploaded. They came back about a day later with a new rejection reason. The bug was resolved, so that issue was removed, as was the “native” issue – phew! – that would have been an unnecessary rewrite. This time they pointed out I had no way to request account deletion. Fair point. I got to work.
I had the accout deletion fixed within a few hours. I tested the heck out of it. It worked great. I resubmitted and hoped for the best.
Two days later is was approved. w00t!
I did have some additional fixes. I let the original version get out there – it was only going to be out for a day – while I fixed some more bugs and tightened things up. Apple Reviews go much faster when you already a published verison of the app. I submitted the update and it was reviewed and approved the same day. Boom, proof.
Now, on to Android…
The Android Story
Usually, Google Play – the Android store – submission is a slam dunk. Google appears to use AI and another automated code-analysis system. I recall it being named something like The Bouncer. I don’t recall the exact name – it’s been a long time and I imagine things have changed. Anyway, given Apple’s issues were largely just Apple requirements, I figured I’d be reviewed within a day. You never know though!
I started to worry when the review had taken more than 2 days. A status of In Review for more than a few hours is uncommon. I was concerned. Alas, the rejection email came in. And it wasn’t what I expected:
First, I don’t know what “all parts of the metadata” means. I think it’s telling me my provided app screenshots and what’s in the app don’t match its description. Specifically, “track your bottles” and “see what you’ve tasted.” Let’s look at their screenshot:
So that’s their “proof” my app is misleading. But what’s this? Their screenshots show exactly what my app description details. Tastings and Collection. It’s all right there.
I’m guessing this is just a case of AI making a mistake judging my app. I don’t blame Google – they probably get a lot of submissions, and have minimal resources to look at them. Remember all those layoffs?
I submitted an appeal. They said it would take 2 days.
I received an email saying it might take longer than 2 days. OK, let’s be patient.
One week later, I finally received a notice that my appeal was accepted. All I had to do – though it wasn’t entirely clear in the email – was resubmit my app. I did that and started to wait.
Two days later, it still was In Review. “Oh, no…” I was thinking to myself… Not this again… Don’t reject me again, AI.
Thankfully, a few days after, my app was finally approved. Wow, unexpected. But I’m happy 😀🎉