Show your passion for the career you’ve entered. Remember, interviews are two-way streets. You want to impress them, but you also want them to impress *you* in how they’ll grow you. Show off a project you’re proud of. Explain what problems you solved and how you learned and evolved via that project. See if they reciprocate and provide feedback. Ask them how mentoring works, and how you can grow, and they’ll see a go-getter who’s motivated to learn and progress, and become even more of a team player and contributor. Good luck!
While in Nashville, having just torched my insides with a fiery hot chicken sandwich from Prince’s, I passed by the all-glass enclosed Apple store on the corner of 5th & Broadway. It was about 6pm, and observations would indicate the evening had already started in the morning for most people. It was my last night in town and the Apple store got me thinking about the Vision Pro, my Quest 3, the 250,000 units Apple had sold to date, and of the articles claiming you could get a demo. So I walked in and asked “Can I get a demo of the Vision Pro?” “Sure! We may have an appointment left,” the friendly associate exclaimed. 7pm was available. I handed them my deets, and went off to drop some shopping goodies off at my hotel a few blocks away.
The Pre-Demo Setup
Before I even left the store, Apple had texted me a pre-demo survey. It was primarily concerned with whether I wore glasses (I do now), and whether I used them for near or far sightedness, or both. I answered the questions and Apple told me I was all set.
Apple’s pre-demo survey recommended I use the Zeiss inserts.
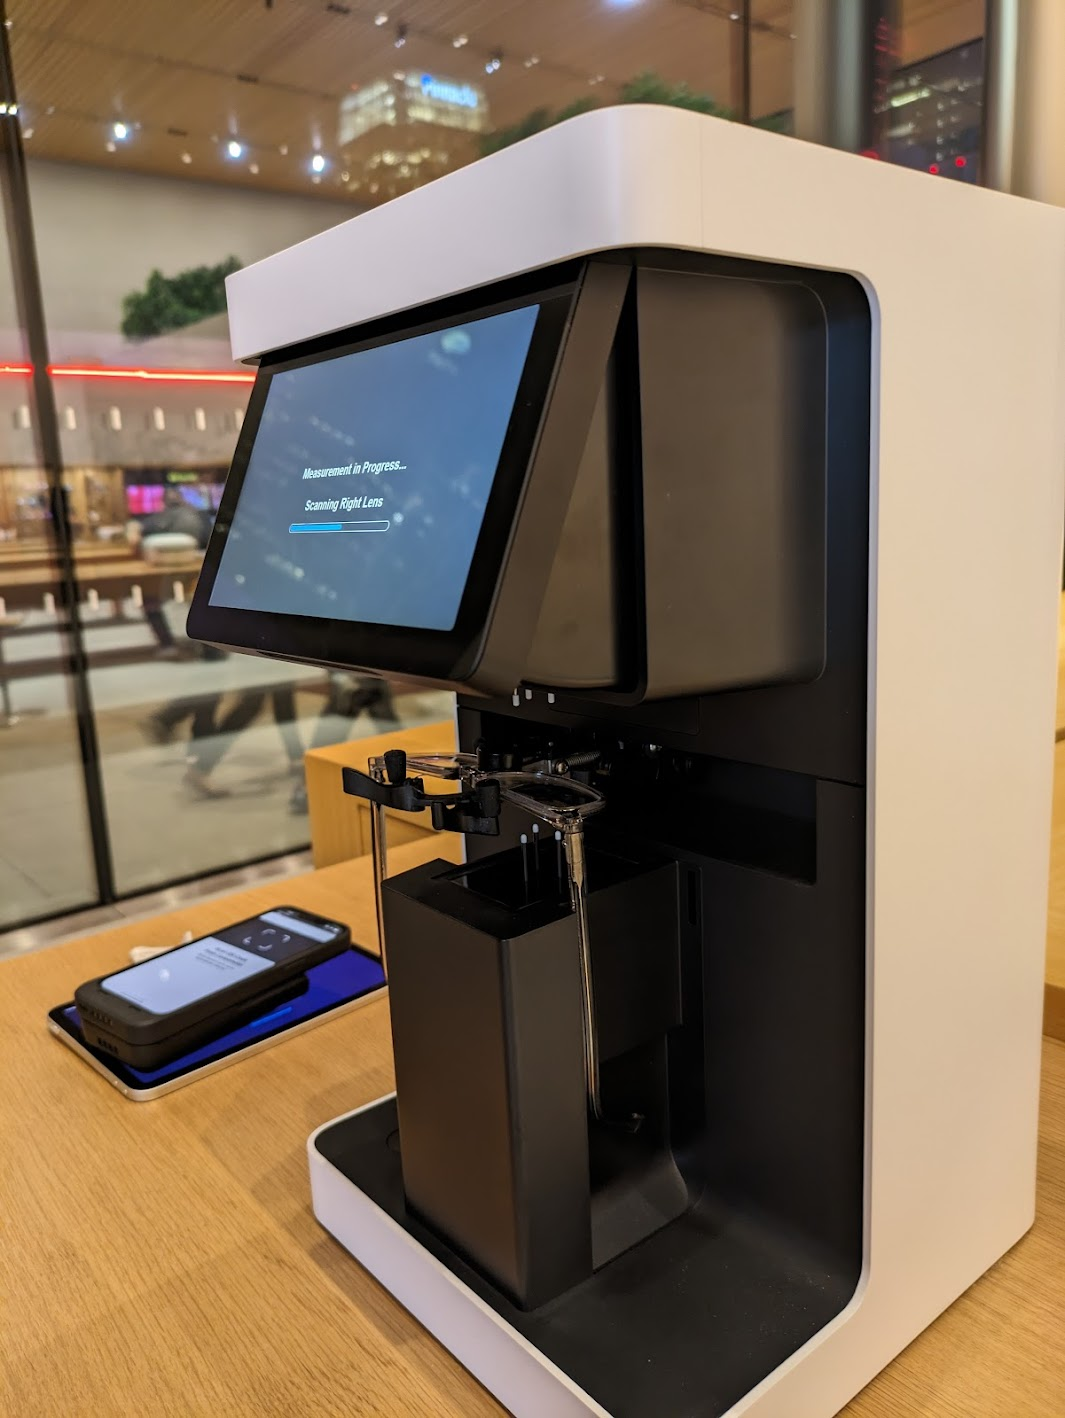
I strolled back into the store close to 7pm. They greeted me quickly with “You’re back!” Well, “I’m a man of my word” I exhorted, and followed them to the back of the store for the demo. Sam would be talking me through the demo. But first they needed my glasses so they could measure them with a fancy, expensive looking measurement machine. I think I’ve seen the same device at Warby Parker. They needed this to set up the Vision Pro for my exact prescription. This begged the question, “So what if my prescription changes? Do I need a new set of inserts?” “Yes, you would need to order new inserts” she explained. I didn’t see her add any inserts, so I was a bit confused by this, but why die on that hill? My guess is the Vision Pro adjusts by itself once provided the script details, but who knows. I sure hope I wouldn’t need to buy new adapters, err “inserts,” after already spending thousands of dollars on this thing. And of course – at this time – you can only buy Apple’s special Zeiss inserts, which I’m sure are a pretty penny.
The lens scanning machine.
After my eyes were ready, I also had to use an iPhone to scan my face. This process wasn’t working well until I moved to the solid-colored wall. The app just kept missing the scan. Sam was a bit frustrated as well, but she kept her cool.
Now, keep in mind, I’ve owned a Meta Quest 3 for a few months now. I was 100% comparing the setup process of that under $500 device to the setup process of a $3,500 (base!!) device here. With the Quest, I just put the unit on my head after some simple setup, and just kept my glasses on. I’m curious how much of this pomp and circumstance is actually necessary, or might be removed in a future software update for the Vision Pro.
Seeing all the work and equipment that went into just getting the unit to be “ready for me” helped me understand the price point. The optical equipment, the personnel, the technology for such a customized experience, has to come from somewhere. Given Apple would have raked in around $1.125B after selling 250K units, I hope they’ve recouped their costs. Now if only there were an iFixit teardown… Oh wait, there is!😀
Note that the entire demo was done while in a sitting position. I was sitting on a chair next to a wooden table. One other person was experiencing a demo at the same time.
Fit and Finish
Sam showed me what the buttons do – a button for the see-through mode, and a “digital crown” like the Apple watch. She also showed me the exact way to place the Vision Pro on my head. Thumb under the nosepiece, and four fingers on the top. Don’t touch the front! I asked what would happen if I did – would it just look ugly? She said yeah, it wouldn’t look good, but otherwise probably nothing. I followed her advice and put the unit on my head. I used the right-hand dial to tighen the unit as close as possible to my liking. Note that, because of the Zeiss inserts, I did not need my glasses on for the demo.
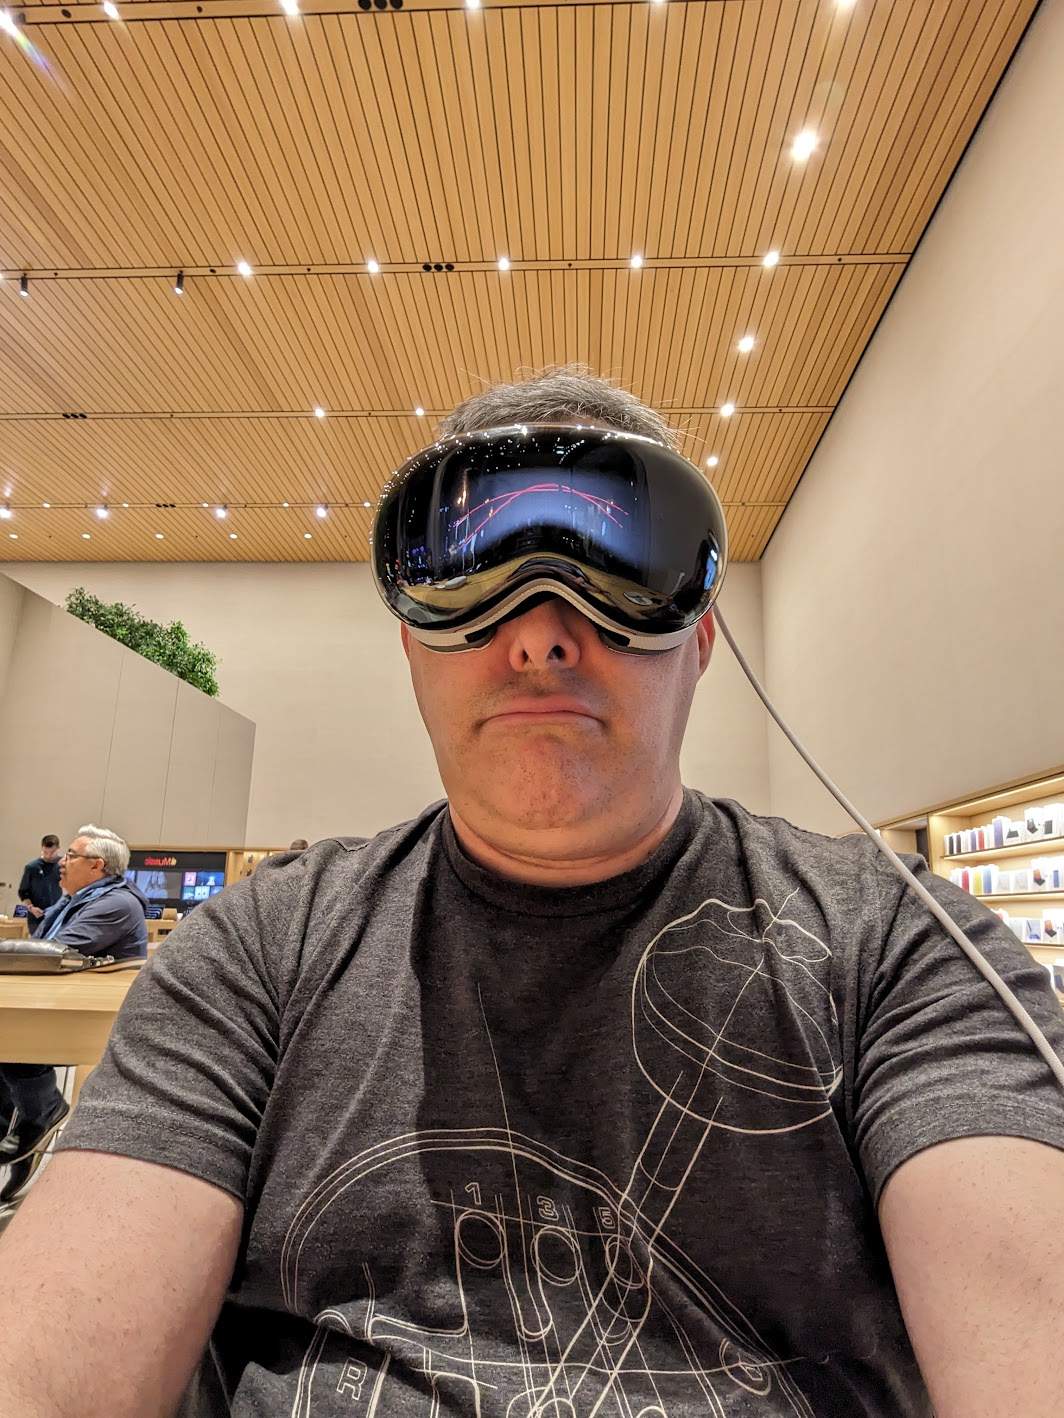
The “eyes” passthrough wasn’t part of the demo.
Once the Vision Pro was on my noggin’ I realized how heavy it is. I have a Quest 3 at home. This unit clearly felt heavier. It wasn’t uncomfortable, but it did feel like I had a decent size computer on my head, which of course I did. Sam suggested I move the strap around a bit. After somem finagling, I figured this was as good as it was going to get. It didn’t feel like it was going to fall off. It just felt front-heavy, like the top-heavy feeling I get when my bourbon-belly body is on rollerblades. I did a search, and the Quest 3 is around 515 grams, while the Vision Pro is around 532.
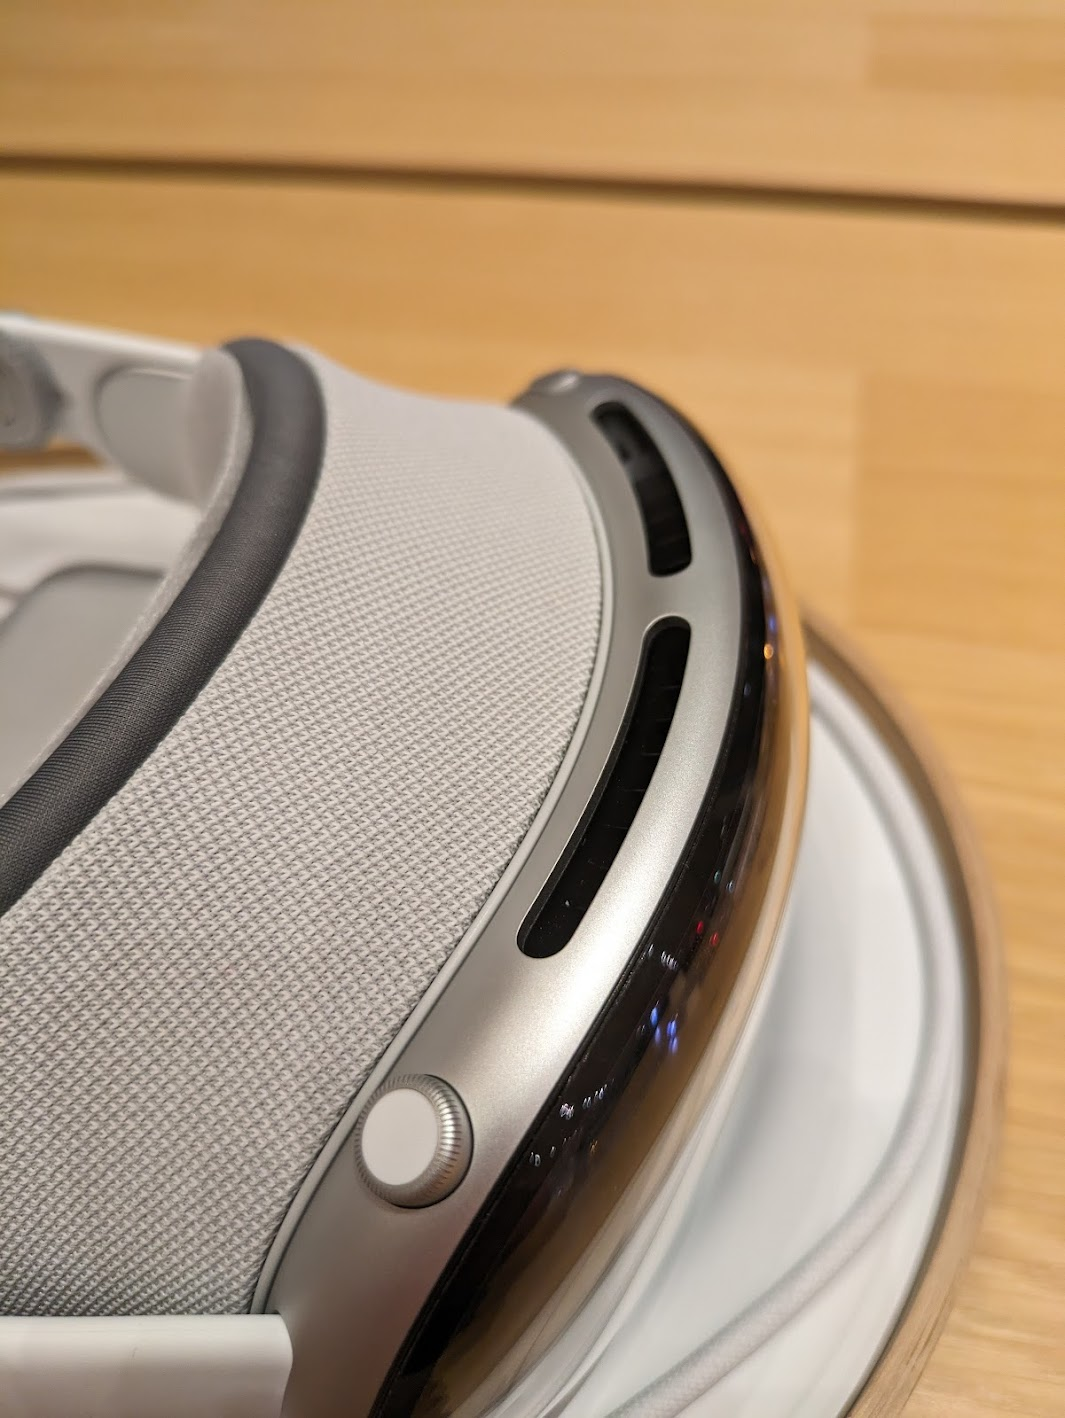
Moving my fingers around I also found the digital crown to be too small. I would use this control device later, and I have to tell you, it needs to be bigger. When you can’t see something, and you want to do small movements with it, and it’s already small, it’s frustrating. Yes, it’s cool, and it fits with the Apple ecosystem, but this needed to be adjusted.
The Digital Crown.
Now, the quality of the materials is top-notch. The strap was incredibly comfortable and disappeared as I used the product. Everything looks clean and precisely engineered. Even the carrying case looks like a high-end The North Face affair. The heaviness did not disappear, however.
The Demo
I should have mentioned earlier that Sam explained she could see everything I was seeing. She had an iPad wirelessly streaming the feed from the Vision Pro. She also had an iPhone that appeared to have the demo script. It was clear Apple wants this demo staged and not free-form. When I would pinch and zoom or move a window before being prompted, Sam would gently verbally nudge me with “Please wait for me.” Sorry, Sam!
First things first was the setup mode. The Vision Pro walked me through mapping my touching and vision. The vision part was interesting – I had to look at each dot on the screen and then pinch my fingers together to “tap” it. Moving my eyes, not necessarily my head, would move an invisible pointer. At the center of my vision – what I’m looking at – becomes what’s selected. It was also incredibly clear and vibrant – so whatever the Zeiss and vision calibration did, it did it well.
The experience is also fascinating from a UI and UX perspective. The center stays focused while items in my “peripheral” vision go out of focus when I move my head, coming into slightly better focus when I stop. In practice, this worked very well. However, the selecting and tapping part was not 100%. I’d say 3 out of 10 times – 30% – when I tried tapping something, the Vision Pro wouldn’t register the tap. Perhaps my hand was under the demo table and I didn’t realize it – but moving my hand closer to the device or further in front of me seemed to solve the issue. I also had to ensure I didn’t lose focus on what I wanted to tap, or I would “miss” or tap the wrong item. After some time using this, I’m sure it would become natural. For the most part it was – but it was clear after 30 minutes Apple has some tweaking to do in its UX, and I can see why this is a scripted demo. But still, damn, it’s amazing.
Once setup was complete, the Apple logo appeared, and I was greeted with the Home Screen. Yes, it looks like the typical iOS home screen layout, just in front of you with your surroundings in semi-transparent fashion in the background. You can tune out your surroundings by rotating the digital crown. I was only allowed to use on of the virtual backgrounds. Sam wouldn’t let me play with others, and she could clearly see via her iPad if I broke the rules. What I did experience, though, was a calming lakeside landscape. It even started raining while I was “there” and that was quite cool, and would have been calming had I not been in the middle of an Apple store. The speakers were loud enough for me to hear the raindrops, but I wasn’t there for that experience. Before you ask – no, I didn’t get a chance to set up the see-through mode that shows my eyes. That’s not part of the demo.
There are three basic gestures on the Vision Pro: Tap, Tap and Drag, and Pinch/Pull to Zoom. The first two are single-hand gestures performed with your dominant hand. The latter requires both hands, and gives you the feeling you’re in [insert Sci-Fi movie here] and manipulating virtual screens in the clear space in front of you. Yeah, it’s pretty cool. Another verbal wrist slap from Sam for me getting ahead of the game.
Demo 1 – Photos
The first demo was launching the classic Apple Photos app. There were many to choose from. Some were “flat” while others had the 3D depth old 3D Android phones were capable of many years ago. Remember the HTC Evo 3D? The flat photo was, well, a photo, and I could zoom in and out as expected. It was perfectly clear, and the colors were sharp and realistic. The 3D photo had true depth, and was shot on an iPhone 15 Pro. Both the 15 Pro and Pro Max support creating 3D and immersive content for the Vision Pro. Apple’s pushing those devices as content creation catalysts, understandbly. Because it was a scripted store demo, I didn’t ask for additional details like format support and technical details. My understanding is other 3D formats are supported, so you’re not limited to just Apple ecosystem solutions.
Demo 2 – Videos
Now for the fun part – video. There was no demo of a flat video here, and that’s fine. Who cares? Every headset does it. You’re not spending $3,500+ for a simple movie theater. There were two demos – one 3D video that wasn’t immersive, meaning it didn’t surround you, and another immersive sports video. The 3D video was cool – a family blowing out the candles on a cake. The frame rate seemed low, maybe 30fps, and reminded me of 3D video from those old 3D Android phones I talked about. It was neat that it was “large” in front of me, but it wasn’t mind-blowing due to having seen it before. Now, I’d like to know if the Quest 3 can do the same. Sam did not appreciate that I played the video more than once. To be fair, she had a lot of patience with me – thank you Sam!
The real treat was the immersive video compilation. It had many immersive videos, all being narrated by someone telling me how great “living the action” is. One was shot with a 360 degree (I think) camera placed on a soccer goal and I could see the game and the ball being kicked into the net. Another was a mountain landscape and I was watching the climber. Another was shot behind first base during a double play. You get the point – incredible action sequences to make you feel like you are there. And it did. It was exhilarating. I recall Sam explaining it was all 8K video. I asked if the screens themselves were 8K, but she wasn’t sure. The detail was phenomenal. Absolutely stunning.
Is there a new market here?
My first thought was Apple TV Plus – what if they started offering this type of content? Is that where it’s headed? I don’t know if it’s viable. Many of you may remember the many, many, MANY failures of trying to bring 3D into the home. Projectors, TVs, special glasses – and the fact 30% of human beings can’t watch 3D content without getting nauseous – it never worked. But they also didn’t have the content, other than more expensive 3D versions of Blu-ray discs. Could Apple stream this type of content? Could they convince people to wear these headsets while watching events such as concerts? I’m not convinced about sports, as I can’t see a bunch of people wearing headsets and drinking beer… Now that I’d like to see. If people generally look funny in VR, that would be a hoot. My point is, Apple certainly has the market position and technologies to make something happen here. What, I’m not yet sure… And Meta may be willing to play ball. If the monopoly regulators have their way, it may be a perfect match…
Demo 3 – Web Browsing and Compatible Apps
The last demo was showing that I could browse the web (Safari, yay?) and run “compatible apps” from the App Store. Meh. It’s iOS, so no surprises here. Cool, but no compelling killer app. The demo app Sam wanted me to run was a cooking app. I won’t be wearing a $3,500 + tax headset near the stove.
The Missing Demo
The Vision Pro content demos were impressive, to be sure. But where was the killer app to sell me on this $3,500 device? Sam kept telling me how this was a “Spatial Computing” device. But never did I see an example of spatial computing. I saw spatial consuming but not spatial creating. I would love to see the results of a survey of the 250,000 purchasers of this product explaining why… and what their income bracket is.
Final Thoughts
I took the Vision Pro off my head and handed it back to Sam. I did this the proper way… thumb under the nosepiece and four fingers on top. I thanked her for the experience and agreed it was quite impressive. I asked how many of these they sold each day. She couldn’t say, other than some people come in and simply buy one outright, no demo needed. It wouldn’t have been fair to ask her why – she’s just selling the unit, and knows fervent Apple fans with an Apple Credit Card are often willing to buy more Apple products (I jest).
But after the demo, I had no incentive to purchase the unit. There was nothing about it, at least during this entertaining 30 minute demo, that left a compelling reason on the table. Certainly not one that made me go “Gosh, I wish my Quest 3 did that!” I do need to determine if the Quest 3, at 1/6 the price, can do 3D video (UPDATE: It does!). But the Vision Pro demo was all about content consumption, and the Quest 3 does effectively the same thing in spades. Oh, and I can play VR games made specifically for its platform (noticeably absent from the Apple demo, but also understandable given the time constraints).
I also left with the feeling of possibility. What the Vision Pro represents, and what could come from such technology, finally, in the content consumption space. And maybe, eventually, in the content creation space, if Apple’s professional applications arm releases whatever they’ve got cooking. Who cares what you call it – spatial computing, VR, or otherwise – if you build something truly compelling.
Either way, the demo was worth it, I got my technologist buzz and my analyst gears working, and still have $3,500 to spend on something else.
I log a lot of event data in Microsoft AppCenter. Thousands of events per day. Unfortunately, AppCenter has a hard limit of 200 distinct custom events for their event data. So, when you look at that great event filter they have, you’re not actually seeing all the data. HOWEVER, that does NOT mean AppCenter is limited to a scant 200 events. Hardly. Behind the scenes, AppCenter is powered by Application Insights. As long as you have storage available, you can keep all your events in App Insights. The problems I ran into were:
I didn’t know Kusto, or KQL, the query language used by App Insights, and
It’s not obvious how to access all the metadata I log for each event.
What’s metadata, you may ask? Well, it’s the additional data you log alongside an event. In AppCenter, the term for metadata is Properties, but I digress. For example, if you’re logging an Software Update Success or Failure, you may also include metadata about a product ID, model number, firmware version, and so forth. Finding the event data is easy. Finding and reporting on the metadata is not so straightforward.
So, dear reader, I have an example query for you. You can copy & paste this into your App Insights query editor and be good to go.
So here’s the query I used to extract a summary of how many software updates succeeded, for specific model numbers, with a count by model number:
customEvents
| where name in ("Software Update: Succeeded")
| extend jsonData = tostring(parse_json(tostring(customDimensions.Properties)).['Model Number'])
| where jsonData in ("model1", "model2", "model3", "model4")
| summarize count() by jsonData
So what’s happening here? Let me explain:
customEvents
This is the table App Insights stores all events sent by AppCenter. | where name in ("Software Update Succeeded")
This filters those events by the event name. | extend jsonData = tostring(parse_json(tostring(customDimensions.Properties)).['Model Number'])
This converts the metadata field – aka customDimensions.Properties – from JSON, extracts a particular metadata field – in this case, Model Number – and then returns that metadata value as a string. | where jsonData in ("model1", "model2", "model3", "model4")
This is a simple filter query. I found if I wanted to get all model numbers I could simply use the following, though your mileage may vary:
| where jsonData !in ("")
And then finally: | summarize count() by jsonData
This takes the results, by model number, and summarizes with counts. App Insights will even automatically generate a graph for you!
Refining the query above, and as you use more extend keywords to extract more data, you may want to use a more meaningful variable name than jsonData😁 For example, here’s a more robust query I wrote, identifying the unique counts by total number of users performing the action:
customEvents
| where name in ("Software Update: Succeeded")
| where timestamp > ago(30d)
| extend modelNumber = tostring(parse_json(tostring(customDimensions.Properties)).['Model Number'])
| extend modelName = case(
modelNumber == "model1", "Headphones",
modelNumber == "model2", "Soundbars",
modelNumber == "model3", "Powered Speakers",
"n/a")
| where modelNumber !in ("")
| summarize count() by user_Id, modelName
| summarize count() by modelName
The two summarize filters let me break things down by total number of users with total number of product models. Here you can see how I used proper variable names and used the other useful customEvents data. This also helps me get data similar to the cool, useful graphs AppCenter shows on their dashboard.
You can do a lot more with this data, but it should get you started. I hope it helps you as it did me.
Additional tip:
Application Insights only stores data for 30 days by default. If you want to retain and report on your events beyond that timeframe, make sure you update your App Insights instance settings.
I’m having a lot of fun sharing this with you. Part 2 is out, and I must say my editing skills are getting better 🙂 In this video, Steve discusses single barrel vs. blending. Spoiler alert: Blending isn’t bad.
I’ve also created a Facebook page for Bourbon Bartender… Yes, finally. Check it out.
Looking forward to your feedback – and I hope you enjoy.
I’ve been wanting to do this for a while… Talk with master distillers and others in the industry and see what their job is like. Most YouTube channels, blogs, and so forth celebrate the drinking aspect of bourbon, whiskey, and other spirits. What about the industry? What’s it like to be the part of the team that makes all this great stuff? And thus, my new Meet the Masters series was born. It’s part of my Bourbon Bartender channel, where I try to educate others on all things bourbon and whiskey.
In my first installment, I had the grand opportunity to interview Steve Nally, Bardstown Bourbon’s master distiller. Steve’s a great guy. Funny, a storyteller, and wise in the ways of distillation and whiskeycraft. I drove down to Louisville the night before, imbibed a bit, then headed to Bardstown. Much to my surprise, they have EV charging stations! The distillery is going through a multi-million dollar expansion, enabled after the investment by Pritzker.
Steve and I had lunch, then a great interview. It’s fascinating how similar our two occupations are – he’s crafting whiskey, and I’m crafting software. There’s so much process and quality control, and at the same time creativity and a focus on teamwork.
After the interview, I stayed the night at the Old Talbott Inn and closed the bar with a few new found friends. The next day, I headed home, eager to figure out how to edit video with two camera angles.
I recently enjoyed a “fireside chat” at the Indy .NET Consortium, a meetup I run for local .NET developers.
I’ve had some good conversations with interns and others recently who have struggled with or had insights into this transition. My experience as a young developer was a bit different, because I didn’t take the traditional path of high school -> college -> workforce. Mine was high school -> college -> co-op -> left-school to work and create career -> go back to school -> leave school to work again -> work for startup -> work for consulting firm -> start a business -> shut down business and go back to workforce.
Our October 5 meetup talked about how the traditional path can be a bit jarring. The way I explained it to my employees was “In school, you can get an A, B, C, D, or F. And that’s OK. You learn from it. But in the workforce, you either get an A or an F. You can have as many Fs as you want, as long as you end up with an A. Sometimes, within reason, I’ll accept an A- or B+, but it’s rare. We’re paid to deliver, not pass lessons.”
I recently ran into an issue with Amazon’s “Login with Alexa” – aka LWA – SDK in our Android app. Before releasing to Google Play, I fully tested the app. Logging in with Alexa worked flawlessly, and I was able to register my Amazon Alexa device.
Everything was looking good in the app, so I uploaded it to Google Play and released it to Production. A few hours later, the app was approved, and available for download to Android apps around the world. w00t!
A week or so later, a partner was testing the app and said “Hey, Amazon login doesn’t work!” Considering I had tested this 7 ways to Sunday, I found that hard to believe. But still, I had to test it.
Sure enough, I downloaded the app from Google Play, went to login with Alexa, and received an error: “Cannot connect to Amazon Alexa.”
WHAT?!?! It worked with the exact same APK I had uploaded. What the heck changed? Certainly, Google doesn’t change the code upon uploading, do they? How could they? Conspiracy theories aside, my team started looking into it.
When we’d logcat the PROD version, we’d see these telling entries:
2021-07-08 10:01:58.972 17695-6047/? W/com.amazon.identity.auth.device.appid.APIKeyDecoder: Failed to decode: Decoding failed: certificate fingerprint can't be verified! pkg=com.our.appname
2021-07-08 10:01:58.972 17695-6047/? W/com.amazon.identity.auth.device.appid.APIKeyDecoder: Unable to decode APIKey for pkg=com.our.appname
It turns out, our signing process was the culprit. Our production LWA API key was generated in the Amazon developer portal using our original keystore’s thumbprint and SHA-256 hash. However, we use Google’s managed key service, which maintains the app signing key in Google Play. This is important, just in case you ever lose your keystore. Old timer Android devs know this nightmare…
So how do we fix this? How do we use a different LWA API key when releasing to Google Play, yet still enable our beta testers to use our sideloaded Dev builds? We definitely don’t want to lose our CI/CD pipeline to a manual process!!
Android build variants to the rescue.
The LWA API key is generally stored under assets/api_key.txt. However, that one was only the debug key. We needed one for both our debug and release build configurations. Luckily, you can simply add build folders for this and Android’s build system will take care of the rest! You don’t need to work with Gradle source sets!
To fix this, under the src/ folder, we added two new folders:
src/debug/java
src/debug/assets
src/release/java
src/release/assets
These are in addition to the typical:
src/main/java
src/main/assets
As long as “replacement” entries exist in the build configuration-specific folders, the Android compiler will choose those assets over those under main/.
There’s more information about how to do this via the Android Studio UI here. Just keep in mind the UI approach is a slow process. Sometimes menu options you’re expecting don’t appear until gradle has finished doing its job.
Alright, to solve this problem, we need a new LWA API key based on our Google Play signing key. Thankfully, Google makes this easy to obtain.
We retrieved our Google Play thumbprint and hash from the Google Play Developer Console and going to <AppName>>Setup >App Integrity, and found our MD5 certificate fingerprint and SHA-256 certificate fingerprint:
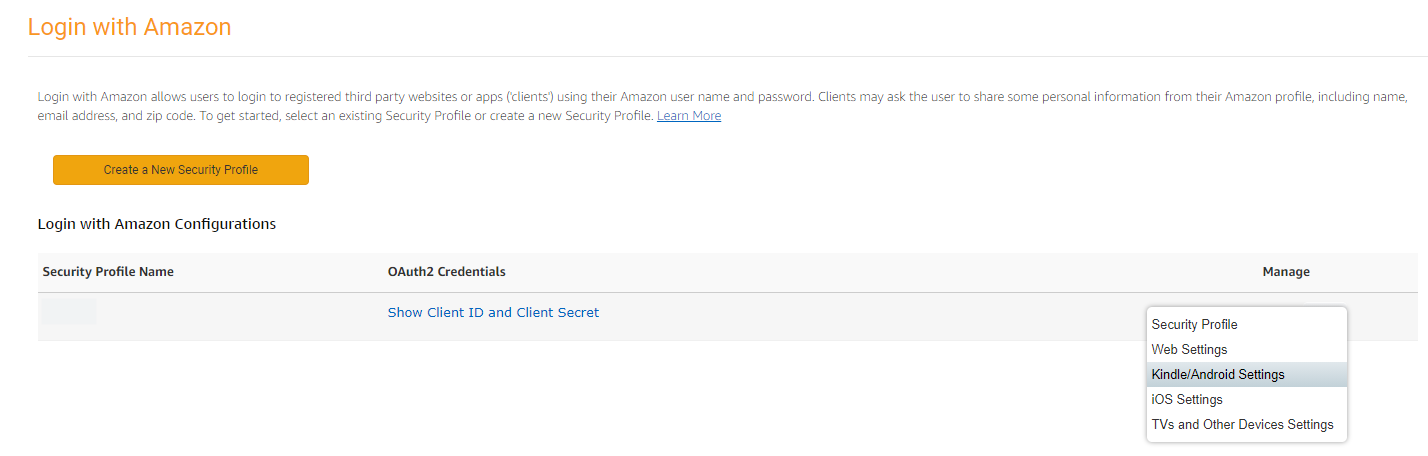
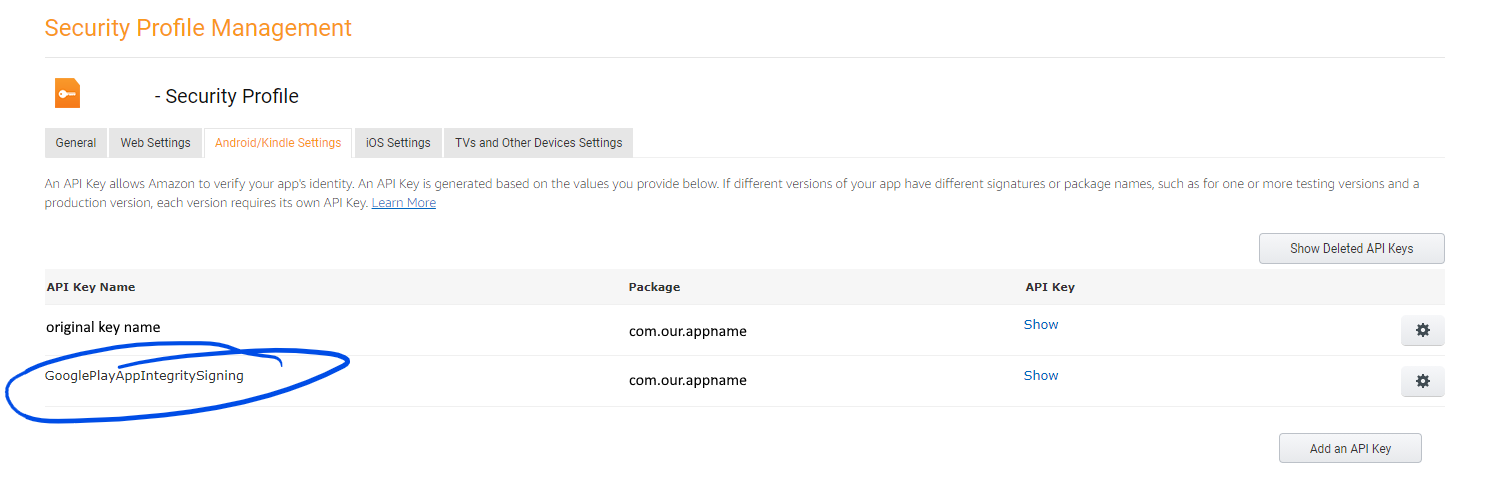
Then we moseyed on over to the Login with Alexa Console, chose Kindle/Android Settings for our security profile, and added a second key:
Figure: Choosing the security profile from the Login with Alexa console.
Figure: After adding the security profile.
Once we had the new API key – which you can retrieve by clicking Show – we added a new api_key.txt file under src/release/assets and inserted the new key there.
We then moved the non-Production API key from src/main/assets/api_key.txt to src/debug/assets. It no longer needed to be located under src/main/assets because we only want the configs for debug and release. If you have other build configs, you may need to create additional folders.
This enabled our CI/CD pipeline to continue to distribute DEV builds that work, and to also generate PROD builds we could successfully distribute via Google Play.
I hope this helps anyone else having the same issue!
A friend with a hearing aid was having issues after upgrading to a new Android phone. He could pair the device with his phone, but couldn’t make or receive phone calls. What the heck – he used the app, and nothing worked like before! I worked on it for about an hour, and finally figured it out… What a terrible experience for him, so I hope this helps others. It boils down to the hearing aid requiring two different Bluetooth connections to make things work. This is very common with headphones, actually.
For those interested in the root of the issue: You have to set up the Bluetooth Classic connection before the Bluetooth Low Energy – a.k.a. BLE – connection. If you set them up in the opposite order, the hearing aids stop advertising Bluetooth Classic and you’re stuck with being frustrated. It’s probably a firmware issue Phonak needs to address. Unfortunately, that requires taking the device to a service center – not an optimal solution for those needing hearing aids.
This article assumes you already have the Phonak app installed on the new phone.
Step 1 – Unpair the Hearing Aids From The Previous Device
Make sure your hearing aids are no longer paired to the old device. In the Phonak app, choose Forget Device. I’m not sure of the actual verbiage, as I’m writing this without having the app handy. Then, under Bluetooth Settings in Android, tap the widget wheel next to all the Phonak entries, and choose Forget Device or Unpair Device.
Step 2 – Factory Reset the Hearing Aids
Make sure the hearing aids are off. You can do this by holding the power button on each bud until the light turns red and letting go. Once they’re off, count 5 seconds. Now, on each bud, hold the power button until the orange light turns on and then off – don’t let go until it turns OFF. Then, power down the ear bud again.
Step 3 – Power On the Hearing Aids
Now that they’re reset, power them on again. You can do this by holding the power button until the green light flashes, then letting go.
Step 4 – Pair Bluetooth Classic
Do *not* launch the app first. Go to Bluetooth settings on your phone, then Scan for devices, and choose the Phonak device that has a headphone icon next to it. You’ll see a couple icon types – but you need the one entry that has the headphone icon. This indicates the “Bluetooth Classic” connection, if you’re interested in such technical details. Accept the pairing request prompts that will show up after you tap to pair. If prompted to make/receive phone calls with the device, confirm you want to do so.
Step 5 – Pair Bluetooth LE
Now that you’ve paired Bluetooth Classic, launch the Phonak app and run through its setup process.
Step 6 – Done!
You should be good to go. I hope this helps those of you frustrated by such a crazy experience.